Using ObjecTime Developer 5.2.1 with ClearCase (v1.3) |
Category: |
|
|
Miscellaneous | |
Purpose: |
|
|
This Tech Note explains the use of ClearCase with ObjecTime Developer 5.2.1. It describes the steps required to properly configure your ObjecTime Session as well as ClearCase. It also describes a possible configuration management process that can be followed to ensure successful interaction of both tools. | |
Intended Audience: |
|
|
Project and configuration managers, ObjecTime developers, and loadbuilders. This technical note assumes some familiarity with the ObjecTime Developer toolset and with configuration operations. This technical note assumes some familiarity with ClearCase and its operation. | |
Applicable to: |
|
|
ObjecTime 5.2.1 and up | |
Description: |
Table of Contents |
Typographical Conventions |
This technical note uses the following typographical conventions:
Tool Configuration |
In general, the standard installation of ClearCase sets up the software correctly for use with ObjecTime Developer. There is, however, an exception in the case of the Windows NT installation. If you are using a UNIX installation, you can safely skip this section.
In the Windows NT case, the normal set up is to turn off case sensitivity on the MVFS drive. For ObjecTime Developer to work properly, the MVFS configuration of ClearCase must be set to be case preserving.
To turn on this capability, please do the following:
The following image shows the ClearCase Properties for these settings:

You are now ready to move on to the next step.
ObjecTime Developer |
You now need to configure your ObjecTime Developer session to use ClearCase.
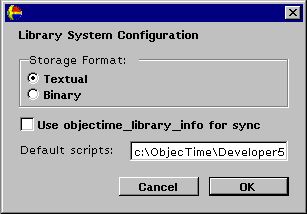
First, we will need to configure the library interface to be able to use the ClearCase scripts. To do so, open the library configuration browser and verify the following:
The following image shows the library configuration editor for these settings:
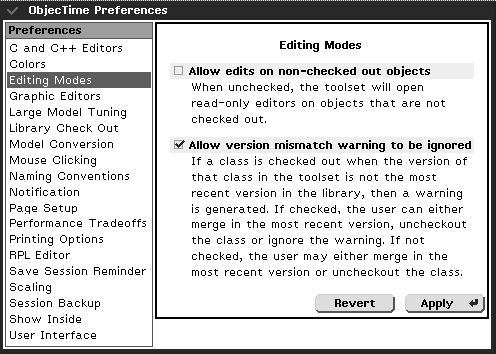
Next, we need to set up the user preferences correctly:
The following image shows the preference editor for these settings:
Finally, if the "OBJECTIME_CODEGEN_TEMP" environment variable is used, it must be set to a different directory for each user. A directory on the user's local drive or in their own "home" directory is ideal. Do not point this environment to a directory in the VOB as it would create too many derived objects that are not required.
Note that this is the opposite to the usage currently described in the ObjecTime Developer 5.2.1 documentation. The usage described in this technical note should be considered correct.
Recommended Patch Lineup |
You also need to make sure that the latest patches are applied. As a minimum, the following patches should be applied:
| Note that special patches such
as those for ObjecTime Web Publisher and ObjecTime TestScope are not
listed here. Please contact Customer
Support for the correct lineup if you are using either of these
tools. |
Patches can be obtained from the ObjecTime Customer Support web site at http://www.objectime.com/support/restricted-dir/index.html
ClearCase Concepts |
In order to use ClearCase, the understanding of a few important concepts is essential. The following is not meant to be a complete explanation of the way ClearCase works (Rational Software has courses that explains this), but rather a quick overview of the concepts that are important in the context of this technical note. The concept of a VOB, of a branch, and of a view are the most important to review in order to understand the rest of this document.
VOB |
A VOB (Versioned Object Base) is a repository of all the configured items and of all their version information.
Branch |
A branch is a stream of development with a certain meaning. For example, you could define a development branch for a certain release or for fixing bugs. In a ClearCase context, the main branch is rarely used and then only for configuration management artifacts such as baselines and releases. Even those are sometimes relegated to other branches. All day to day development work is usually done on a development branch. This allows for parallel development as separate developers could be working on the same file, but in different branches representing different stages or phases of development.
The branch on which you are working is actually defined by your view's configuration specification.
View |
A view is like a window into a VOB. By configuring the view, we can look at the contents of the VOB in different ways. This is accomplished through the view's configuration specification.
The view's configuration specification can be used to specify which files can be seen, which version of these files are seen, and to offer a certain level of security. For example, this configuration specification could restrict checkouts for a certain directory or branches.
It is beyond the scope of this document to explain the structure of a view's configuration specification. The reader should consult ClearCase documentation and possibly attend a ClearCase course to become more familiar with this.
Views are typically assigned to and used by a single developer and not shared. The reason for this is that they also contain some intermediate work files that could cause problems with development tools were they to be shared. Having a view used by one and only one developer eliminates this source of potential problems.
On Windows NT, a supplementary mechanism can be used to control and configure "standard" configuration specifications: View Profiles. These view profiles are part of a VOB and can be associated with a view. Once this is done, this view profile can be updated from a central location, making its maintenance a lot easier.
On UNIX, there is no equivalent to the view profile. Instead, it is recommended that you place the configuration specifications in text files that could then be read in to the view. These configuration specification files could themselves be under control of ClearCase.
ObjecTime Update Configuration |
It is recommended that you set up your packages before putting your model in the library. This will prevent you from having to check out the packages and project multiple time afterwards. Note that it is very important that classes only belong to one package.
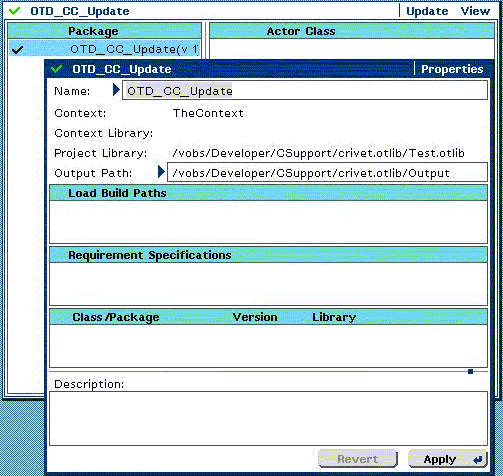
If you are to use clearmake as your make utility, there is still some more work to be done. First, you will need to modify your update configuration(s) to use clearmake. This is done through the Language Option's Targets' properties editor. Both the "Make Name" and the " Make Type" must be set to clearmake (actually, clearmake and Clearmake, respectively). The following image shows these settings for a Sun Solaris installation:

Next, you have to change your update's properties to specify an output path. This output path is $PWD by default and must be changed to a path inside your VOB. It is suggested that you create a directory specially for this purpose in the VOB and put its path in here. Note that to allow for winkins, this directory must be versioned so that it is visible by all developers.
Note that if you changed the output path before setting your make type to use clearmake and you performed a build, linear form files will have been generated. These files will be found in an "LF" directory in the tree in the output path and will have to be removed (deleted) along with the "info" directory found in "C++/{Target|Simulation}RTS" before performing a full rebuild with the new configuration. If this is not done, these files will be used by clearmake instead of the correct classes, resulting in a non-changing executable.
ObjecTime Common Image |
At this point, especially if you are just starting development, you may want to create a common, pre-configured ObjecTime image that will be used by all members of the development team. You may also want to create a common, pre-configured context from the configured update you created in the previous section.
To create a context from your configured update, use the " New Context..." option from the update's menu and Give the context a significant name (e.g., "OurContext"). This will create a new entry in the Workspace browser. You can now delete your update and save and exit from ObjecTime Developer.
Now, let's make this session that you have just saved as the one used by everyone. To do this, first go to the $OBJECTIME_HOME/image (%OBJECTIME_HOME%\image) directory and make a copy of the ObjecTime5.2.otd file, to an "Original" directory for example. Now go back to your working directory and copy the image file you have just saved (also named ObjecTime5.2.otd) to the $OBJECTIME_HOME/image (%OBJECTIME_HOME%\image) directory. From this point on, anyone creating a new working directory, either by using create_objectime_dir or through the ObjecTime Launcher, will be using this pre-configured image.
Note that anyone who already created a working directory prior to this should passivate their update, create a new working directory with the new image, and activate their update in their new session.
ObjecTime Model Configurations |
Although it was already good modeling practice to only work in packages within the ObjecTime Developer toolset, it is now essential when working with ClearCase as a configuration management tool.
Packages are the mechanism provided by ObjecTime Developer to help you organize your model. It allows you to easily define the layers and subsystems that are part of your architecture.
There is another ObjecTime Developer model entity that is very important when dealing with configuration management: the project. In order to really understand the reasons behind the need to use packages when dealing with configuration management, it would be a good idea to first explain what are projects and packages.
Projects and Packages |
Both projects and packages can be thought of as being simply containers or lists.
A package is a list of the all the classes (actor, protocol, and data) that it contains. Optionally, it can also have local configurations that override some of the properties of an associated project-level configuration.
A project is a list of the packages, configurations, and of any classes that are not part of any package. A project also contains thread information for your model. A project is created from an update by using the latter's "Check Out as Project File" menu option and then submitting it.
Packaging Heuristics |
Once projects and packages are understood, it is easier to determine some heuristics on their use when dealing with a configuration management tool.
Directory Configuration (Non-Distributed) |
Once you have your model configuration done, at least at the main package level, it is easier to determine your directory tree. The easiest way to do it is to simply adopt the same "hierarchy" by having a sub-directory for each package. In such a configuration, each sub-directory will be represented by a separate and distinct library in ObjecTime Developer. For example, you could end up with the following tree:
N:\VOBName\ProjectName\Package1.otlib
.....................................\SubPackage1.otlib
......................\PackageN.otlib
......................\Configurations.otlib
......................\Projects.otlib
......................\TestHarnesses.otlib
......................\Output
Where N is the mount point for your ClearCase view. Note that it is essential that this mount point be the same for all developers as this information is stored in the versioned object. Developers not having the same mount point would be unable to access the library.
The above example shows a Windows NT directory tree. A UNIX tree would be similar, except that the "\" would be replaced with "/" and the drive letter ("N:") would be replaced with the VOB mount point (e.g., "/vobs").
Note that this is only a suggestion. It is also possible to have multiple packages share the same directory (or library). However, this proposed organization allows for better control of the software.
Distribution |
It may sometimes be necessary to distribute development to different geographical locations (sites). If this is the case with your development effort, you will want to make sure that work can be isolated at a package level. This means that work done on a package (and its contained packages) should only be done at a single site.
Although the level of granularity for general configuration management within ObjecTime Developer is the class, the level of granularity when dealing with the distribution of the Configuration Management functionality is the package.
Note that this is not an absolute requirement, but rather a suggestion to reduce the amount of work required later on. If working on the same package is allowed for multiple sites, it will have to be done on separate branches, one for every site. This will then require merging of these branches later on, which is a manual process. See the sections titled "A Note on Merging" and "Merge two branches" later on in this document.
Directory Configuration (Distributed) |
First, let's list a few heuristics:
These suggestions are meant to facilitate and partition development.
So, instead of the directory structure suggested earlier, we would now have something similar to this (once again, using the NT notation):
N:\VOB_Common\ProjectName\Package1.otlib
........................................\SubPackage1.otlib
.........................\PackageN.otlib
.........................\Configurations.otlib
.........................\Projects.otlib
.........................\TestHarnesses.otlib
N:\VOB_2\ProjectName\PackageN+1.otlib
.....................................\SubPackage1.otlib
....................\PackageM.otlib
....................\Projects.otlib
....................\TestHarnesses.otlib
N:\VOB_X\ProjectName\PackageM+1.otlib
.....................................\SubPackage1.otlib
....................\PackageL.otlib
....................\Projects.otlib
....................\TestHarnesses.otlib
N:\VOB_OUT\ProjectName\Output
Note that the view spans the multiple VOBs, and that all the VOBs share the same mount point on NT. The latter is especially important to ensure the drive letter stored in the versioned object is consistent.
You will also notice that there is an individual VOB setup for the output directory. This VOB should be the only one that is both readable and writable from all locations. This is the VOB that will contain all the generated files. As such, everyone needs read/write access to it in order to generate and share wink-in information.
Putting Your Model Under Configuration Control |
Now that your model and directories are organized correctly, you can check everything out and submit. There are two scenarios possible.
Single Library |
If you want the complete model in a single library (.otlib), you should check out the update as a project file and specify the desired library. You should then submit the update. The toolset will automatically ask whether you want to check out and submit all the other elements of your model. Answering in the affirmative will result in the complete model being stored in the library. Note that at this point, all elements are checked in.
Multiple Libraries |
If you have a need to store different model entities in different libraries, you should first make sure that the storage is correctly organized as packages. You will want the packages to be organized in such a way that each package's contents is located in a single library. You should then check out the desired elements to their specific libraries. Once all elements are stored, you can then check out the update as a project file and all its configurations. Once everything is checked out, you can then submit. If anything was forgotten, you will be prompted to have these checked out.
You should now be ready to work and enjoy your development!
A Note on Renaming |
A common operation when working on a model is renaming model elements. This can occur for a variety of reasons such as making sure the name is a good descriptor of the functionality provided. Unfortunately, there is no easy way to do this from within ObjecTime Developer whilst keeping historical information about the model element.
The easiest way to rename a model element is to change its name while the element is not checked out. This will effectively create a new model element having the same characteristics, but a different name, and its historical information will therefore be lost. This new model element should then be checked out along with all other model elements that refer to it. One such model element would be its container package. Once all affected elements are checked out, the update can then be submitted.
By using a combination of ClearCase commands and ObjecTime Developer toolset functionality, it is also possible to keep the model element's historical information. This process is described later in a suggested development process.
A Note on Merging |
ClearCase offers tools to automatically (or manually) merge the elements of two branches. These tools were designed to work with simple text files and as such may not be suitable for merging ObjecTime Developer files.
Although we have previously specified that we want the versioned objects to be stored in textual format, they still contain graphical information. Because of this, letting the ClearCase tools, such as findmerge or xclearmerge, perform the merge operation may result in unviable linear form files that will not load in the toolset.
As such, we recommend the use of the Class Version Merge facility provided by the toolset in order to perform the merge of classes. The usage of any other tool should be considered as unsupported and at your own risk.
Version in view vs. Latest Version |
When merging an element into your model, you are presented with a dialog that allows you to either merge with the version in view or with the latest version. When using ClearCase, you should always be selecting to merge the version in view. You should therefore always set your view to select the versions you actually wish to see.
Selecting to merge the latest version can result in unexpected behaviour as the toolset will actually scan all branches to determine which is the most recent (timewise) version. You may therefore end up with unstable versions from someone else's development branch!
To Freeze or Not To Freeze |
One question that often occur is when to use the "Freeze versions in Library" checkbox when activating/merging a class into the update. In general, you should rely on ClearCase to provide you with the correct version and never use this option.
The only safe use would be to look (and only look) at a previously stored version of a project. In any case, the project loaded will be the one in view, but the package versions will be the ones specified in the project file. You could use this feature, for example, to determine the differences between the last baseline version of the project with the work that has been done since (and that is currently in view).
Suggested Development Process |
Here is an example of a development process that can be used when working with ObjecTime Developer and ClearCase. Before beginning, it is useful to define a few global rules:
The following sections describe some of the usual processes that are performed by different persons in the project.
Developer Processes |
Add a class to a package |
Remove a class from a package and model |
Move a class between packages |
Note that this method will leave the class' disk file in the same location. If your process requires that the disk file also be moved, please look at the next process.
Rename a class |
|
|
Note that this process can also be used to change a class' disk file location.
| |
Integrator Processes |
Add a package to a project |
Remove a package and its contents from a project |
Note that since packages represent logical groupings, you should never have to remove a package without also removing its contents.
Merge two branches - Method 1 |
This process is usually done when a new "baseline" is to be established for the loadbuilder. Using this new merged branch, the loadbuilder can proceed with daily/weekly loadbuilds.
Merge two branches - Method 2 |
This is an alternate method that can be used when the branch and version information is known for all elements to be merged.
Loadbuilder Processes |
Checking out the project and the packages will ensure that the lineup is saved in ClearCase as part of these files' information.
Build the model - from Command Line |
Configuration Manager Processes |
Create a baseline - Copy-Merge |
The method described below assumes the existence of a defect tracking software that identifies the file version to be merged back into the baseline. It also assumes that there is no parallel development on the source branch(es). If a file (class) is modified on more than one branch, then this method should not be used and the classes should first be merged manually using the ObjecTime Developer Toolset.
Limitations: |
None
See also: |
This technical notes is also available as a PDF file.
What's New? |
Copyright © 1999, ObjecTime Limited. |