In the previous step you added the basic layout policy for the Jive home page. In this module you will create a specific layout for the PC version of the page, and add format attributes that will bind the layout to your XDIME 2 content.
In the previous step you added the basic layout policy for the Jive home page. In this module you will create a specific layout for the PC version of the page, and add format attributes that will bind the layout to your XDIME 2 content.
When designing a layout you start with a grid structure that defines the skeleton of the page. Next, you add elements such as panes, which hold targeted content of the XDIME 2 page.
If you have not copied the remaining image policies to your project, you should do so now. You will need them for this module.
Using grids
Grids give a device layout a basic structure for your content. You can nest grids inside one another, and also wrap one grid element in another.
-
Make sure the jivehome.mlyt layout is opened in the Layout editor
-
Pick the 'Targeted, PC' variant in the list of variants and switch to page by clicking on the tab to display a single empty layout cell
-
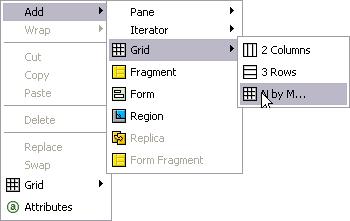
Right-click in the empty cell area and choose Add | Grid | N by M to open the Add Grid dialog
-
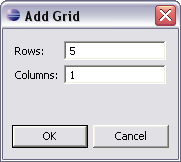
Enter values for 5 rows and 1 column for the home page and click OK. There are now empty cells for each row.
-
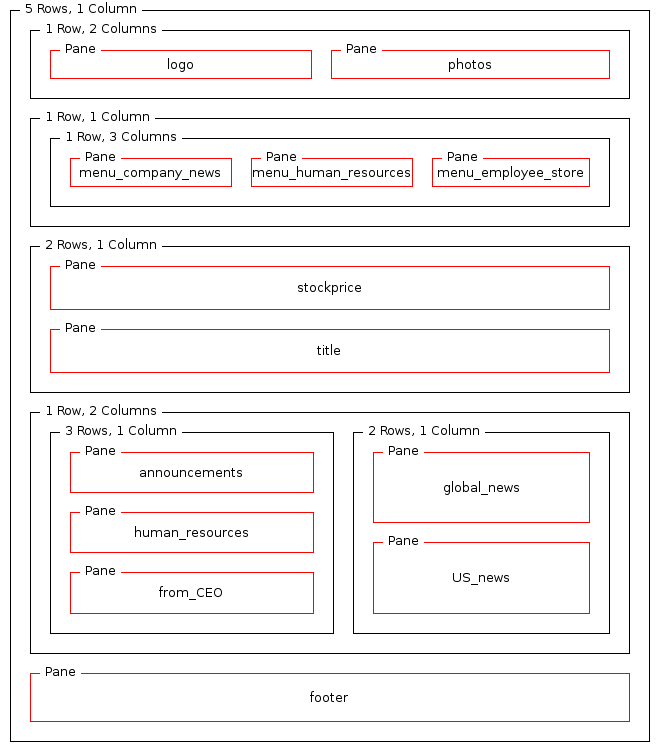
In the first row, add 2 columns to hold the page header and logo images
-
In the second row , first nest a single row, and inside it, create 3 columns to hold the menu section buttons
-
In the third row add 2 columns to contain the stock price and page title
-
In row four add 2 columns. In the left-hand side column nest 3 rows , and on the right-hand side add 2 rows. The Announcements and News sections will be placed here.
-
Leave the last row of the main grid untouched for now. It will hold a footer.
-
Your final grid structure should look like the following example
Adding a format
MCS displays XDIME content in individual panes, which need to have a unique names within the layout. In the content, you use the pane names to specify where output from XDIME elements appears.
-
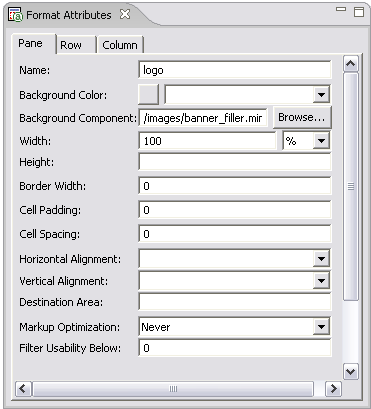
In the first row of the grid, right-click on the left-hand cell, and choose Add | Pane | Pane. The added pane is highlighted in red. If it is not already visible, MCS displays the Format Attributes view.
-
With this pane selected in the page, set the Name control in the Format Attributes view to 'logo'. On the page the name is displayed.

-
Click Browse next to the Background policy control, and select the image policy images/banner_filler.mimg in the Policy Selection dialog. This dialog shows only those policies in the mcs-policies folder.
-
Continue to add the attributes for this pane, and create panes and attribute values for the remaining cells in the grid that are summarized in the Completion section.
Checklist
These are the format attribute values that you need to set for the panes in the PC page layout.
The 'Markup Optimaization' and 'Filter Useability Below' attributes must be set to 'Never' and '0" for all panes.
| Name | Background Policy | Width | Border Width | Cell Padding | Cell Spacing | Horizontal Alignment | Vertical Alignment |
|---|---|---|---|---|---|---|---|
| logo | /images/banner_filler.mimg | 100% | 0 | 0 | 0 | ||
| photos | Right | ||||||
| stockprice | /images/orange_gradient.mimg | Top | |||||
| title | Left | ||||||
| announcements | Left | Top | |||||
| human_resources | |||||||
| from_CEO | |||||||
| global_news | |||||||
| US_news | |||||||
| footer | |||||||
| menu_company_news | /images/repeater.mimg | 33% | Center | Top | |||
| menu_human_resources | |||||||
| menu_employee_store |