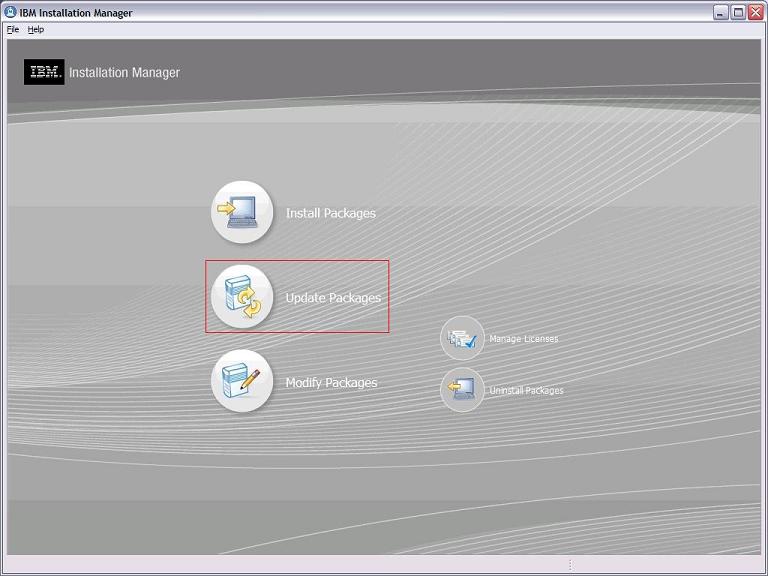
Note: Do NOT select Install Packages.
Note: Depending on the speed of your computer processor, the amount of RAM, and the speed of your Internet connection, the update(s) could take an extended period of time to download and install.
Copyright International Business Machines Corporation 2002, 2008. All rights reserved. US Government Users Restricted Rights - Use, duplication or disclosure restricted by GSA ADP Schedule Contract with IBM Corp.
This document includes the following information:
This refresh pack may be applied to HATS V7.1 installations. HATS V7.1 may be installed in conjunction with Rational Software Delivery Platform V7.0.x and V7.1.
Previously, when a HATS Web application displays a transformed host screen, the cursor position was always located at the beginning of any input field that had focus. With HATS V7.1.0.1, the cursor position on the Web page matches the cursor position on the host screen.
For example, if the host screen being rendered has an input field that is 8 characters in length and the cursor within that field is at position 3, the cursor is in position 3 in the field when the corresponding transformed Web page displays. Previously, the cursor position on the transformed web page would have been in field one at position 1.
Note: If you select the Select all text on focus client setting, you might not see this cursor position change, because the Select all text on focus setting highlights all of the text in a field when the field receives focus. In effect, there is no true cursor position in the field.
The interface panel controls in this section can be enabled only for projects using a bidirectional code page.
To assign the proper alignment of table rows containing HATS component elements, a Component Alignment drop-down list is now available on the following HATS interface panels:
The value of the Component Alignment drop-down list are right and left. The Component Alignment setting in the project settings affects the alignment of all widgets in the project. The value set in the project settings becomes the default for the Create a Transformation and Create a screen customization wizards. However, the alignment specified for any individual rendering item overrides the value specified for default rendering.
In previous releases of HATS, using the Input Method Editor (IME) with autoAdvance enabled, the following issues occured:
With HATS V7.1.0.1 you can add a setting, eliminateMaxlengthInIdeographicFields, to overcome those issues. With autoAdvance enabled and eliminateMaxlengthInIdeographicFields set to true:
You can enable the setting in the DBCS settings for the project, or for individual widgets. The individual widgets affected by the new setting are:
To enable the setting for the entire project, open the source view of the application.hap file, locate the class for the DBCS setting, and add the highlighted setting as shown in the following example:
<class name="com.ibm.hats.common.DBCSSettings">
   <setting name="autoConvertSBCStoDBCS" value="false" />
   <setting name="showUnprotectedSISOSpace" value="true" />
   <setting name="eliminateMaxlengthInIdeographicFields" value="true" />
</class>
To enable the setting for an individual widget, open the source view of the application.hap file, locate the class for the widget, and add the highlighted setting as shown in the following example for the field widget:
<class name="com.ibm.hats.transform.widgets.FieldWidget">
   <setting name="addSpanTagToText" value="false"/>
   .
   .
   .
   <setting name="usingMonospaceFont" value="true"/>
   <setting name="eliminateMaxlengthInIdeographicFields" value="true" />
</class>
The following field types are supported by this setting:
The following field types are not supported by this setting:
With HATS V7.1.0.1 you can add a setting, truncateToPreserveLength, to enable text replacement of short strings with longer strings. The values for this setting are true and false. The default value when the setting is not specified is true, which has no effect on your project. Specifying false for this setting enables the longer text replacement. To use this setting, you must not be using default rendering. If you use default rendering, the setting is ignored.
The truncateToPreserveLength setting is a project level setting; it affects all text replacements in the project. If you use this setting, verify that all of your renderings appear as you want them and that any alignment issues that might arise are not problems.
To enable the setting for the entire project, open the source view of the application.hap file. Locate the class for the transform, and add the highlighted setting as shown in the following example:
<class name="com.ibm.hats.transform">
   <setting name="truncateToPreserveLength" value="false" />
</class>
With HATS V7.1.0.1, you can add a setting, SSLSyncMode, to control whether SSL sessions are started synchronously or asynchronously, and how many threads are used for the sessions. Another setting, maxHODThreadManagerThreads, determines the maximum number of threads that can be created in the Host On-Demand ThreadManager thread pool.
SSLSyncMode is set in the advanced settings table of the HATS connection editor. Use the following values in the advanced settings table:
You set maxHODThreadManagerThreads in the runtime.properties file. You can specify a value between 10 and 10000. If you specify a value outside of this range, the setting is ignored and the default Host On-Demand of 10000 is used.
This refresh pack contains fixes for APARs as well as internal fixes.
Please see the HATS support page for a more detailed description of these APARs.
This update includes the following fixes:
IC54544 - Default rendering and transformation populated with default rendered fields have different screen widths.
IC54734 - Light pen selectable fields not being filled in if question mark "?" is entered and light pen mode is set to false.
IC55488 - Reverse color on transformed screen wrong foreground color.
IC55533 - Text replacement standards changed from V6 to V7.
IC55534 - xlatehostkeys="false" - allows typing on protected. No override.
IC55589 - Java installer should dump the install log file path and name.
IC55817 - Foreground and background colors display the same color.
IC56241 - HATS 7.0.0.2 doesn't render subfile at all that was rendered by HATS V6.
IC56326 - Function keys in mixed case fail to render.
IC56360 - Unable to set global rules for an unmatched screen event.
IC56372 - Function keys not rendering correctly for Hebrew code page 424.
IC56395 - DBCS problem when first character of RCP project upper case.
IC56436 - SSL enabled HATS application not connecting after migration.
IC56534 - Tabbing order on screen customizations incorrect.
IC56656 - Auto-IME always stay in KANA input mode by ATOK.
IC56690 - HATS V7 allows paste using IE6 even when IE6 is configured to prompt before paste, and user selects No on prompt popup.
IC56730 - HATS RCP user can type on iSeries screen when should be locked.
IC56748 - HATS field+ key is inconsistent with Hebrew code page 424.
IC56760 - Font used in Subfile rendering doesn't always align correctly in bidirectional (BIDI) environment HATS 7.0.
IC56771 - Web Bidi input fields in 3270 screens fail.
IC56783 - "Word by word" alignment and DBCS causes some input characters to be lost after pressing enter.
IC56813 - "ERASEEOF" not working with link widget.
IC56850 - Certain characters '<', '>', and '"' (left and right angle bracket and double quote) aren't rendered correctly for bidi.
IC56855 - HATS column is not calculated correctly for DBCS fields for RCP.
IC56859 - Order of words in the column heads is reversed.
IC57028 - HATS action items in buttons, drop-down lists, and check boxes are all left justified even when RTL is checked.
IC57032 - Running RCP application (with bidi codepage) and working with it for short period of time causes the application to crash.
IC57033 - Bidi input field with upper and lower case letters moves the blank spaces between them to the wrong location.
IC57034 - Under load, HOD code used by HATS does not release idle threads when number of concurrent connections is high.
IC57071 - When using BIDI support, subfile action items rendered in incorrect order.
IC57236 - HATS 7.1 on WAS 5.1.1.18 fails to display function keys.
IC57276 - Inputting DBCS lowercase characters and pressing the "Tab" key causes characters to change to capital letters.
IC57331 - No error or warning if the region is marked that divides a DBCS character.
IC57334 - HATS DBCS macro screen recognition area shrinks.
IC57342 - Screen combination shows duplicate results.
IC57407 - Pasting data to a field using business logic fails if exact data is already present in field.
The following problems were found internally, so there is no additional information about them on the HATS support page.
37316 - Wrong screen direction definition for the transformation files.
37458 - Wrong ordering of BIDI text in .cvs file contains title row.
37479 - Custom caption source shown incorrectly for Popup widget.
37816 - Studio is not honoring the applyTextReplacement attribute.
38098 - DBCS: The cursor stays at the wrong position with Delete Key.
38110 - HATS Tools menu inserted button not "portletized".
38128 - DBCS: Add extra space in the front of DBCS with macor enter key.
38147 - Add GUI setting for Subfile data empty row support.
38151 - BIDI text is reversed in input field with hints.
38152 - Bad alignment of selection list in RTL screen.
38159 - Using an image with text replacement causes additional character.
38161 - RTL bidirectional tabbing works incorrectly.
38163 - Opposite direction of selection list in transformation.
38168 - Problem with tabbing on iSeries RTB page.
38179 - DBCS: Add extra space in the front of DBCS when SOSI is OFF.
38195 - More Information button does nothing in RCP Studio.
38198 - DBCS: Can't be recognized as Subfile with specific region.
38209 - Connection error More/Additional information shows as "null".
38210 - Text replacment with image is broken in input field - RCP app.
38218 - Not able to insert integration object transaction method.
38229 - Additional <br> tags are displayed in Item selection component.
38239 - Inconsistency of marker position in opposite subfile.
38264 - Cannot edit default rendering item because of NullPointerException.
38270 - RCP: NPE in transformation view on Lotus Expeditor.
38276 - No Project Settings Text Replacement for Eclipse RCP at Runtime.
38286 - Allow override of SSLP12FileName and SSLP12Password.
38304 - Global variable does not appear in list once created.
38340 - Can't set correct alignment for first column of table.
38343 - Input field is not rendered as popup widget in RTL screen.
38364 - DBCS: Maximum length not set for 3270 Numerical field.
38368 - Text Replacement is not working on the project level.
38371 - Do not delete characters when SBCS characters are entered.
With Windows Vista SP1, the default Japanese font support is JIS2004, which HATS does not support at this time. Some characters entered with JIS2004 machines display as different character shapes than those displayed on a JIS90 machine, and some of the characters might not display on JIS90 machines at all. In addition, it is also possible that displayed characters and printed characters could have different shapes.
Japanese customers who want to continue using JIS90 on the Vista operating system can install Microsoft service pack KB927490, which can be downloaded and applied through Windows Update as additional software.
If you install the WebSphere Application Server Version 6.1 Feature Pack for Web Services, you can create HATS Web services for the IBM WebSphere Java API for XML-Based Web Services (JAX-WS) runtime. If you plan to create HATS Web services for the JAX-WS runtime, be aware of the following:
In addition to setting the BindingProvider.SESSION_MAINTAIN_PROPERTY setting to true, update your generated Web service to obtain the HttpSession object and explicitly create the session. One way to update the Web service is to add the following @Resource annotation to web_service_nameDelegate.java:
@Resource
private WebServiceContext wsContext;
Also add the following lines to the first_in_chain_IO_nameProcessWS method:
MessageContext mc = wsContext.getMessageContext();
HttpSession session = ((javax.servlet.http.HttpServletRequest)mc.get(MessageContext.SERVLET_REQUEST)).getSession();
The following limitations apply after the installation of this refresh pack:
When the (debug) host terminal is started, a balloon message pops up stating:
"The color scheme has been changed to Windows Vista Basic."
Help information further states:
"A running program isn't compatible with certain visual elements of Windows."
This situation is caused by a Swing DirectDraw issue with the current internal JVMs used to run HATS projects. A workaround to this problem requires that the JVM property sun.java2d.noddraw be set to true. This can be done in the following ways:
If you import the Web and EAR projects as Project Interchange files into the workspace and migrate the Web project, the associated EAR project is also migrated and the SSL and WEL configuration information is not lost.
This section describes how to install IBM(R) Rational(R) Host Access Transformation Services (HATS) Refresh Pack V7.1.0.1, which contains all fixes available since HATS Version V7.1 was first released. This refresh pack is provided as an update and installed using IBM Installation Manager. The update is generally installed directly from the IBM update server; however you can also choose to download an archive file that contains the update and then use IBM Installation Manager to perform local installations. The following sections describe how to install this update.
Installation prerequisites
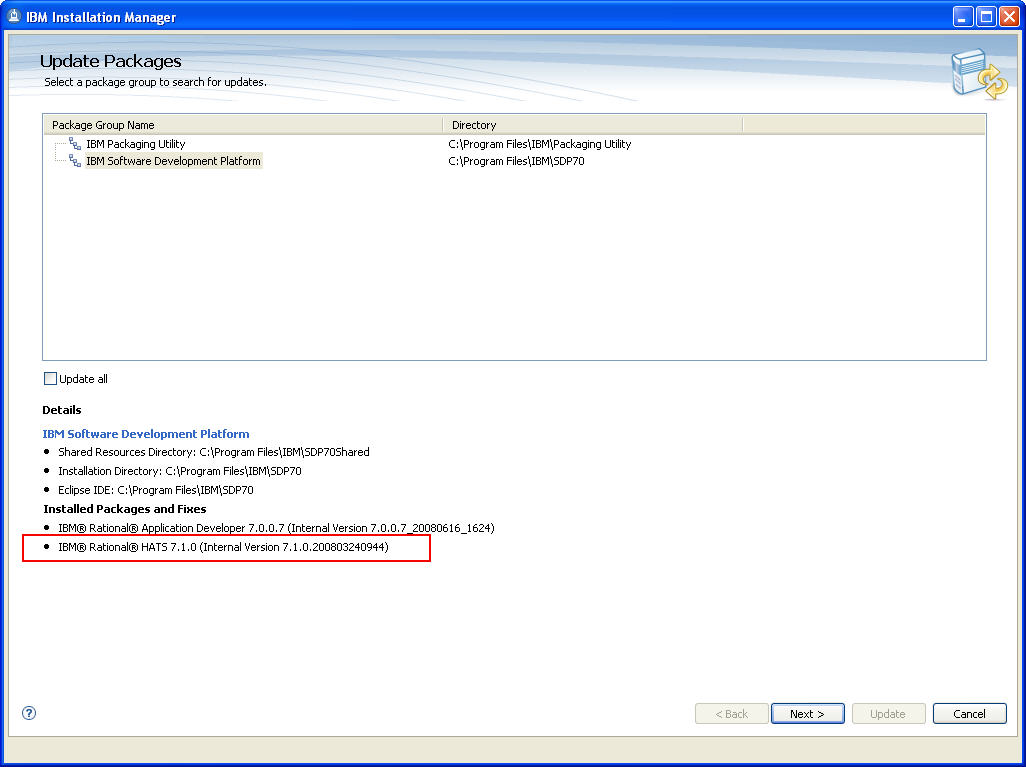
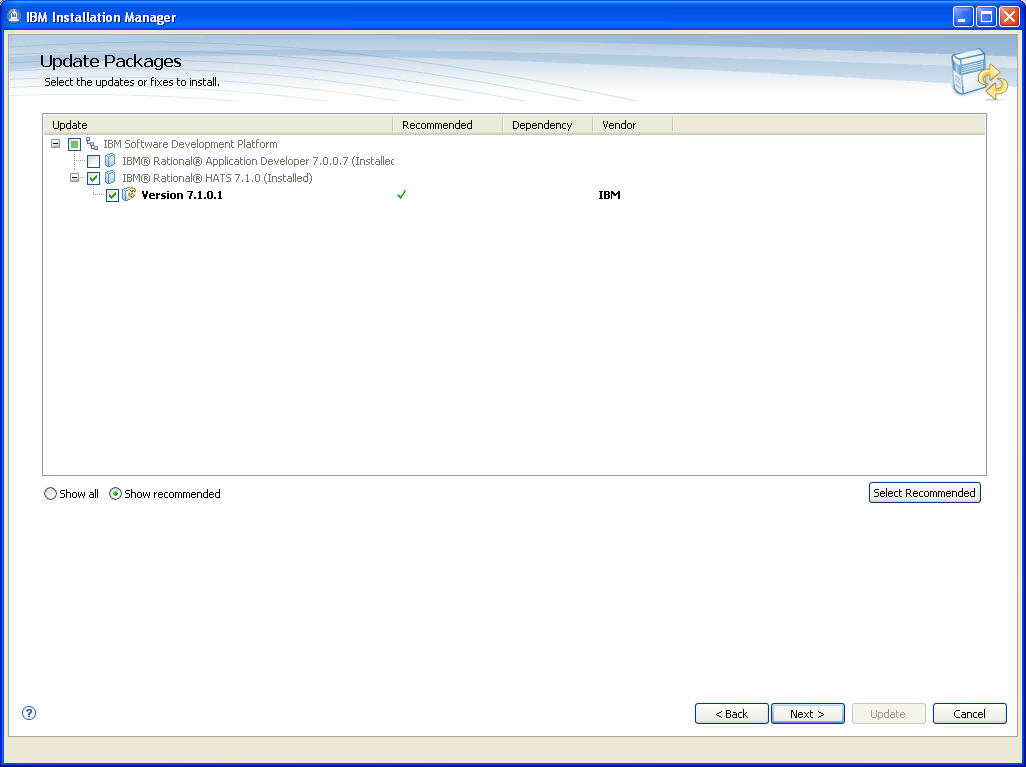
Update Package installation instructions
Archive download for local installation instructions
Verifying your installation
HATS project updates
Installing the HATS runtime plug-ins into your rich client
platform
Installation of this refresh pack requires the following:
HATS project files overwritten by the installation of HATS maintenance are saved. If HATS maintenance is uninstalled or disabled, HATS projects are not automatically restored to their former state. We recommend that you back up your existing HATS projects using a code repository, export them as zip files, or export them as project interchange files before applying HATS maintenance. See HATS project updates for more information.
For more information about HATS prerequisites, refer to the Rational Host Access Transformation Services V7.1 - Supported Platform Summary.
To install directly from the IBM update server:
Ideally, this update should be installed directly from the IBM update server, as described in the Update installation instructions section above. However, you may also download an archive file containing the update and perform local installations. You might want to do this if:
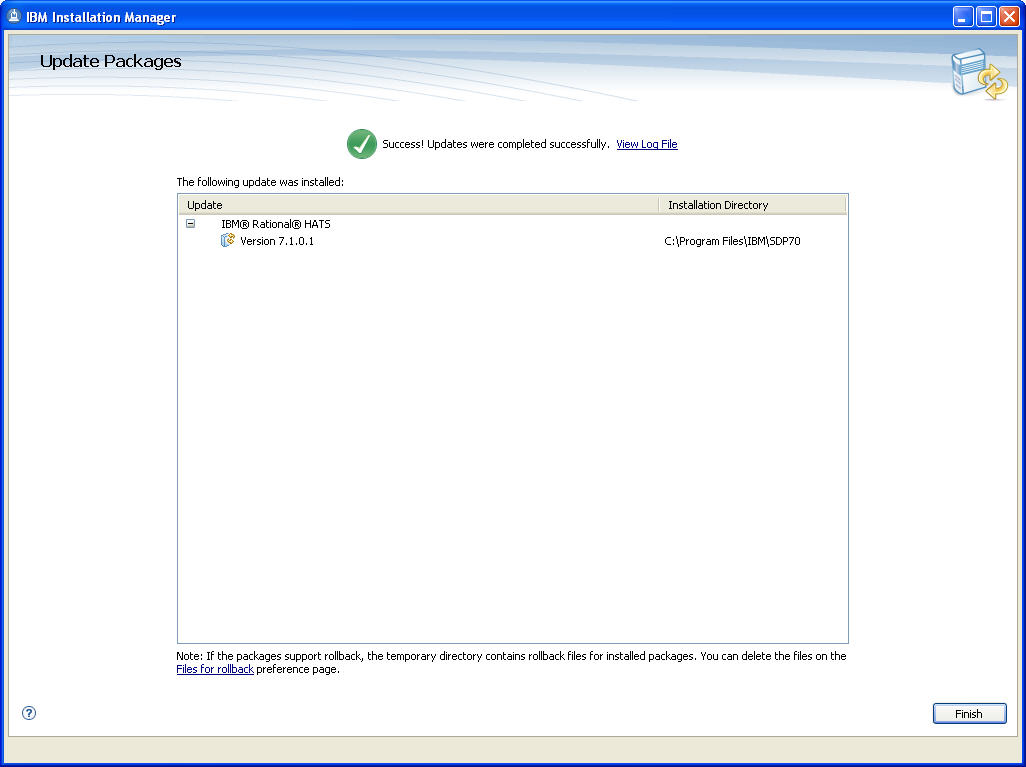
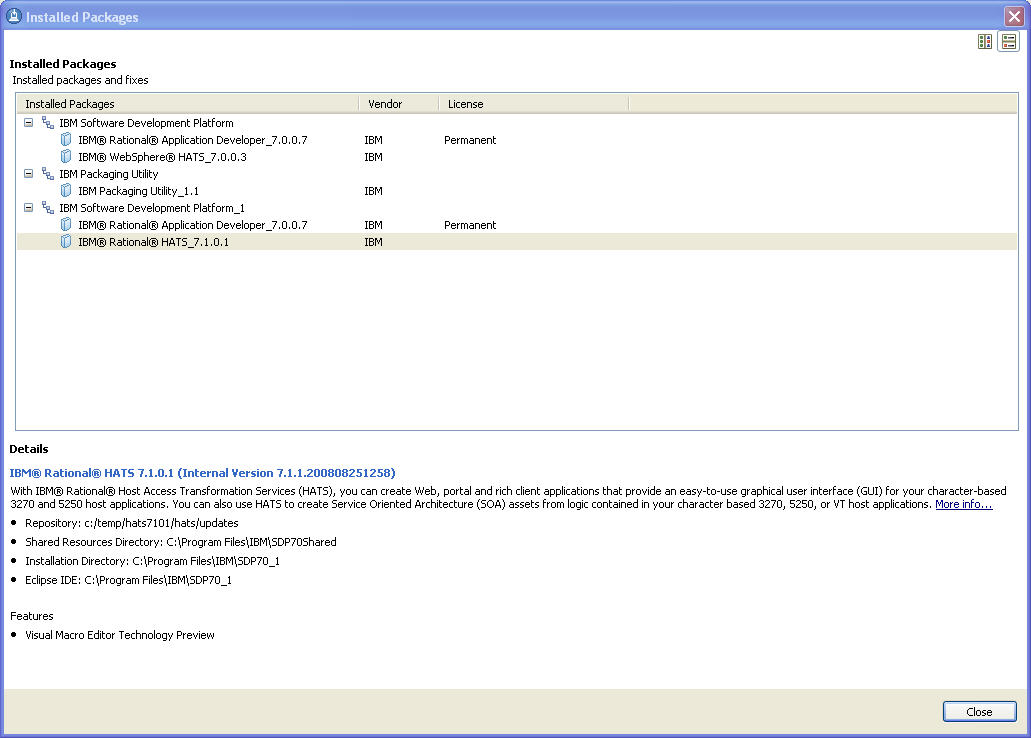
You can verify that the update is installed by running View Installed Packages which is located on the Installation Manager menu bar under the File menu. You should see IBM Rational Host Access Transformation Services V7.1.0.1 (7.1.1.200808251258) listed.
After installing the HATS maintenance and restarting the Rational Toolkit, the HATS projects in the current workspace are automatically updated with the new files.
If your workspace contains rich client applications, see Installing the HATS runtime plug-ins into your rich client platform for important information.
The project update process creates a backup folder in the project named save_pre_7.1.0.1. This folder contains all of the files that were overwritten by the package update process. These files are saved so that you can compare and merge them with your newly installed HATS files. Do not worry if you see errors in the task view; these files are no longer used by the application. When you are satisfied that all the saved files have been compared and merged, you can delete the save_pre_7.1.0.1 folder.
Note:
If you need to roll back to this version of HATS in the future, the files in this folder are required to perform the roll back. See Removing installed maintenance for more information.
After applying a HATS service update, if you have changed the target platform of your workspace (Windows > Preferences > Plug-in Development >Target Platform) from the default Rational Software Delivery Platform, you are prompted to install the HATS runtime features and plug-ins into your target platform the first time you start RAD. For example, if the target platform of your workspace is Lotus Expeditor, you are prompted to install the updated HATS runtime plug-ins into this platform. After the plug-ins are installed, you are prompted to reload the target platform using the Windows > Preferences > Plug-in Development >Target Platform panel. Once the plug-in list is refreshed, you should see updated versions for the com.ibm.hats.core, com.ibm.etools.terminal.beans, and com.ibm.hsrendering plug-ins.
To apply a service update to a client that already has a HATS rich client application installed, follow the instructions in the HATS User's and Administrator's Guide for Exporting the HATS runtime features. This exports the updated versions of the HATS runtime features and plug-ins. To make these updates available to a client, you can either modify your existing update site to include the updated features, or you can create a new update site. See Creating an update site in the User's and Administrator's Guide for more information. Because a HATS service update does not update your rich client projects, there is no need to re-export or re-install your HATS rich client applications.
If you used the New Product Configuration wizard to create a product package that includes Eclipse, HATS runtime plug-ins, and its dependencies, you need to regenerate this package and distribute it to your client machines. Instructions for creating a new product configuration can be found in the Packaging an Eclipse client environment for distribution section of the HATS User's and Administrator's Guide. There is no automated way to update plug-ins within an Eclipse environment that was packaged using the steps provided in the HATS User's and Administrator's Guide. This is a known issue.
You can remove installed HATS maintenance by selecting Roll Back Packages from the IBM Installation Manager main panel. Use the rollback feature if you have applied an update to a product package, and decide later that you want to remove the update and revert to the earlier version of the product. Installation Manager uninstalls the updated resources, and reinstalls the resources from the previous version. When you roll back to a previous version, it is restored with same features that were associated with the version.
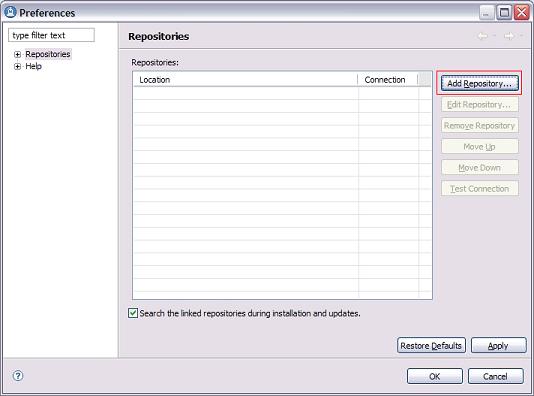
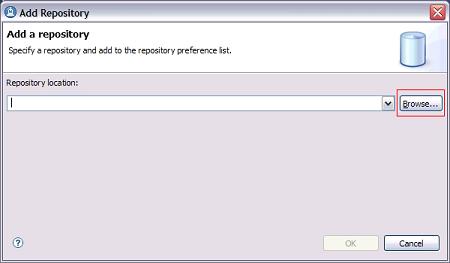
During the rollback process, Installation Manager must access files from the earlier version of the package. By default, these files are stored on your system when you install a package. If you changed the default setting or deleted the files on the Roll Back preferences page, Installation Manager will require access to your installation repository or media. If you installed the product from a repository, you must have listed the repository from which you installed the previous version of the product in your repository preferences (File > Preferences > Repositories). To roll back your installation to a previous version:
When you roll back HATS, HATS projects are not automatically restored to their previous level. See Manually restoring your workspace for more information.
When HATS is installed on a system that has Rational Application Developer V7.0.0.2 along with WebSphere Developer for System z V7 or V7.1.0.1, there might be problems in uninstalling HATS. For more information, refer to http://www-1.ibm.com/support/docview.wss?rs=103&context=SS6UCR&dc=D600&uid=swg21258176&loc=en_US&cs=UTF-8&lang=en.
Following a roll back of installed HATS maintenance, you can manually restore your workspace to the state before HATS maintenance was installed. You can either use backup copies you created in a code repository or exported as zip files or project interchange files, or you can follow these steps:
As an alternative to using the graphical installation wizard in IBM Installation Manager, you can use the command line to install or roll back to a previous HATS version silently.
For more information about installing product updates from a command line, see Working with silent installations in the IBM Installation Manager help.
Updates, limitations, and known problems about Host Access Transformation Services are documented in the form of technotes on the IBM Software Support Web site.
As limitations and problems are discovered and resolved, the IBM Software Support team updates the knowledge base. By searching the knowledge base, you can quickly find workarounds or solutions to problems that you experience. The following link launches a customized query of the live Support knowledge base. To create your own query, go to the Advanced search page on the IBM Software Support Web site:
View all technotes for Host Access Transformation Services
IBM Software Support provides assistance with product defects.
Before you submit your problem to IBM Software Support, ensure that your company has an active IBM software maintenance contract, and that you are authorized to submit problems to IBM. The type of software maintenance contract that you need depends on the type of product you have:
For IBM distributed software products (including, but not limited to, Tivoli, Lotus, and Rational products, as well as DB2 and WebSphere products that run on Windows or UNIX operating systems), enroll in Passport Advantage in one of the following ways:
If you are not sure what type of software maintenance contract you need, call 1-800-IBMSERV (1-800-426-7378) in the United States. From other countries, go to the "Contacts" page of the IBM Software Support Handbook at http://techsupport.services.ibm.com/guides/contacts.html and click the name of your geographic region for phone numbers of people who provide support for your location.
To contact IBM Software support, follow these steps:
When you report a problem to IBM, you are asked to supply a severity level. Therefore, you need to understand and assess the business impact of the problem that you are reporting. Use the following criteria:
| Severity 1 | The problem has a critical business impact: You are unable to use the program, resulting in a critical impact on operations. This condition requires an immediate solution. |
| Severity 2 | This problem has a significant business impact: The program is usable, but it is severely limited. |
| Severity 3 | The problem has some business impact: The program is usable, but less significant features (not critical to operations) are unavailable. |
| Severity 4 | The problem has minimal business impact: The problem causes little impact on operations, or a reasonable circumvention to the problem was implemented. |
When describing a problem to IBM, be as specific as possible. Include all relevant background information so that IBM Software Support specialists can help you solve the problem efficiently. To save time, know the answers to these questions:
You can submit your problem to IBM Software Support in one of two ways:
If the problem you submit is for a software defect or for missing or inaccurate documentation, IBM Software Support creates an Authorized Program Analysis Report (APAR). The APAR describes the problem in detail. Whenever possible, IBM Software Support provides a workaround that you can implement until the APAR is resolved and a fix is delivered. IBM publishes resolved APARs on the Software Support Web site daily, so that other users who experience the same problem can benefit from the same resolution.
The following terms are trademarks of International Business Machines Corporation in the United States, other countries, or both:
Java and all Java-based trademarks are trademarks of Sun Microsystems, Inc. in the United States, other countries, or both.
Microsoft, Windows, and the Windows logo are trademarks of Microsoft Corporation in the United States, other countries, or both.
Other company, product, or service names may be trademarks or service marks of others.