Rational Asset Analyzer 5.5 fix pack 1(technical preview) Readme File
| Disclaimer |
|
The executables represent the Rational Asset Analyzer 5.5 fix pack 1 technology
preview for execution on a workstation environment.
This is an unsupported, not-for-sale execution environment for the Rational
Asset Analyzer 5.5.
|
Index
The following enhancements are included in this fix pack:
Two REXX execs are now provided to enable you to perform REORG and RUNSTATS
on your database as part of the recommended administration process:
- /bin/dmhReorg.rexx
Based on the database name you specify on invocation, this exec
generates REORG statements, and then executes those statements to REORG
your database. Invoke this command as follows:
rexx dmhReorg.rexx <RAAdbname>
- /bin/dmhRunstats.rexx
Based on the database and schema names you specify on the invocation,
this exec generates RUNSTATS statements, execute those statements, and
then performs BINDs for your database. Invoke this command as follows:
rexx dmhRunstats.rexx <RAAdbname> <RAAdbschemaname>
Note: During the initial inventory process, and regularly
during production use of the product, the database should be REORGed and
RUNSTATS should be run to improve the performance. If you find that the product
appears to be sluggish and you have been adding to the database through
inventory collection, postprocessing, or impact analysis, perform REORG and
RUNSTATS on your database.
Product fixes
The following changes are incorporated in this fix pack:
|
Documentation
|
Added a link to How to Scan DB2 Catalogs on Windows
document, available in PDF format, to the the online help.
|
|
Functional enhancements and fixes
|
- Added fix for
searches on Data Elements, Data Stores, and Data Sets that prevented
results when specifying data types and other criteria through Advanced
Search.
- Enabled resizing of
list boxes in the Concatenation Set update wizard.
- Fixed broken data
store link from Program diagram in Impact Analysis context.
- Compiler-based
scanning in enhanced mode now reports missing includes.
- Restored .dbd file
extension missing from Assembler section of Analyzers.cfg to enable
scanning and identification of DBD source files.
- Resolved
compiler-based scanning memory consumption issues that was causing
memory shortages.
- Fixed issue of
embedded dots in source file names (for example, A.B.C.SourceFile) preventing successful
scans.
- Added support for
STDSQL(YES) for COBOL proprietary scanning.
- Enabled DB2 schema
name > 8 chars when processing the <scan> parameter for the DB2
catalog scan.
- Fixed issue of File
Size dashboard not rendering results for large volumes of data.
- Fixed inadvertent
display of annotations on Metrics pages when enabling the display of
annotations on File/Program summary pages.
- Added checks for
recursive includes in COBOL and PL/I scanning.
- Fixed IMS source
scanning issue that resulted in relationship to an existing IMS region
not being created.
|
|
Installation
|
- Fixed issue where,
under WebSphere® Application Server Community Edition, RA was creating
directories with "5.1.1" in the name.
- Resolved issue where
installing into a directory with embedded dots (for example, c:\raa5.5,) did not work.
- Added validation of
Site name.
- Fixed issue with Site
name of CHANGEME when installing to localhost.
- Resolved issue where
DB2 schema specified during install was not being used to create the
database.
|
|
Administration
|
- Replaced
dmhRunstatsAllTables command file with separate dmhReorg and dmhRunstats
commands.
|
Following are the hardware and software prerequisites for downloading and
installing the RAA technical preview on your local workstation.
Hardware Prerequisites
The local machine on which you are installing the technical preview must,
at a minimum, meet the following requirements:
- Windows (Intel) workstation
- A minimum real memory of 1 GB; 2 GB is suggested for optimal performance
- Additional 300+MB of disk space
Software Prerequisites
The local machine on which you are installing the technical preview must
have a supported version of DB2, WAS, and OORexx installed and all must
be verified to be working properly. The following list contains the set
of supported versions for each software product (those in bold green are the recommended free versions of the pre-reqs):
- One of the following DB2 versions:
- One of the following WAS versions:
- WebSphere Application Server Community Edition 2.0 a no-charge IBM product available at http://www.ibm.com/developerworks/downloads/
- WAS 6.1 Enterprise or Express Edition
- WAS 6.0.2 Enterprise or Express Edition
- WAS 5.1 Enterprise or Express Edition
- One of the following Object Rexx products:
This RAA technical preview installation has the following limitations:
- If you have any previous WSAA workstation driver or earlier version of
RAA technical preview installed, you must uninstall it prior to installing
this technical preview. Additionally, you must drop any previously existing
WSAA or RAA workstation database. The install does not do this for you.
When you attempt to bring up the technical preview, the driver validates
its level against the version of your database. You will be alerted if
you have not done this properly.
- It is a 90 day trial version, and will expire 90 days from its installation
- The first time you install the technical preview, the SVG scrollbars may
be disabled. In this case, follow the instructions for Enabling SVG Scrollbars.
- There is file identification for Assembler source files, but no data flow
will be detected because there is no deep scanner available on the workstation.
- There is no scanning support for CICS regions or IMS subsystems, although
there is scanning support for IMS DBD and PSB source files
Perform the steps in this section to install the RAA technical preview.
If you encounter any errors during the installation of the prerequisite
software, consult the Troubleshooting and FAQs section at the end of this file for guidance.
Installation Notes:
- Before installing the RAA technical preview for the first time you should uninstall any previously installed WSAA or RAA workstation
drivers and ensure that you drop its DB2 database. The installation will
not do this for you and a new database will not be created if one already
exists with the same name.
- If you have a previous version of the RAA technical preview, you need not
uninstall it to install an updated version unless otherwise instructed
to do so.
- During the install, a "current site" is created from your workstation
host name to be used as the default for all scans initiated by the Inventory
wizard. This site is distinct from the distributed scanner default site,
which is created when you bring up the distributed scanner for the first
time.
- The RAA technical preview's Web Services web application is automatically
installed.
- If you intend to scan distributed assets, you must bring up the distributed
scanner GUI prior to defining any new scan root. The reason for this is
that the Distributed Site must be created in your database first. The Distributed
Scanner GUI will do that automatically the first time it is started up.
- It is not necessary to reboot your machine after installing/uninstalling
the RAA technical preview. However, you must restart your WebSphere Application
Server
- Ensure that you have satisfied all of the prerequisite hardware and software requirements that are identified in the prerequisites section above.
- Ensure that you are logged on to Windows with a user id that has DB2 Admin
authority.
- Ensure that your WAS Administrative Server
is up and running.
- Invoke the RAA technical preview install program by typing RAATPMMxDD.exe from a command window.
If you encounter any errors during the verification of your installation, consult the Troubleshooting and FAQs section at the end of this file for guidance.
Start the RAA technical preview from your Start menu: Start->All Programs->IBM ->Rational Asset Analyzer.
In the following steps, <InstallDir> indicates the directory indicated
as the installation directory during the technical preview's installation
(for example, c:\Program Files\IBM\Rational Asset Analyzer).
- Click the Database->Collect inventory menu option.
- Take the default site and click the Next button.
- In the Windows Directory entry field, type <InstallDir>\sample\source
and click the Next button.
- Take the defaults for the remaining panel, clicking the Next button until you see the Process queued requests panel.
- Click the Finish button.
- View your inventory collection progress via Database->Analysis queue.
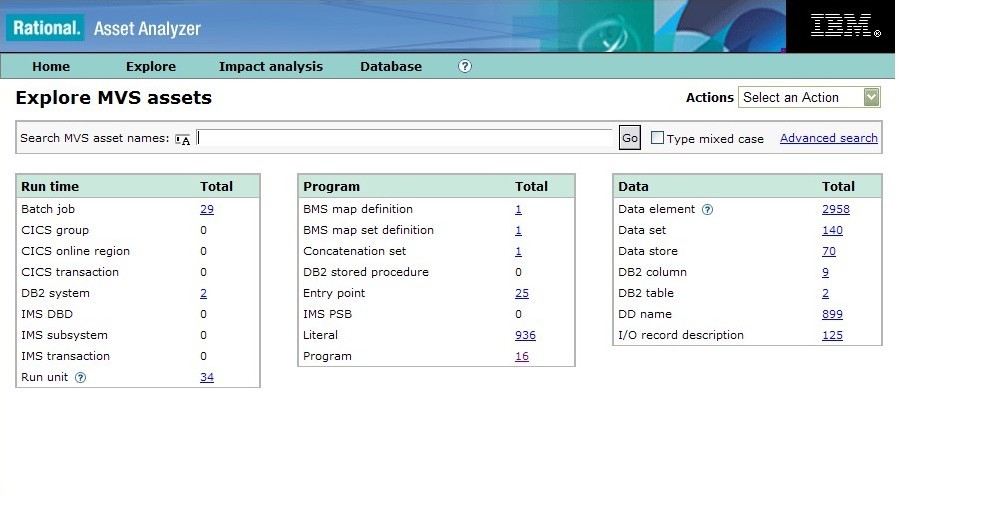
Validate MVS IVP Asset Inventory Collection
After performing inventory collection for the IVP data for MVS assets, validate that you have the correct content by going to the Explore->MVS assets menu. Compare the content displayed in your window to the following. In general, it is okay if the numbers are slightly off for things in the Data box because of the nature of this tool and the fact that it is changing, but it is not okay if you do not see basically what appears below. Go to the Troubleshooting and FAQs section to see a common set of problems if you have problems with this verification step.
- Ensure that you have created the Distributed Site by bringing up the Distributed Scanner at least once. You can do this by going to Start->All Programs->IBM ->Rational Asset Analyzer->Distributed
Scanner. If you have problems bringing up the distributed scanner via the Start menu, you must bring it up from a command line to see what the errors are by doing the following:
- Go to the <InstallDir>\assetloc directory
- Execute alrun.bat
- Examine the errors in the command window. See Diagnosing Distributed Scanner Errors for some common problems.
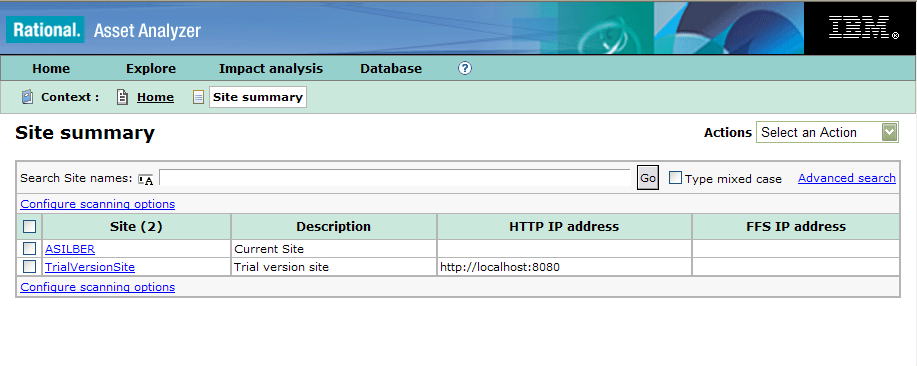
Validate that you have two sites by going to the tool's Home Page and noting
a Site count of 2. Click on the count and validate that one of the sites
is for MVS and one is for distributed. For example:
- Create a Distributed Scan Root by doing the following steps:
- Bring up the RAA technical preview in your browser and click on Database->Distributed
scan roots
- From the Actions pulldown, select Create new distributed scan root
- The Create new distributed scan root wizard will be displayed. Enter the following information:
- On the Create new distributed scan root page, type a name and a description for the scan root, ensure that the distributed site appears, and then click Next.
- On the Specify resource manager page, select File System as the Resource manager, and then click Next.
- On the Specify information for this resource type page, type <InstallDir>\assetloc\SampleSource in the Path field
and then click Next.
- Take the defaults for the following pages and on the Review page ensure that the Add to analysis queue now checkbox is checked, and then click Finish.
- Run the scanner by clicking Start->All Programs->IBM ->Rational Asset Analyzer->Distributed
Scanner. See the Diagnosing Distributed Scanner Errors section topics for problems starting the distributed scanner.
- When the Scanner Client dialog appears, click the green arrow to start
the scanning process.
- Proceed to validate your results for the
distributed IVP asset inventory collection.
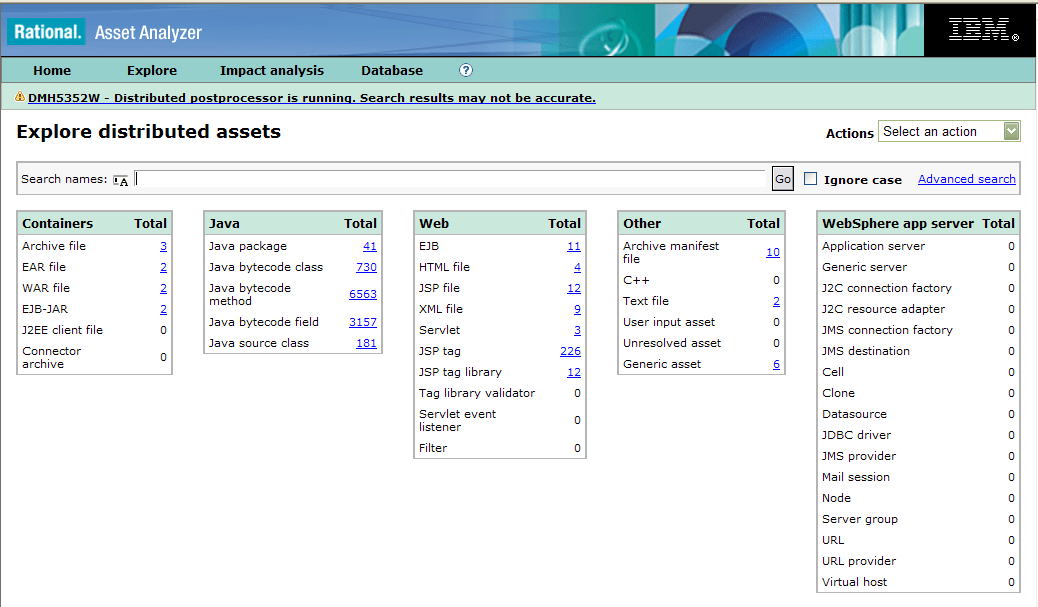
Validate Distributed IVP Asset Inventory
Collection
After performing inventory collection for the IVP data for distributed
assets, validate that you have the correct content by going to the Explore->Distributed
assets menu. Compare the content displayed in your window to the following.
If you cannot see this information , go to the Diagnosing Distributed Scanner Errors section to see a common set of problems.
Congratulations! Your installation has been
completed successfully!
The RAA technical preview provides the ability to optionally scan your
COBOL and PLI artifacts using the Enterprise COBOL and Enterprise PLI compilers.
In order to use the functionality, you must have specified that you want
to enable compiler-based scanning during the install and you must have
RDz V7.x installed in order to have access to the COBOL and PL/I compilers
on your workstation. In addition, you must update your system environment
variables to mimic those set by the RDz environment batch file for the
compilers. This can typically be found in: <RDzInstallDir>\bin\setenvWDZ71.bat.
Once you have found the RDz environment batch file, perform the following
steps:
- Go to My Computer->Properties
- Select the Advanced tab
- Click on the Environment Variables button
- For each property specified in the RDz batch file, create or update the
property in your System Variables section. Note that for English systems,
you need not update the LANG property.
This tool allows you to configure your scanning options through the user
interface, so aside from enabling the compilers, there is nothing else
you need to do to switch between proprietary and compiler-based scanning
outside of the product user interface.
In the RAA technical preview, due to open source legal issues, the scrollbars
on the SVG diagrams are disabled by default. There is a free download available
to enable the scrollbars. Please refer to the RAA External web site for more information.
Quick Links:
- HTTP Statut 500 error bringing up product in web brower
- Diagnosing problems with the distributed scanner
- No Java bytecode methods or fields after distributed scan
- Errors occur when installing the RAA technical preview
- When scanning the <InstallDir>\sample\source library, no Library
or Member objects are created
- I can see the Home Page, but I cannot get to other pages from the browser
- The SVG graphs do not display
- Provider null could not be instantiated exception when trying to bring up the technical preview in a browser window
- DB2 crashes when trying to access parts of the technical preview's browser
interface
- Errors encountered when trying to bring up technical preview's Home Page
- Errors encountered when trying to bring up the on line HELP
type Exception report
message
description The server encountered an internal error () that
prevented it from fulfilling this request.
exception
org.apache.jasper.JasperException: com.ibm.dmh.util.ConfigRuntimeException: ConfigRuntimeException: Could not find configuration file [Urls.cfg] in search path []
        org.apache.jasper.servlet.JspServletWrapper.service(JspServletWrapper.java:432)
        org.apache.jasper.servlet.JspServlet.serviceJspFile(JspServlet.java:320)
        org.apache.jasper.servlet.JspServlet.service(JspServlet.java:266)
        javax.servlet.http.HttpServlet.service(HttpServlet.java:806)
root cause
com.ibm.dmh.util.ConfigRuntimeException: ConfigRuntimeException: Could not find configuration file [Urls.cfg] in search path []
        com.ibm.Software Inventory Tool.util.ConfigMgr.getConfigFile(Unknown Source)
        com.ibm.Software Inventory Tool.util.ConfigMgr.get(Unknown Source)
        org.apache.jsp.index_jsp._jspService(index_jsp.java:69)
        org.apache.jasper.runtime.HttpJspBase.service(HttpJspBase.java:70)
        javax.servlet.http.HttpServlet.service(HttpServlet.java:806)
        org.apache.jasper.servlet.JspServletWrapper.service(JspServletWrapper.java:388)
        org.apache.jasper.servlet.JspServlet.serviceJspFile(JspServlet.java:320)
        org.apache.jasper.servlet.JspServlet.service(JspServlet.java:266)
        javax.servlet.http.HttpServlet.service(HttpServlet.java:806)
note The full stack trace of the root cause is available in the Apache Tomcat/6.0.13
logs
Solution
In an early version of the WSAA Workstation Edition technical preview,
DMH02X20, there was a potential problem setting the wsaaConfig property. Reinstall the latest technical preview version available on
the web page to resolve this issue. An alternative is to define a new System
Variable:
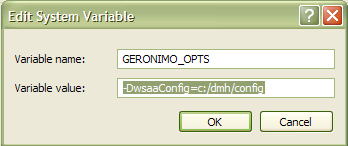
You can do this via the My Computer->Properties->Advanced->Environment
Variables dialog. You must restart your WAS server after making this update.
Here are a few of the common issues with the distributed scanner that you
might encounter. Note that in all cases, by executing the scanner from
the command line via <InstallDir>\assetloc\alrun.bat you can see
the errors in the command window. If you bring up the scanner from the
Start menu, you will not see these errors.
When attempting to run the distributed scanner,
the follow error is displayed:
- Loading Asset Locator...
- JAVA_HOME=/=\
- The system cannot find the path specified.
- The system cannot find the path specified.
This problem occurs if you do not have your
JAVA_HOME environment variable set to point
to the JDK runtime environment. For example:
- JAVA_HOME=C:\WebSphere\AppServer\java
Pay careful attention during the install of the product to ensure that
it is pointing to the correct Java directory. The install attempts to default
this directory but may not be accurate. In order to fix this, you must
do one of the following:
- Re-install the tool and specify the correct Java directory. Note that you
need not uninstall or drop your database to do this.
- Go to <InstallDir>\config\Common.cfg and change the javaHome property to the correct value (see below). You must restart your web applications
after making this update.
- #--------------------------------------------------------------------------------
# ---PrereqPaths---
# This specifies the install directories of prerequisite software.
#--------------------------------------------------------------------------------
[PrereqPaths]
...
javaHome = C:\Program Files\IBM\Java50\jre
The distributed scanner is shipped with a configuration for coarse-grained
scanning, by default. This causes the scanner to skip indepth bytecode
scanning that captures method and field information. If you want method
and field information in your inventory, you must change this default prior
to performing a scan by performing the following steps:
- Go to <InstallDir>\config
- Edit the AssetLocator.cfg file
- Find the GranularityLevel and change the value from "Coarse"
to "Fine"
- #bytecode analysis
#the possabilities are:
# 1. Coarse - analyze just up to class file level
# 2. Fine - analyze Methods and Fields in class files, connect methods to method, method to field and method to class
GranularityLevel = Fine
- Restart your web applications
The following list shows some of the reasons for these errors:
- If there is a problem with creating the database, check the contents of
your \Program Files\wsaainstall.log for the following text:
SQL1013N The database alias name or database
name "DMHDB" could not be found.
SQLSTATE=42705 Database "DMHDB"
does not already exist.
Creating new database...
SQL1005N The database alias "DMHDB"
already exists in either the local database
directory or system database directory.
If you find this text, then the DMHDB database
has been uncataloged from DB2, but has not been dropped. This could occur, for example, if you installed
a new DB2 but did not clean up your databases
first and did nothing to catalog them after
the new install of DB2. You will need to
add the DMHDB database back to DB2, drop
it, and then create it again. To add the
database back to DB2, do the following:
- Open up the DB2 Control Center
- Expand the "databases" folder
- Right-click on the "databases"
folder and select "Add". From
here
you can add the DMHDB database (the directions
vary depending upon the version of DB2
you
have installed).
- At this point, if you know that the database
has the correct schema, you are done.
Otherise,
right-click on the DMHDB database and
select
"Drop" to drop the database
- Run <InstallDir>\install\SetupDB.bat DMHDB DMH to create the database.
- If the installation failed trying to update web applications or java resources
for the technical preview, you may have a problem with communications between
the tool and WAS. The latest stand-alone driver install is designed to
try to start the WAS server automatically, but some users experience problems
with this for various versions of WAS. As a precaution, you should always
ensure WAS is started prior to running the install. You can re-run the
install after starting WAS to see if your installation errors go away.
If after running the scan on <InstallDir>\sample\source, you do not
see the appropriate results, try to identify any errors by doing the following
steps:
- Edit the <InstallDir>\log\dmh6000.log file to find any errors. If
there are errors, attempt to correct any problems. If you find errors that
you do not understand or cannot correct, consult the Services Contact.
- Verify that you have the correct version of IBM Object REXX installed (see
the prerequisites section above).
- Edit the <InstallDir>\bin\dmh6000Run.bat file to have output from
executing dmh6000.exe piped to a log:
- Go to line 49 (or the line that contains @%4dmh6000.exe %1 %2 %3
%6 %5 %7 %8)
- Change that line to pipe output to a file. For example, change it to look
like this string: @%4dmh6000.exe %1 %2 %3 %6 %5 %7 %8 2>&1 | tee
<InstallDir>6000.log (if you do not have the tee.exe available, you
can simply pipe the stdout and stderr output. So instead of @%4dmh6000.exe
%1 %2 %3 %6 %5 %7 %8 2>&1 | tee <InstallDir>6000.log try this:
@%4dmh6000.exe %1 %2 %3 %6 %5 %7 %8 >> <InstallDir>6000.log
2>&1 )
- Run the scanning test again, and then examine your <InstallDir>6000.log
file for any errors. If there are errors, attempt to correct the
problems. If you find errors you do not understand or cannot correct, consult
a RAA technical preview Services Contact.
If you can get to the Home Page, but you
cannot get to any other page, you likely
are experiencing a communications/connection
problem. Here are some things to look at:
- If your Home Page is served up via the localhost host name, verify whether or not the URL
used when you proceed to another page also
contains the localhost host name. If you see something more like
http://10.1.1.1/dmh/servlet/DmhPageServlet?pagetype=explore&menustate=7&dmhRequest=
then try changing the section highlighted
in blue to localhost and refresh your browser. If this works, then you must re-run the RAA
technical preview's install and be sure to specify localhost as your hostname during the install.
- If you specified a host name during the installation of the RAA technical
preview and your host name is assigned an IP address dynamically, you are
likely to have issues related to (1) above.
- If you still cannot get to other pages and
you are using a wireless adapter of some
kind, you are likely experiencing connection
issues related to your adapter. Try removing
the adapter to see if you can then get
to
browser pages.
- If you have also installed WSED, you may be experiencing REXX problems
even if you have verified in the pre-req steps above that REXX was installed
and configured properly. The issue is that WSED copies REXX DLLs to the
winnt\system32 subdirectory (rxapi.exe, rexx.dll, etc.). To resolve this,
you need to rename the REXX DLLs/EXEs in winnt\system32.
- When you view a component diagram, you see
a message in place of the diagram
- The SVG plugin is not installed, or your
Internet Explorer settings are incorrect.
First check that both the Run ActiveX
and
the Script ActiveX options are enabled
in
Internet Explorer. (Click Tools -> Internet options -> Security
-> Enable Run ActiveX and -> Enable Script ActiveX.) If they are, use the link provided in
the message to download and install the
Adobe
SVG Viewer.
This is a jaxp.properties bug in WAS 5.1.
You need to edit C:\Program Files\WebSphere\AppServer\java\jre\lib\jaxp.properties,
and uncomment out the 3 lines at the bottom
of the file so it looks like this:
javax.xml.transform.TransformerFactory=org.apache.xalan.processor.TransformerFactoryImpl
javax.xml.parsers.SAXParserFactory=org.apache.xerces.jaxp.SAXParserFactoryImpl
javax.xml.parsers.DocumentBuilderFactory=org.apache.xerces.jaxp.DocumentBuilderFactoryImpl
After saving the file, restart WAS.
Some people have seen problems with various
levels of DB2 V8 while exploring data in
the browser interface. If you are running
with DB2 V8, please ensure that you have
installed the latest fixpacks. We do know
that the base DB2 V8.2 has problems, but
by applying fixpack 1 for DB2 V8.2, the problems
disappear. This level is equivalent to DB2
V8.1 fixpack 8.
When navigating to the RAA technical preview's Home page, two errors are
encountered:
- DMH5252E - The data source named "jdbc/DMHDB" could not be
located. Ensure that the name has been defined to WebSphere.
- DMH7883E - Could not find an appropriate method to access the database
Debugging Steps
- Validate that A DB2 connection can be established outside of RAA technical
preview via the DB2 command window using the userid and password specified
during the RAA technical preview install
- Check the SystemErr.log and the SystemOut.log for more details. These logs
can be found in your <WebSphereInstall>\AppServer\logs\<serverName>
directory
- Check the Admin Console to see if you have a DataSource defined in Resources->JDBC Providers (filling in cell, node and server info as appropriate).
- Check your \Program Files\wsaainstall.log for any errors
If none of the steps above provide any explanation or if you find that
you do not have the appropriate Data Source defined to WAS, try re-installing
the RAA technical preview. Remember that starting with V4.2, you no longer
have to uninstall before a re-install. Ensure that you fill in the appropriate
nodeName during the install so that a DataSource can be created.
If you have installed WAS CE, there is a possibility that the on line help will issue an error.
You will experience the following symptoms:
- WAS CE window/console will have a simlar exception reported:
13:54:02,656 ERROR [RepositoryConfigurationStore] C:\Program Files\IBM\WebSphere
\AppServerCommunityEdition\repository\Wsaa\WsaaHelpWar\5.1.1\WsaaHelpWar-5.1.1.w
ar is not an empty directory
13:54:02,734 ERROR [DirectoryHotDeployer] Unable to deploy: org.apache.geronimo.
kernel.config.ConfigurationAlreadyExistsException: Configuration already exists:
Wsaa/WsaaHelpWar/5.1.1/war
org.apache.geronimo.common.DeploymentException: org.apache.geronimo.kernel.confi
g.ConfigurationAlreadyExistsException: Configuration already exists: Wsaa/WsaaHe
lpWar/5.1.1/war
at org.apache.geronimo.j2ee.deployment.EARConfigBuilder.buildConfigurati
on(EARConfigBuilder.java:503)
- When you try to use the Help button, you'll get an HTTP STatus 404 error for
/dmh2/help.jsp (it isn't available).
Apparently, this is a timing issue with WAS CE. It has a delay in deploying the
web apps once our install finishes. It takes a few minutes for it to finish that task,
but it's not obvious that's what is happening. If you immediately go stop and restart
the WAS server, it is in the middle of the deploy and things get corrupted. We have added
a delay of a few minutes at the end of the install to give WAS time to deploy. In case
you are still experiencing this problem, you might need to wait longer after our install
finishes, and check the WAS server to see that all the web apps (wsaa, wsaadistscan,
wsaaexternal, wsaahelp) have been deployed before stopping/restarting WAS.