Spreadsheet Add-in User's Guide for Excel
Before starting the tutorial, you should have a working familiarity with
the Essbase product through the use of the Essbase Spreadsheet Add-in
interface. Review in this guide "A Basic Essbase Tutorial" and "An Advanced Essbase Tutorial" as prerequisite reading.
A sample Essbase database is the basis for the examples in this
tutorial. The database administrator creates this sample Essbase
database using the sample metaoutline supplied with Essbase Integration
Services. For more information, see the OLAP Metaoutline
User's Guide. A sample Microsoft Excel file,
Essdt.xls, contains a sheet with the appropriate
member intersections for the sample drill-through report. For more
information on the sample database, Microsoft Excel file, and drill-through
report, see "About the Samples Used in This Tutorial".
If you plan to follow the examples in a live working session, check with
the person at your organization who installs the Essbase Integration Services
product family for information on the sample database you need for
drill-through, and to which Essbase server you should connect.
- Note:
- The Essdt.xls file also contains sample results of the
drill-through reports when you run them without customizing the
reports. The results are provided in separate sheets in the workbook so
that you can see the sample report results without working through the
tutorial For more information about the sample reports, see "About the Samples Used in This Tutorial".
Before starting the tutorial, make sure you meet the following
requirements:
- You must install the following components on your client PC:
- The Essbase system administrator must install the Essbase server.
- You must have access to Essbase Integration Services and to the Essbase
server. For more information, contact the Essbase system administrator
or the person who administers Essbase Integration Services at your
organization.
- You must have access to the underlying relational database (typically
using a user name and password that are different from those you use for
Essbase). For more information, contact the Essbase system
administrator or the person who administers Essbase Integration Services at
your organization.
- Make sure that the sample Excel file, Essdt.xls, is
available in the \Essbase\client\sample directory.
- In order to use the sample drill-through report,
Essdt.xls, you need to login to a machine that has both the
Essbase server and Essbase Integration Services installed. You must run
member and data load and calculate the data for the sample Essbase Integration
Services database that you will access from Essbase Spreadsheet Add-in.
- The sample database that contains the drill-through report must be set up
and running. The sample drill-through reports used in this tutorial
(called "Market Detail," "Measures Detail," and "Product
Detail") are available with the sample database. Contact the person
at your organization who installs Essbase Integration Services to find out the
name of the sample database needed for drill-through.
- Note:
- For more information on Essbase Integration Services installations, see the
Installation Guide. For more information on
Essbase installations, see the Installation
Guide.
Keep in mind the following guidelines during the tutorial:
- Each tutorial task builds upon the previous one, and tasks must be
followed in succession.
- Tasks that should not be performed as part of the tutorial are
displayed in gray boxes. These tasks are included for your
reference. You can find more information on these tasks in the
Drill-Through online help.
- The examples used in this tutorial are based on the sample database that
is included with the Essbase Integration Services installation. Contact
the person at your organization who installs Essbase Integration Services for
information about accessing the sample database.
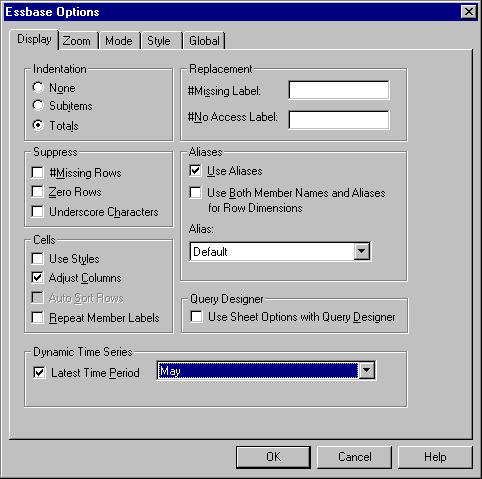
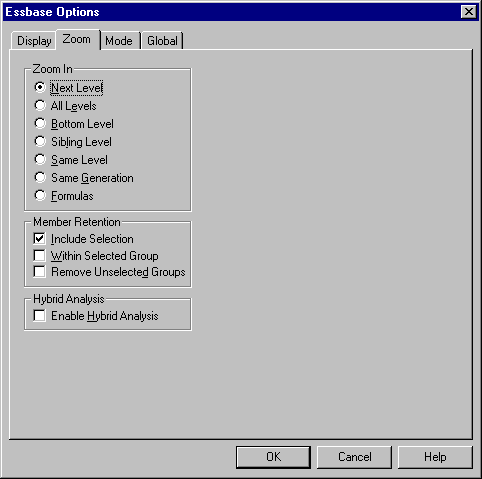
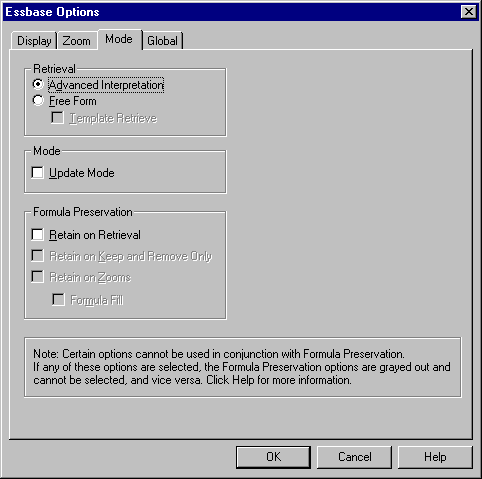
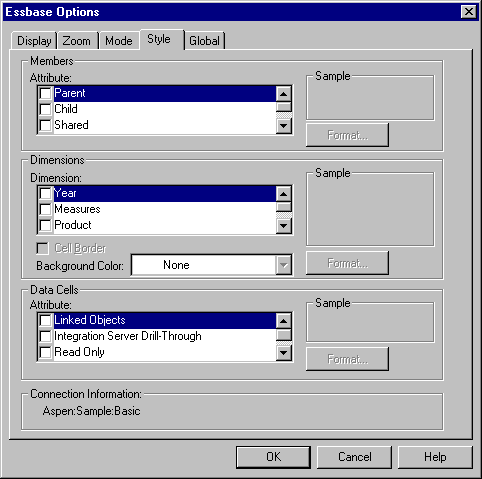
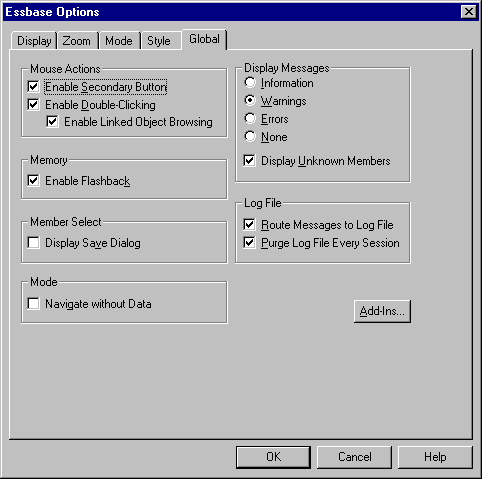
- Set the options in the Essbase Options dialog box as described in the
following section, "Setting Essbase Options". If the option settings are different, the illustrations
presented in this chapter may not match the spreadsheet view.
- If you make a mistake during the tutorial, select Essbase > FlashBack
to return to the previous spreadsheet view.
Before you begin the tutorial, make sure that the spreadsheet options are set
to the initial settings, as illustrated in Figure Figure 173 through Figure Figure 177. If your option settings are
different, the illustrations presented in this chapter may not match the
spreadsheet view.
- Note:
- For information about each option in the Essbase Options dialog box, click
Help to see the Essbase Spreadsheet Add-in online help.
To set Essbase options:
- From the spreadsheet menu, select Essbase > Options.
- In the Essbase Options dialog box,
select the Display tab.
- Select the appropriate check boxes and option buttons so that your display
matches the following illustration:
Figure 173. Initial Settings for Display Options
- Select the Zoom
tab.
- Select the appropriate check boxes and option buttons so that your display
matches the following illustration:
Figure 174. Initial Settings for Zoom Options
- Select the Mode tab.
- Select the appropriate check boxes and option buttons so that your display
matches the following illustration:
Figure 175. Initial Settings for Mode Options
- Select the Style tab.
- Select the appropriate check boxes and option buttons so that your display
matches the following illustration:
Figure 176. Initial Settings for Style Options
- Select the Global tab.
- Select the appropriate check boxes and option buttons so that your display
matches the following illustration:
Figure 177. Initial Settings for Global Options
- Click OK to save the settings for this session and close the
Essbase Options dialog box.
The sample database used for this tutorial contains the following
dimensions: Scenario, Product, Market, Measures, and Year. The
sample Excel file shown in Figure Figure 178 provides a particular view from this database:
Figure 178. View from Sample Database
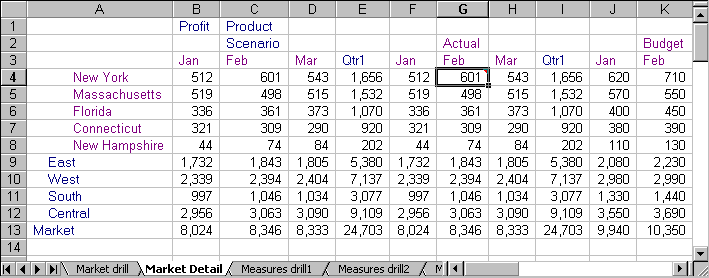
For this spreadsheet view, detail-level data exists in a relational data
source--data that is not available from Essbase. For example, the
relational source contains columns of data for market detail, measures detail,
and product detail. This tutorial walks you through a sample
drill-through session, where you will drill down from the data shown in Figure
Figure 178 into the detail data from the relational source.
This tutorial uses two sample drill-through reports, "Measures
Detail" and "Market Detail." As with all drill-through
reports, these reports have been predefined to retrieve specific columns from
the relational source. You will use the Drill-Through Wizard to
customize the report, "Measures Detail."
- Note:
- The sample file also contains two more sample reports called "Product
Detail" and "Two reports" that you can use for drill-through
practice. In "Two reports," select the drill-through cell B3 to
select from two drill-through reports, "Product Detail" and Market
Detail, select cell B6 to view "Market Detail," and cell G3 to view
"Product Detail."
In addition to the sample drill-through reports,
Essdt.xls provides sample results of the drill-through
reports. The following list describes the drill-through results that
are provided:
- The Market Detail drill tab displays the results for Market Detail when
you run a drill-through report on cell G4 without customizing the
report.
- The Measures Detail drill1 tab displays the results for Measures Detail
when you run a drill-through report on cell C4 without customizing the
report.
- The Measures Detail drill2 tab displays the results for Measures Detail
when you run a drill-through report on cell G6 without customizing the
report.
- The Product Detail drill tab displays the results for Product Detail when
you run a drill-through report on cell D5.
[ Top of Page | Previous Page | Next Page | Table of Contents | Index ]
