Spreadsheet Add-in User's Guide for Excel


Selecting Members

A Essbase database may contain hundreds or even thousands of members, making it difficult to remember each member name. You can use the Essbase Member Selection dialog box to find and select members and to define the layout of members in the worksheet. In addition, you can use Boolean operators, such as AND, OR, and NOT, or other search parameters to specify criteria and conditions that members must meet for the member selection. Member selection is an important method of creating a spreadsheet report for the data you want to retrieve.

Note:
For complete information on the Essbase Member Selection dialog box, see the Essbase Spreadsheet Add-in online help.

To view specific members from the Product dimension:

  1. To open a new worksheet, select File > New or click the icon.
    Note:
    You should be connected to the Sample Basic database. If you are not connected, follow the steps in "Connecting to a Database".
  2. Select Essbase > Retrieve.
  3. Select Product and select Essbase > Pivot to display Product as a row, rather than a column, dimension.

    Figure 69. Initial Worksheet for Member Selection


  4. Select Product again, and select Essbase > Member Selection.

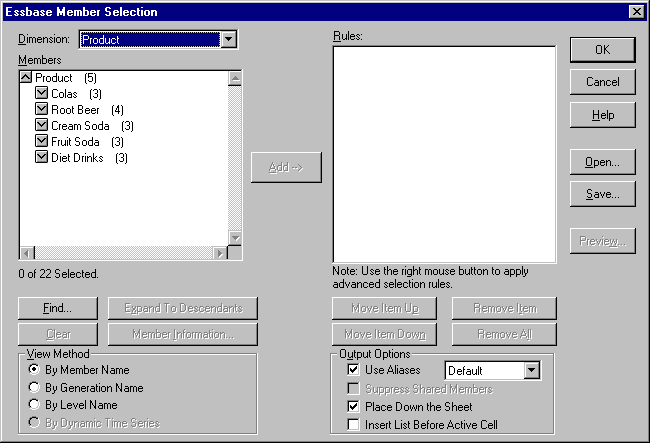
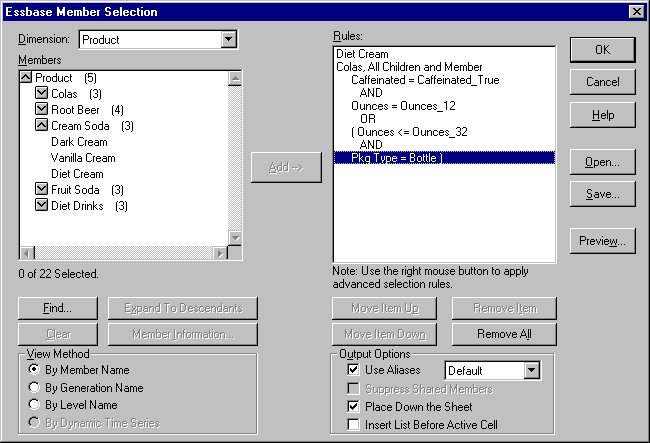
    Essbase displays the Essbase Member Selection dialog box. In the Essbase Member Selection dialog box, Essbase displays the Product dimension in the Dimension list box and its children, Colas, Root Beer, Cream Soda, Fruit Soda, and Diet Drinks, in the Members list box.

    Figure 70. Essbase Member Selection Dialog Box


  5. Select Colas and click the Member Information button.

    Essbase displays the Member Information dialog box. The dialog box provides information about the selected member, such as dimension, generation, level, storage setting, formula, UDAs, and member comments.

    Figure 71. Member Information Dialog Box


  6. To close the Member Information dialog box, click OK.
  7. In the Essbase Member Selection dialog box, click Add to add Colas to the Rules list box.
    Note:
    Alternatively, you can double-click an item in the Members list box to add the item.
  8. Select Cream Soda, and click the Find button.

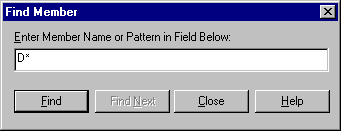
    Essbase displays the Find Member dialog box.

    In the Find Member dialog box, you can do pattern-match searches for members in the selected dimension. You can use Wildcard patterns--(trailing asterisk, *) and (single-character match, ?). Hyperion Essbase locates the members that match the text string (in alphabetical order) and keeps them selected so that they can be selected as a group.

    Note:
    You can use the trailing asterisk wildcard and single-character wildcard in the text string. The * wildcard replaces a string of characters, whereas the ? wildcard replaces a single character. J?n and 100* are examples of valid wildcard strings; *-10 and J*n are examples of invalid wildcard strings.
  9. In the Find Member dialog box, type D* in the text box.

    Figure 72. Find Member Dialog Box


  10. Click Find to locate all members that match D*.

    Essbase locates and selects Diet Cream. Its parent, Cream Soda, is also selected because it was highlighted before the search.

  11. To close the Find Member dialog box, click Close.
  12. Clear Cream Soda, leaving only Diet Cream selected, and click Add. Essbase displays Colas and the new selection, Diet Cream, in the Rules list box.
  13. In the Essbase Member Selection dialog box, select Colas in the Rules list box, and then right-click. From the pop-up menu, select All Children and Member.

    Essbase displays All Children and Member next to Colas in the Selection Rules list box.

  14. In the Selection Rules list box, select Colas, All Children and Member, and then right-click again.
  15. From the pop-up menu, select Subset.

    Essbase displays the Subset Dialog box, where you can further define conditions for the selected member.

    Note:
    You can define a maximum of 50 conditions in the Subset Dialog box.
  16. In the Subset Dialog box, in the first list box, select Caffeinated. In the second list box, select Is. In the third list box select Caffeinated_True.
  17. Click the Add as AND Condition button.

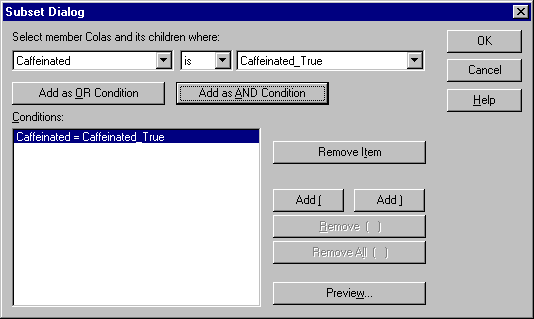
    Essbase displays Caffeinated = Caffeinated_True in the Conditions list box.

    When you use Add as AND Condition, the subsetting condition in the Conditions list box is evaluated using AND logic. AND logic means that the selection must meet the current condition and the following condition in the Conditions list box.

    Figure 73. Subset Dialog Box (Before Adding Conditions)


  18. In the first list box, select Ounces. In the second list box, select the logical operator "=". In the third list box, select Ounces_12.
  19. Click the Add as AND Condition button.

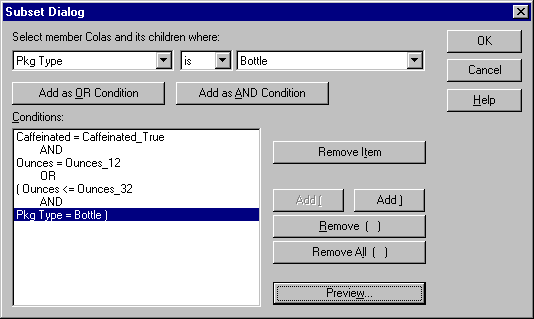
    Essbase displays Ounces = Ounces_12 in the Conditions box.

  20. In the first list box, select Ounces. In the second list box, select the logical operator "<=". In the third list box, select Ounces_32.
  21. Click the Add as OR Condition button.

    Essbase displays Ounces <= Ounces_32 in the Conditions box.

    When you use the Add as OR Condition, the subsetting condition in the Conditions list box is evaluated using OR logic. OR logic means that the selection must meet the current condition or the following condition in the Conditions list box.

  22. In the first list box, select Pkg Type. In the second list box, select Is. In the third list box, select Bottle.
  23. Click the Add as AND Condition button.

    Essbase displays Pkg Type = Bottle in the Conditions list box.

  24. In the Conditions box, select Ounces <= Ounces_32, and then click the Add ( button.
  25. Select Pkg Type = Bottle, and click the Add ) button.

    The Add ( and Add ) buttons add a left parenthesis and right parenthesis, respectively, to selected items. Use parentheses for grouping multiple subsetting conditions to determine the order of priority for analyzing the conditions. Each item in the Conditions list box can have either the left or right parenthesis, but not both. In this example, Essbase first evaluates members that are equal to or less than 32 ounces and are packaged in a bottle. Essbase then evaluates the results from this condition against members that are 12 ounces.

    Note:
    Use the Remove ( ) button to remove an individual group of parentheses from a selected item in the Conditions list box. Use the Remove All ( ) button to remove all parenthetical groupings from the Conditions list box.

    The Subset Dialog box is displayed as follows:

    Figure 74. Subset Dialog Box (After Adding Conditions)


  26. To open the Member Preview dialog box, click Preview.

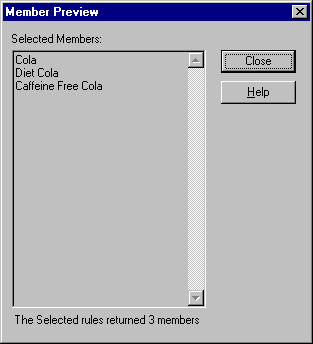
    In the Member Preview dialog box, you can view the member selection that results from the conditions you defined.

    Figure 75. Member Selection That Results from Subsetting Conditions


  27. To close the Member Preview dialog box, click Close.
  28. To close the Subset dialog box and return to the Essbase Member Selection dialog box, click OK.

    The conditions you set in the Subset dialog box are displayed in the Selection Rules list box.

  29. To change the order in which Diet Cream is displayed in the worksheet, select Diet Cream and click the Move Item Up button.

    Each time you click the Move Item Up or Move Item Down button, the selected item and its associated subset conditions move up or down one position in the Selection Rules list box. You can move only the top-level item (the item you added from the Members list box), not the individual subset conditions.

    Figure 76. Selecting Members Completed


  30. To preview the members that will be retrieved in the worksheet, click Preview.

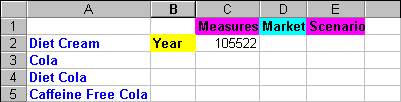
    Essbase displays the Member Preview dialog box.

  31. After previewing the list, click Close.

    Figure 77. Members to be Retrieved in Worksheet


  32. To close the Essbase Member Selection dialog box and insert the new members into the worksheet, click OK.

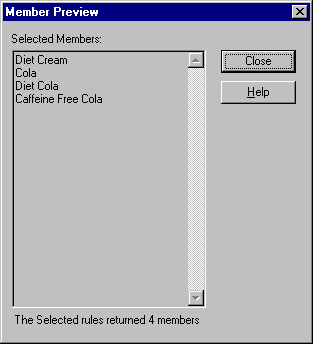
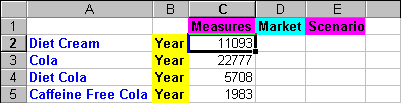
    Figure 78. Result of Selecting Members


    Note:
    The FlashBack command cannot undo a Member Selection action.
  33. Starting with Diet Cream, type Year next to each product.

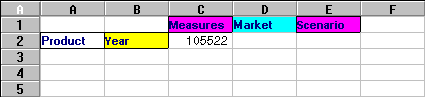
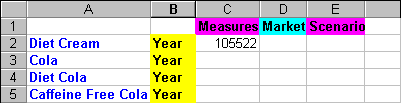
    You need to do this step so that every product has a matching Year dimension associated with it in the report.

    Figure 79. Worksheet After Adding the Year Dimension to All States


  34. To update the values in the worksheet, select Essbase > Retrieve.

    Essbase retrieves data for the members that you selected and also applies the styles you previously set.

    Figure 80. Result After Retrieving with Member Selection


[ Top of Page | Previous Page | Next Page | Table of Contents | Index ]