
Perform the steps in this chapter to enable the VMDSS code onto the service and production disks and to configure a database machine (SQLMACH) for VMDSS.
Before beginning, make sure that you have completed the following:
__ 1. | |
__ 2. | Make sure that you have installed DB2 Server for VM Version 7 Release 1 with at least one 7.1.0 database available. You need this database to verify the enabling of VMDSS. |
__ 3. | Decide whether you will configure the database machine for ESA or XC mode. |
__ 4. | Make sure you have enough space on DASD to complete every step. |
__ 5. | Decide whether you will resave DB2 Server for VM components in saved segments after you enable. |
__ 6. | Read the DB2 Server for VM Program Directory to check for any prerequisite Program Temporary Fixes (PTFs) that need to be installed. |
__ 7. | See whether there is any additional Preventive Service Planning (PSP) information that you should be aware of. Check with your IBM Support Center or use IBMLink (ServiceLink).
|
Notes:
|
Figure 35. Typical DB2 Server for VM System Setup
|
Perform the following steps to:
Log onto the MAINT machine.
Skip this step if you plan to configure your database machine for ESA mode or if you already updated the CP directory for XC mode when you planned the initial install of DB2 Server for VM.
To use all the VMDSS functions, you must add the statements shown in Figure 36 to the CP directory entry for the database machine.
Figure 36. Additional Directory Control Statements for the Database Machine
 |
The value in this example, 1022, is the upper limit for these parameters. Since there is no cost in setting this value high, the value 1022 should be acceptable for most applications. To precisely calculate the maximum number of data spaces that your database machine will use, refer to Appendix B, Determining Number of Data Spaces.
TOTSIZE specifies the maximum total size, in bytes, of all the data spaces that the database machine can create and have existing concurrently.
Since each data space is 2GB, your maximum total size for 1022 data spaces will be 2044GB. For a description of how to precisely calculate the maximum total size of the data spaces for your database, refer to Appendix B, Determining Number of Data Spaces.
For more information on the MACHINE and XCONFIG directory statements, refer to the VM/ESA: Planning and Administration.
When you have finished adding the CP directory control statements for the database machine, update the CP directory using your current operating procedures.
Log off the MAINT machine.
Log onto the database machine (SQLMACH). Refer to SQLMACH Database Machine for information on this virtual machine.
While installing VMDSS does not affect the data in your database, it is always good practice to archive your database before installing new code or applying service. If you do not archive your database on a regular basis, LOGMODE=Y or N (Y is the default), skip this step.
If your application server is currently running with LOGMODE=L or A, you can perform a user archive or a database archive. To create a database archive, type:
SQLEND ARCHIVE
As with any archive, the database manager requests that you mount the required tape volume to contain the database archive (or log archive, if LOGMODE=L, and you are not archiving the log to disk). The database manager then creates the archive. When the database manager prompts you to mount and ready the archive volume, you should respond with the virtual device number. Unless you have issued your own CMS FILEDEF command before starting the database manager, the virtual device number for database archives is 181. The virtual device number for log archives is 183.
For more information on the SQLEND command, or information on user archives, refer to DB2 Server for VM System Administration.
To enable (or remove) the VMDSS code, perform the following steps on the database machine user ID. These steps must be performed on every database machine on which you wish to use VMDSS.
     LINK machid 195 195 W
     LINK machid 193 193 W
     ACCESS 195 Q
     ACCESS 193 V
If you are using SFS directories instead of minidisks, access them with file modes Q and V.
>>-ARISDBMA----DSS(-+-Y-+--)-----------------------------------><
                    '-N-'
|
Specify the following parameters:
For example, to identify that you want to enable or disable the DSS code, type:
     ARISDBMA DSS(Y)
     ARISDBMA DSS(N)
Log off the database machine.
Log onto the DB2 Server for VM Installation user ID, 5697F42S.
Rebuild the database manager with VMDSS by link-editing the DBSS component in the ARISQLLD loadlib.
vmfsetup 5697F42S {DB2VM|DB2VMSFS}
5697F42S is the PPF that was shipped with the product. If you have your own PPF override, substitute that name for 5697F42S shown in this command. You also need to substitute your PPF name in the VMSES/E commands in any subsequent steps.
Use DB2VM for installing on minidisks or DB2VMSFS for installing in Shared File System directories.
vmfbld ppf 5697F42S {DB2VM | DB2VMSFS} ARIBLLLD ARISQLDS (all
vmfview build
Use DB2VM for installing on minidisks or DB2VMSFS for installing in Shared File System directories.
ARIBLLLD is the name of the VMSES/E build list used to build the ARISQLLD LOADLIB.
Review the build message log ($VMFBLD $MSGLOG). If necessary, correct any problems before you continue. Use the F2 key, ALL, to review all of the messages.
| Note: | The following message is normal if you are NOT running DB2 Server
for VM with the DB2 Data Spaces Support:
VMFLLB2074I Part xxxxxxx TXT in object ARISQLDS
            in build list ARIBLLLD
            EXEC will be ignored
|
vmfbld ppf 5697F42S {DB2VM | DB2VMSFS} (serviced
vmfview build
Use DB2VM for installing on minidisks or DB2VMSFS for installing in Shared File System directories.
Review the build message log ($VMFBLD $MSGLOG). If necessary, correct any problems before you continue.
link SQLMACH 195 295 MR
acc 295 l
link SQLMACH 193 293 MR
acc 293 m
You will be prompted for the password to the disks.
Substitute your minidisk addresses, if different.
Substitute in the appropriate SFS directory names.
You also need to substitute your minidisk addresses or SFS directory names in the VMSES/E commands in any subsequent steps.
access 195 i
vmfcopy arisqlld L* i = = l (prodid 5697F42S%DB2VM olddate replace
access 193 j
vmfcopy arisqlld L*  j = = m (prodid 5697F42S%DB2VM olddate replace
The VMFCOPY command updates the VMSES PARTCAT file on the production disk (195) and the service disk (193).
access 5697F42S.sql.production i
access SQLMACH.sql.production l
vmfcopy arisqlld L*  i = = l (prodid 5697F42S%DB2VM olddate replace
access 5697F42S.sql.service j
access SQLMACH.sql.service  m
vmfcopy arisqlld L*  j = = m (prodid 5697F42S%DB2VM olddate replace
The VMFCOPY command updates the VMSES PARTCAT file.
If you are using a saved segment for DBSS then you need to resave it. Use the following steps to resave the saved segment, otherwise continue with Step 11.
Before building the new DB2 Server for VM segment, following these steps:
ipl cms parm clear nosprof instseg no
| Note: | ** DO NOT press ENTER at the VM READ!** |
access (noprof
access 5e5 b
link MAINT 51d 51d mr
access 51d d
access vdev k
vdev is the address the database machine production minidisk is linked as by the installation user ID, or vdev is the name of the database machine production SFS directory. You need write access to this minidisk or directory.
set language ameng (add ari user
rel k
To build the DB2 Server for VM segments, enter the following command:
vmfbld ppf segbld esasegs segblist SQLSQLDS (serviced
If you are using a different name for the DBSS saved segment substitute your name in place of SQLSQLDS in the VMFBLD command. The ARISAVES is called by the VMFBLD command.
If you responded YES when prompted by the ARISAVES EXEC to use the saved segments you that loaded as defaults, you do not have to do this step, as ARISAVES would have generated a default bootstrap package (SQLDBA) for you. Continue with Step 11: Log off the DB2 for VM Installation User ID.
If you answered NO to the prompt, you must run the SQLGENLD EXEC to create a bootstrap package for the saved segments you loaded. To run SQLGENLD EXEC, you must log off of the installation user ID and log on to the database machine.
Because SQLGENLD prompts you for certain information about the new bootstrap, you should determine the contents of the bootstrap package before you run the SQLGENLD EXEC. For more information, see Contents of a Bootstrap Package.
A bootstrap package contains modules created by the SQLGENLD EXEC. SQLGENLD places the modules on the production minidisk (Q-disk). Note that, even though the DBSS and RDS components are loaded in different saved segments, there is only one bootstrap module for them. All of those components are needed to run the DB2 Server for VM system code in a database machine. Thus, one bootstrap identifies the location of the DBSS and RDS components.
Not all modules are needed because the database manager uses defaults when a module of a bootstrap is missing. For more information on the defaults, see Using SQLGENLD.
Figure 37 summarizes the different bootstrap modules that you can have.
Figure 37. Bootstrap Package Contents
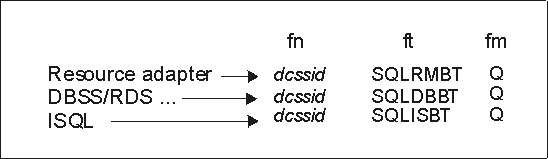 |
The dcssid (saved segment ID) is the name you give to the bootstrap package with SQLGENLD. It is the dcssid that you use in the DCSSID parameter of various IBM-supplied execs (such as, SQLSTART or SQLINIT). When dcssid is specified in a DCSSID parameter, the bootstrap package production disk entries are copied to the execution machine's A-disk as shown in Figure 38.
Figure 38. Bootstraps Copied to the Execution Machine A-disk
The resource adapter bootstrap is incomplete when it is copied to the A-disk of the user machine. It is completed when the user runs the SQLINIT EXEC, which supplies the missing server name to be accessed.
Use SQLGENLD to generate bootstrap packages for running the database manager in saved segments. You cannot use this EXEC to generate a bootstrap package for running the database manager in a default mode. The SQLDBA bootstrap package identifies the default mode, which can be default saved segments (if you have defined them) or user free storage.
When you identify the bootstraps to be contained in the package you are creating and the location where you want them to load the code, you can use the SQLGENLD EXEC. To use SQLGENLD, obtain read access to the service minidisk by entering the following command:
access 193 v
You can run SQLGENLD only from the database machine:
sqlgenld
When it runs, the SQLGENLD EXEC obtains both read and write access to the production minidisk. Both kinds of access are available to a defined database machine. You should ensure that no other machine has write access to the production minidisk when you run SQLGENLD.
If you are running SQLGENLD from a database machine that does not own the production minidisk, SQLGENLD prompts you for the write password.
The SQLGENLD EXEC prompts you for dcssid. This is the name of the new bootstrap package. If a bootstrap package with this name already exists, SQLGENLD replaces the existing bootstraps. The EXEC does not let you replace the initial SQLDBA bootstrap package. The SQLDBA bootstrap package is used as a default by many IBM-supplied execs. Do not modify or erase the SQLDBA bootstrap package.
When you supply dcssid, SQLGENLD prompts if you want to create a resource adapter bootstrap, a DBSS/RDS bootstrap, and an ISQL bootstrap. For each bootstrap that you choose to create, you are prompted for the saved segment name (or, in the case of DBSS/RDS, names). The name is the name you used in the DEFSEG command.
The database manager prompts if you want this bootstrap package to be the default DCSSID for user machines that have a link to this production (Q) disk. Specify this as the default if you have users linking to this Q-disk who will be accessing a database machine that does not own this production (Q) disk, and if you do not have saved segments identified by the SQLDBA bootstrap package. Because the database manager provides a default DCSSID, these users are not required to specify the DCSSID parameter when they run the SQLINIT EXEC.
| Note: | The SQLDCSID DEFAULT file cannot be used by a user if the file resid SQLDBN exists on the production (Q) disk they are linked to. This is because the default bootstrap package for a database is identified in the resid SQLDBN file. The SQLDCSID DEFAULT file is used by users that are accessing an application server other than the one that owns the Q-disk to which they are linked. |
If you say that you want this bootstrap to be the default for users with a link to this production (Q) disk, a new file SQLDCSID DEFAULT will be created on the production (Q) disk to contain the default DCSSID. When the bootstraps are created, SQLGENLD places them on the production minidisk. They are then erased from the database machine A-disk.
Restart the application server in multiple user mode with the required PROTOCOL parameter.
Log off the DB2 Server for VM installation machine (if not already done).
Log onto the SQLMACH machine (if not already done).
You must now verify that you enabled the VMDSS code successfully.
Perform either Step 13A or 13B, depending on whether you chose to enable in non-XC mode or XC mode.
Check that your database machine is not in XC mode by typing #cp query set. For example:
+--------------------------------------------------------------------------------+
|#cp query set                                                                   |
|cp query set                                                                    |
|MSG ON  , WNG ON  , EMSG ON  , ACNT OFF, RUN OFF                                |
|LINEDIT ON , TIMER ON  , ISAM OFF, ECMODE ON                                    |
|ASSIST OFF           , PAGEX OFF, AUTOPOLL OFF                                  |
|IMSG ON  , SMSG ON  , AFFINITY NONE   , NOTRAN OFF                              |
|VMSAVE OFF, 370E OFF                                                            |
|STBYPASS OFF   , STMULTI OFF   00/000                                           |
|MIH OFF , VMCONIO OFF , CPCONIO OFF , SVCACCL OFF , CONCEAL OFF                 |
|MACHINE XA, SVC76 CP, NOPDATA OFF, IOASSIST OFF                                 |
|CCWTRAN ON                                                                      |
+--------------------------------------------------------------------------------+
If you are in XC mode (MACHINE XC), go to Step 2: Update the CP Directory and check that the CP directory entries listed in that step are not included in your database machines directory entries.
Start the application server in multiple user mode by entering:
SQLSTART DB(server_name)
Replace server_name with the name of your database. This name is specified in the IUCV *IDENT statement contained in the CP directory for the database machine. For more information on the SQLSTART command, refer to the DB2 Server for VSE & VM Operation manual.
For example:
+--------------------------------------------------------------------------------+
|sqlstart db(sqldba)                                                             |
|ARI0717I Start SQLSTART EXEC: 05/28/99 11:05:52 EDT.                            |
|ARI0320I The default database name is SQLDBA.                                   |
|
·
·
·
                                                                             |
|ARI2015I The storage pool specification input file was not                      |
|         found. The database manager will use the default values.               |
|ARI2020I The machine is not in XC-mode.                                         |
|         Data spaces will not be used.                                          |
|ARI2027I No storage pools will use data spaces.                                 |
|ARI0283I Log analysis is complete.                                              |
|ARI0282I LUW UNDO is completed.                                                 |
|ARI0281I LUW REDO is completed.                                                 |
|ARI0143I The application server has been initialized                            |
|         with the following values:                                             |
|         CHARNAME = INTERNATIONAL, DBCS = NO, CHARSUB = SBCS,                   |
|         CCSIDSBCS = 500, CCSIDMIXED = 0, CCSIDGRAPHIC = 0.                     |
|ARI0134I Application server FTMACH6 has been                                    |
|         identified as a global resource.                                       |
|ARI0060I database manager initialization complete.                              |
|ARI0045I Ready for operator communications.                                     |
+--------------------------------------------------------------------------------+
Note, the underlined messages show that VMDSS is installed. Because the database machine is not in XC mode, the database manager will use the standard DASD I/O system instead of Data Spaces Support. To confirm this, type counter pool 1. You should see something like the following:
+--------------------------------------------------------------------------------+
|counter pool 1                                                                  |
|Counter values at  DATE='05-28-99'  TIME='11:14:35'.                            |
|                                                                                |
|Pool No. 1:  *BLOCKIO                                                           |
|Pages looked at in the buffer  LBUFLOOK:  121                                   |
|Page reads                     PGREAD  :  26                                    |
|Page writes                    PGWRITE :  0                                     |
|IUCV *BLOCKIO I/O requests     IUCVBIO :  26                                    |
|ARI0065I Operator command processing is complete.                               |
+--------------------------------------------------------------------------------+
If *BLOCKIO appears, this tells you that the database manager is using the standard DASD I/O system for storage pool 1.
While you cannot use data spaces in non-XC mode, you can use striping. Since it is the default setting for the database manager to use striping, you should see something like the following if you type show pool 1:
+--------------------------------------------------------------------------------+
|show pool 1                                                                     |
|                                                                                |
|POOL NO.  1:     NUMBER OF EXTENTS = 2  BLK STR                                 |
|                                                                                |
|EXTENT   TOTAL   NO. OF     NO. OF     NO. OF     %                             |
| NO.     PAGES PAGES USED FREE PAGES RESV PAGES USED                            |
|   1       855         77       778               9                             |
|   2       855          0       855               0                             |
|TOTAL     1710         77      1633         20    7                             |
|ARI0065I Operator command processing is complete.                               |
+--------------------------------------------------------------------------------+
If STR appears, this tells you that the database manager is using striping for storage pool 1.
Continue with Step 14: Optional System Activities.
Check that your database machine is in XC mode by typing #cp query set. For example:
+--------------------------------------------------------------------------------+
|#cp query set                                                                   |
|CP QUERY SET                                                                    |
|MSG ON  , WNG ON  , EMSG ON  , ACNT OFF, RUN OFF                                |
|LINEDIT ON , TIMER OFF , ISAM OFF, ECMODE ON                                    |
|ASSIST OFF           , PAGEX OFF, AUTOPOLL OFF                                  |
|IMSG ON  , SMSG ON  , AFFINITY NONE   , NOTRAN OFF                              |
|VMSAVE OFF, 370E OFF                                                            |
|STBYPASS OFF   , STMULTI OFF   00/000                                           |
|MIH OFF , VMCONIO OFF , CPCONIO OFF , SVCACCL OFF , CONCEAL OFF                 |
|MACHINE XC , SVC76 CP, NOPDATA OFF, IOASSIST OFF                                |
|CCWTRAN ON                                                                      |
+--------------------------------------------------------------------------------+
If you are not in XC mode, return to Step 2: Update the CP Directory and check the CP directory entries for your database machine.
Start the application server in multiple user mode by entering:
SQLSTART DB(server_name)
| Note: | A storage pool used only for internal dbspaces and which has a dbextent on a virtual disk cannot be used with data spaces turned on for that pool. This storage pool must be specified with the BLK and SEQ options in the storage pool specification file. See Appendix A, Storage Pool Specification File Format. |
Replace server_name with the name of your database. This name is specified in the IUCV *IDENT statement contained in the CP directory for the database machine. For more information on the SQLSTART command, refer to the DB2 Server for VSE & VM Operation manual.
For example:
+--------------------------------------------------------------------------------+
|sqlstart db(sqldba)                                                             |
|ARI0717I Start SQLSTART EXEC: 05/28/99 10:51:06 EDT.                            |
|ARI0320I The default database name is SQLDBA.                                   |
|
·
·
·
                                                                             |
|ARI0015I SEPINTDB parameter value is Y.                                         |
|ARI0016I SAVEINTV parameter value is 10.                                        |
|ARI0015I MAPPING parameter value is L.                                          |
|ARI0016I TARGETWS parameter value is 32.                                        |
|ARI2015I The storage pool specification input file was not                      |
|         found. The database manager will use the default values.               |
|ARI2026I Some or all storage pools will use data spaces.                        |
|ARI0283I Log analysis is complete.                                              |
|ARI0282I LUW UNDO is completed.                                                 |
|ARI0281I LUW REDO is completed.                                                 |
|ARI0143I The application server has been initialized                            |
|         with the following values:                                             |
|         CHARNAME = INTERNATIONAL, DBCS = NO, CHARSUB = SBCS,                   |
|         CCSIDSBCS = 500, CCSIDMIXED = 0, CCSIDGRAPHIC = 0.                     |
|ARI0134I Application server FTMACH6 has been                                    |
|         identified as a global resource.                                       |
|ARI0060I database manager initialization complete.                              |
|ARI0045I Ready for operator communications.                                     |
+--------------------------------------------------------------------------------+
Note, the underlined messages show that VMDSS is installed and, because the database machine is in XC-mode, the database manager is using Data Spaces Support. To confirm this, type counter pool 1. You should see something like the following:
+--------------------------------------------------------------------------------+
|counter pool 1                                                                  |
|Counter values at  DATE='05-28-99'  TIME='10:59:24'.                            |
|                                                                                |
|Pool No. 1:  Data Spaces                                                        |
|Pages looked at in the buffer  LBUFLOOK:  121                                   |
|Pages moved from DS to buffer  DSREAD  :  26                                    |
|Pages moved from buffer to DS  DSWRITE :  0                                     |
|DS page fault notifications    DSFAULT :  6                                     |
|ARI0065I Operator command processing is complete.                               |
+--------------------------------------------------------------------------------+
If Data Spaces appears, this tells you that the database manager is using Data Spaces Support for storage pool 1.
You may now choose any of the following options:
If you want to disable VMDSS from your service and production disks perform the Steps 1-4 and 6 in the database machine (SQLMACH), and Step 5 from the installation user machine.
If you regularly archive your database, type the following at the operator console:
SQLEND ARCHIVE
For more information on the SQLEND command, refer to Step 2: Update the CP Directory or see the DB2 Server for VSE & VM Operation manual.
Accesses the DB2 Server for VM service minidisk with file mode V.
ACCESS 193 V
If you are using a service SFS directory instead of a minidisk, access it with file mode V.
Your directory disk must be formatted with a block size of 512-bytes in order for the database manager to be able to use it without VMDSS. If it is formatted with the 4KB size, you must reblock it. Follow the instructions in Reblocking the Database Directory.
To remove the VMDSS files you need to run ARISDBMA with the DSS(N) option. See Step 6: Activate VMDSS.
Rebuild the database manager without VMDSS by link-editing the DBSS component. To do the link-edit on the load library follow Step 8: Log onto the DB2 for VM Installation User ID (5697F42S) through Step 10: Resave the DBSS Saved Segment. These steps will include the rebuilding of the DBSS saved segment.
Start the application server in multiple user mode using your normal operating procedures.