This section provides an overview of QueryEnabler and the windows that open when you submit a query. Before you can submit a query that will be routed to the DB2 Query Patroller Server, you must ensure that your administrator started the server using the dqpstart command. Only an administrator has the authority to start a DB2 Query Patroller Server. For more information, refer to the DB2 Query Patroller Administration Guide.
When you submit a query from your application, provided that it exceeds the management threshold set up for your user profile by your administrator, the query is trapped by QueryEnabler and routed to the DB2 Query Patroller Server. The DB2 Query Patroller Server will search its job table to see if this query has been submitted before and if results for this query are stored in the DB2 Query Patroller database.
If the DB2 Query Patroller Server cannot find the submitted query in its jobs table, the QueryEnabler: New Query windows opens. If the submitted query exists in the job table, the QueryEnabler: Result Sets window opens.
The following sections describe each window in detail:
If you are submitting a query for the first time, the QueryEnabler: New Query window opens.
For example, assume that you enter the following commands to create a new query that will select all of the staff members associated with department 20:
   db2 terminate
   db2 connect to sample
   db2 "select * from paulz.staff where dept = 20"
After you enter this command, QueryEnabler will trap the query.
Since this query has never been run before, the QueryEnabler: New Query
window opens. For example:

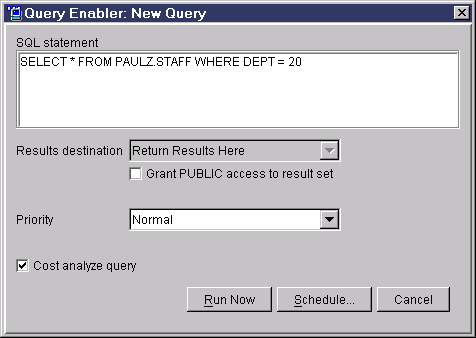
The query that you submitted is shown in the SQL statement box. From the QueryEnabler: New Query window, you can define submission options for this query and submit it to run immediately or schedule it to run at a different time.
When you submit a query, you can specify options to redirect the results of the query to a different destination, prioritize the query, or request not to have a cost analysis performed for the query (if your user profile has been given this right). You must define these options before submitting or scheduling the query to run.
If your administrator has set up alternate destinations for the result sets generated by your queries, you can click on the Results destination drop down box and select an alternative destination for the result set of this query.
If there are no alternate destinations for your queries, this field will not be available and will default to Return Results Here. This setting means that a DB2 table will be used to store the result set of your query. If you select this destination, you can grant public access to it so that all users have access to the result set by selecting the Grant PUBLIC access to result set check box.
You can optionally set the priority level of a query by clicking on the Priority drop down box and selecting the appropriate priority level. By default, there are three different priority levels: Low, Normal, and High. These priority levels are defined by the administrator of the DB2 Query Patroller Server. For more information, refer to the DB2 Query Patroller Administration Guide.
By default, the Cost analyze query check box is selected. If your administrator has set up your user profile with the right to optionally request a cost analysis, you can deselect this check box to bypass a cost analysis on the query that you are submitting. For more information, refer to the DB2 Query Patroller Administration Guide.
When a cost analysis is performed, an estimate of the query's cost is generated and compared to the User Threshold value for your user profile. Your administrator determines the user threshold level for each user in a DB2 Query Patroller environment. Only an administrator can change the user threshold defined for a user or group. For more information, refer to the DB2 Query Patroller Administration Guide.
If the estimated cost exceeds the limit set for a user, the query's status is changed to Held. If a job that you submitted is being held, you need to have an administrator or operator change the job's status using in order for the query to run. A job's status can be changed using QueryMonitor. For more information, see Introduction to QueryMonitor.
You can cancel the submission of the query by clicking on Cancel.
After you have defined all of the options for your query, you are ready to submit the query or schedule it to run at a later time. Go to the section that describes when you want to run your query:
You can select to run the query that you have
submitted. To run the submitted query immediately, click on Run
Now. The Query in Progress window opens. For
example:

The query is now under the control of the DB2 Query Patroller Server. The server will run the query as long as the costs associated with the query do not exceed the threshold set by your administrator.
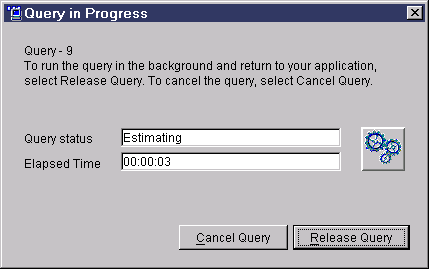
The Query in Progress window displays the status and the elapsed time of the query that you submitted. The status of the running query will be updated in the Query status field. It may take some time for the query to change states as the DB2 Query Patroller Server assigns resources and prioritizes the submitted query.
For example, the query's status may change from Estimating to Scheduled. In the Scheduled state, the query may be held until queries with a higher priority complete. Once the resources become available to run the query, the status will be changed to Running.
To continue running the query and return to your application, click on Release Query. Releasing the query returns control back to the application. The processing of the query still continues and the database on the DB2 Query Patroller Server will be updated with the query's result set.
You may want to release a query if it will take a long time to complete and you will not require the information contained in the result set immediately. If the same query were to be submitted at a later time, the DB2 Query Patroller Server would recognize this query and the QueryEnabler: Result Sets window would open. A user would then have the option to retrieve the result set associated with this query in a timely manner. If a user submitted the same query, a table scan would be run on the result table that was generated to satisfy this query when it was previously submitted.
Typically, an administrator may submit and select to release a number of queries that will be submitted by the users of the data warehouse at a later time. For details on submitting a query that has been previously processed by the DB2 Query Patroller Server, see Submitting a Query that Has Been Previously Submitted.
To cancel the query, click on Cancel.
When the processing of the query completes successfully, the result set is created as a table in the Query Patroller Server's database. If you did not release the query, the result set is returned to the application. For example:
   ID     NAME      DEPT   JOB   YEARS  SALARY    COMM
   ------ --------- ------ ----- ------ --------- ---------
       10 Sanders       20 Mgr        7  18357.50         -
       20 Pernal        20 Sales      8  18171.25    612.45
       80 James         20 Clerk      -  13504.60    128.20
      190 Sneider       20 Clerk      8  14252.75    126.50

     4 record(s) selected.
For details on how to monitor any queries that you submitted, see Introduction to QueryMonitor.
You can schedule the query that you have submitted
to run at a later time using a combination of date and time
characteristics. For example, you may want to run the query weekly,
every Monday at nine o'clock in the morning. To schedule a query,
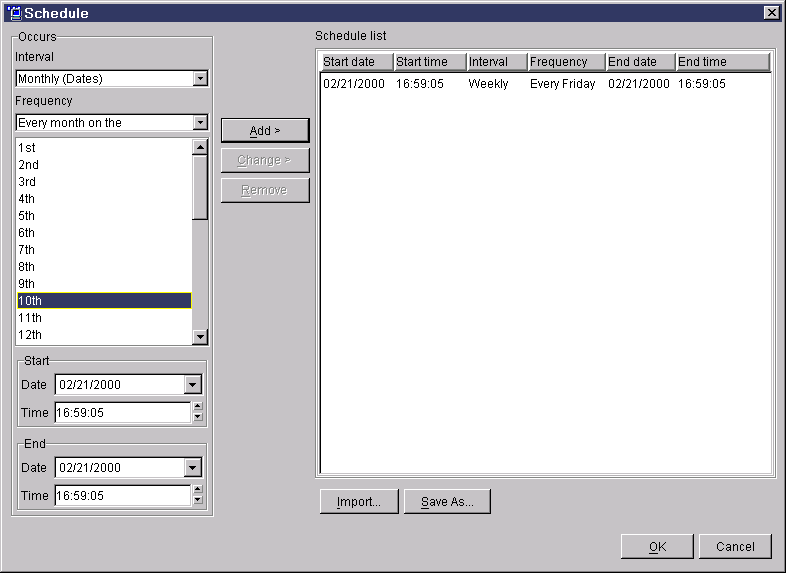
click on Schedule. The Schedule window opens. For
example:

To schedule a query, perform the following steps:
You can save a schedule that you defined for a query so that you can import the schedule at a later time and use it with the same query or a different query. This feature saves you the time of redefining often used schedules. To save a schedule, click on Save As. The schedule you defined will be saved as a schedule file, with the extension .cal. To import a defined schedule, click on Import.
Click on Cancel to cancel the scheduling of the query that you selected. You will be returned to the QueryEnabler: New Query window.
For details on how to monitor any queries that you submitted, see Introduction to QueryMonitor.
If you are submitting a query that has been submitted in the past and the query is stored in the DB2 Query Patroller Server's job table, QueryEnabler traps the query and the QueryEnabler: Result Sets window opens.
For example, assume that you enter the following commands to submit the same query that you submitted in Submitting a Query for the First Time:
   db2 terminate
   db2 connect to sample
   db2 "select * from paulz.staff where dept = 20"
After you enter this command, the query will be trapped. Since this
query has been submitted before, and it exists in the job table on the DB2
Query Patroller Server, the QueryEnabler: Result Sets window
opens. For example:

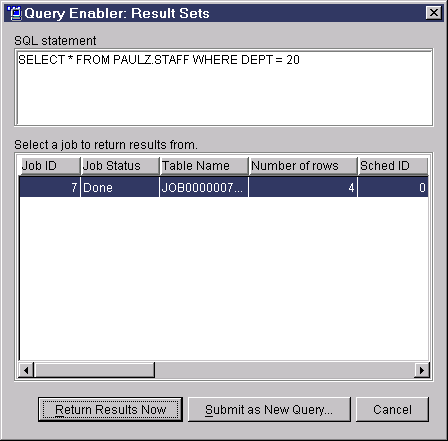
The query that you submitted is shown in the SQL statement box. From the QueryEnabler: Result Sets window, you can return the result set from a matching query that was submitted in the past, or resubmit the query and specify different submission options, or schedule it to run at a different time.
Typically, you would want to resubmit your query if the data that this query was run against has changed. For example, if you were running a query against your data warehouse to try and determine a target market for a particular product, and the data warehouse was updated with new demographic data after the original query was run, you may want to resubmit your query to leverage the updated data.
You can cancel the query that you submitted by clicking on Cancel. You can also cancel a job that is in progress. If the state of the query is Estimating, Scheduled, or Queued, you can select the job from the Select a job to return results from box, click on the right-mouse button, and select the Cancel option. Cancelling a query that has already been submitted is usually done using QueryMonitor.
To return the result set associated with this query to your application, select a job that was submitted at an acceptable time from the Select a job to return results from box and click on Return Results Now.
The Select a job to return results from box contains a list of all the jobs that contain the same query and have been submitted in the past. Jobs that completed successfully contain a time-related result set of your query based on the data in your data warehouse. Keep in mind that as the data warehouse is updated, the data in the result set may change or become out of date. When data isn't current and causes inferences that are not correct, it is often referred to as dirty. If you feel that a result set may have data that has become dirty, you can select the previously submitted job, click on the right-mouse button, and select the Drop Results option to drop the result set associated with the job.
After you click on Return Results Now, the results of your query are returned to your application. For example:
   ID     NAME      DEPT   JOB   YEARS  SALARY    COMM
   ------ --------- ------ ----- ------ --------- ---------
       10 Sanders       20 Mgr        7  18357.50         -
       20 Pernal        20 Sales      8  18171.25    612.45
       80 James         20 Clerk      -  13504.60    128.20
      190 Sneider       20 Clerk      8  14252.75    126.50

     4 record(s) selected.
If you want to resubmit your query, click on Submit as New Query. The QueryEnabler: New Query window opens. For more information, see Submitting a Query for the First Time.
For details on how to monitor any queries that you submitted, see Introduction to QueryMonitor.