
Installation and Configuration Supplement
This section describes how to set up a configure a Thin Client to run
on your network.
Before you begin the installation, be sure that you have the
following items and information:
__ 1.
| Ensure that your system meets all of the memory, hardware, and software
requirements to install your DB2 product. For more information, see Planning for Installation.
|
__ 2.
| A user account to perform the installation.
Windows 9x
| Any valid Windows 9x user.
| Windows NT
| Any user account that has the "Log on as a service" advanced
user right on the machine where the account is defined. For more
information on user rights, refer to the Windows NT online help.
|
|
To install the DB2 client on a code server,
perform the following steps:
step 1.
| Log on to the system with a user account that meets the requirements for
installing DB2 Connect Personal Edition. For more information, see Before you begin.
|
step 2.
| Shut down any programs that are running so that the setup program can
update files as required.
|
step 3.
| Insert the appropriate CD-ROM into the drive. The auto-run feature
automatically starts the setup program. The setup program will
determine the system language, and launch the setup program for that
language. If you want to run the setup program in a different language,
or the setup program failed to auto-start, see the tip that follows.

| To manually invoke the setup program, perform the following steps:
- Click on Start and select the Run option.
- In the Open field, enter the following command:
x:\setup /i language
where:
- x: represents your CD-ROM drive
- language represents the country code for your language (for
example, EN for English). Table 36 lists the code for each available language.
- Click on OK.
|
|
step 4.
| The Welcome window opens. Click on the Next push
button.
|
step 5.
| The Select Products window opens. Select the DB2 client
check box and click on the Next push button.
|
step 6.
| The Select Installation Type window opens. Click on the
Custom graphic button.
|
step 7.
| The Select Components window opens. Select the components that you
want to install. You must select the Thin Client Code Server
component to enable a Thin Client workstation to access the DB2 client on the
code server.
|
step 8.
| Respond to the setup program's remaining prompts. Online help
can walk you through the remaining steps of the installation process.
You can invoke online help by clicking on the Help push button, or
by pressing the F1 key, at any time.
|
This step describes how to set up a Windows NT
code server to service Windows 9x Thin Client workstations.
To have a Windows NT code server service a Thin Client workstation on a
Windows 9x machine, perform the following steps:
step 1.
| Create a directory on the Windows NT code server that will be used to
service Windows 9x Thin Client workstations by entering the following
command:
md d:\sqllib9x
where: d: represents a local hard drive.
|
step 2.
| Copy the DB2 client directory (for example, c:\sqllib)
into the directory that you just created by entering the following
command:
xcopy c:\sqllib\*.* d:\sqllib9x /s /e
where:
- c: represents the drive where the DB2 client was installed
- d: represents the drive where the sqllib9x
directory was created in Step 1.
|
step 3.
| Enter the c:\sqllib\bin\db2thn9x.bat command
(where c: is the drive where you installed the code server) to
enable this machine to service Windows 9x Thin Clients.
|
You now have two code bases on your Windows NT code server. If you
are installing a Thin Client workstation on a Windows NT machine, use the
Windows NT code base (for example, c:\sqllib). If you
are installing a Thin Client workstation on a Windows 9x machine, use the
Windows 9x code base (for example, d:\sqllib9x).
| If you are logged onto a Windows 9x Thin Client workstation, that is
running code off of a Windows NT code server, you must ensure that the user
account that you are logged on to the Windows 9x workstation is locally
defined on the Windows NT code server.
|
The code server must be installed in a
directory that can be accessed in READ mode by all Thin Client
workstations.
To make the code server available to all Thin Client workstations in
READ mode, perform the following steps:
step 1.
| Click on Start and select Programs->Windows
Explorer.
|
step 2.
| Select the directory where you installed the DB2 product. For
example, c:\sqllib.
|
step 3.
| Select File->Properties from the menu bar.
|
step 4.
| Select the Sharing tab.
|
step 5.
| Select the Shared As radio button.
|
step 6.
| In the Share Name field, enter a share name.
|
step 7.
| Specify READ access for all users as follows:
- Click the Permissions button. The Access Through
Share Permissions window opens.
- In the Name box, select Everyone.
- Click on the Type of Access drop down box and select
Read.
- Click on OK until all windows are closed.
|
During a regular installation, you provide the
information needed to install a DB2 client and configure its
environment. During a distributed installation, this information is
provided in the form of keywords and values in a response file. For a
DB2 client installation, there is a ready-to-use sample response file,
db2thin.rsp, with default settings for the most common
installation type.
The c:\sqllib\thnsetup directory on the code server, where
c: represents the drive where you installed the code server,
contains all the files needed to install a Thin Client workstation, including
a sample response file (called db2thin.rsp). If you
need to customize a response file, perform the following steps:
step 1.
| Open the db2thin.rsp sample response file, located in
the c:\sqllib\thnsetup directory on the code server (where
c: represents the drive where you installed the DB2
client).
The response file contains:
- Keywords unique to installation
- Registry value/environment variable settings
- Database manager configuration parameter settings.
|
step 2.
| Customize the sample response file for the installation type that you want
to perform. To activate an item in a response file:
- Remove the asterisk (*) to the left of the variable.
- Erase the current setting to the right of the equal sign (=).
- Enter the new setting to the right of the equal sign (=); possible
settings are listed to the right of the current setting.
The following is a section of the db2thin.rsp sample
response file:
* Required Global DB2 Registry Variable
* -------------------------------------
DB2INSTPROF                   = C:\CFG


* General Options
* ---------------
*TYPE                          = 0,1,2  (0=compact, 1=typical, 2=custom)
*COMP                          = ODBC_SUPPORT
*COMP                          = CONTROL_CENTER
*COMP                          = EVENT_ANALYZER
*COMP                          = WEB_ADMINISTRATION
*COMP                          = QUERYMONITOR
*COMP                          = TRACKER
*COMP                          = QUERYADMIN
*COMP                          = CLIENT_CONFIGURATION_ASSISTANT
*COMP                          = COMMAND_CENTER
*COMP                          = DOCUMENTATION
*CREATE_ICONS                  = YES or NO (default=YES)
*REBOOT                        = YES or NO
·
The TYPE keyword specifies the type of install that you
want.
- Install type 0 specifies a compact install. This option
provides you with access to the client code, but none of the other components
are accessible from the Thin Client workstation.
- Install type 1 specifies a typical install, and is the default
setting. With this option, all components defined on the code server
are accessible from the Thin Client workstation.
- Install type 2 specifies a custom install. This option
allows you to specify specific components to install. Set the
TYPE keyword to 2 (Custom Install) and activate the COMP
keyword for each component you want to be accessible from the client
workstation.
Notes:
- Currently, the DB2 Client configuration files must be stored locally in a
writable directory on the Thin Client workstation. By default, the
c:\cfg directory will be created (as specified by the
DB2INSTPROF keyword in the response file) to store the DB2 client
configuration files.
- If you want to allow any user to add a database to the system, you must
set the CATALOG_NOAUTH database manager configuration parameter to
YES in the response file or by updating the database manager
configuration file. For information on how to update this database
manager configuration parameter, refer to the Administration Guide.
- You will need to reboot the target workstation after completing the
installation. To have this done automatically, set the REBOOT
keyword to Yes.
|
step 3.
| Exit the file. If you have made any changes, save the file under a
new file name (using the file extension .rsp) to preserve
the original sample response file.
|
This step gives a Thin Client
workstation access to the DB2 client code installed on the code server.
From the Thin Client workstation, enter the net use command to
attach the shared directory that you created in Step 3. Create a Network Share on the Code Server as follows:
net use x: \\computer_name\directory_sharename /USER:domain\username
where:
- x: represents the drive used to connect to the remote
shared directory
- computer_name represents the computer name of the code server
- directory_sharename represents the shared directory on the code
server.
- domain represents the domain where the user account is
defined.
- username represents a user that has access to this
machine.
For example, to assign a shared directory called sqllib on a
machine called myserver, to the x: drive, enter the
following command:
net use x: \\myserver\sqllib
This step installs the Thin Client code on the
target workstation, and sets up the required links to the code server.
To install a Thin Client workstation, perform the following steps:
step 1.
| At the workstation where the Thin Client code will be installed, log on
with a user account that you created to perform the installation in Before you begin.
|
step 2.
| Run the setup program:
- Click Start, and select the Run option.
- In the Open field, enter the path to the thnsetup
command to install a Thin Connect workstation.
The syntax of the thnsetup command is as follows:
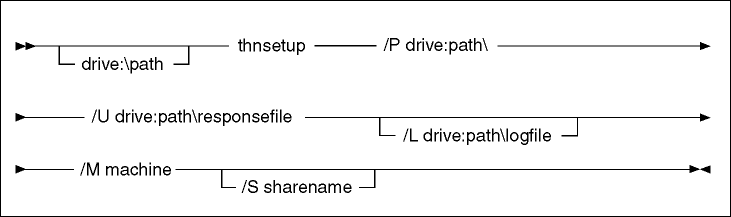
/P
| Specifies the path where the DB2 client is installed on the code
server. You can specify this parameter as a local directory (if you
have entered the net use command to attach the shared directory) or
as a share name (for example, \\myserver\sqllib). If you
specify a sharename, the setup program will implicitly perform the net
use command for you. This parameter is required.
| /U
| Specifies the fully qualified response file name. This parameter is
required.
| /L
| Specifies the fully qualified log file name, where setup information and
any errors occurring during setup are logged.
If you do not specify the log file's name, the default log file name
(db2.log) is used. This file is created in a
directory called db2log, on the drive where your operating system
is installed. This parameter is optional.
| /M
| Specifies the computer name of the code server. This parameter is
required.
| /S
| Specifies the share name of the code server drive or directory where DB2
Thin Client code server is installed. If you specify this parameter,
you will not have to perform a net use command to the code server
each time you reboot your machine.
If this share requires that a user account be entered, specify the share
name as: sharename,userid,password.
This parameter is optional.
|
For example, to install a Thin Connect workstation where the shared
sqllib directory, on a code server called myserver, is
mapped as drive x:, enter the following command:
x:\thnsetup\thnsetup /P x: /U x:\thnsetup\db2thin.rsp /M myserver
|
step 3.
| Check the messages in the log file for installation errors when the
installation finishes.
|
step 4.
| After the installation, the workstation must be rebooted before you use
the Thin Client workstation.
|
[ Top of Page | Previous Page | Next Page | Table of Contents | Index ]
[ DB2 List of Books |
Search the DB2 Books ]
