
step 1.
Install and configure the Oracle client software on the DB2 federated server using the documentation provided by Oracle.
You can use either SQL*Net or Net8 to access both Oracle Version 7 and Oracle Version 8 data sources.
Recommendation for federated servers running on UNIX platforms: | Request a relink of SQL*Net or Net8 during the installation of the Oracle client software. |
step 2.
For DB2 federated servers running on UNIX platforms, run the db2djlink.sh script to link-edit the Oracle SQL*Net or Net8 libraries to your DB2 federated server. The db2djlink.sh script is located in /install_directory/lib. Run this script only after installing Oracle's client software on the DB2 federated server.
step 3.
Set data source environment variables by modifying the DB2DJ.ini file and issuing the db2set command. The db2set command updates the DB2 profile registry with your settings.
The DB2DJ.ini file contains configuration information about the
Oracle client software installed on your federated server. In a
multiple parallel processing (MPP) environment, you can use a single
DB2DJ.ini file for all nodes in a particular instance, or you can use a
unique DB2DJ.ini file for one or more nodes in a particular
instance. In a non-MPP environment, there can be only one
DB2DJ.ini file per instance.
 | Proceed to 2 if the default settings in DJ.ini are acceptable for your configuration. |
- Edit the DB2DJ.ini file located in sqllib/cfg, and set
the following environment variables:
ORACLE_HOME
Set the ORACLE_HOME environment variable to the Oracle home directory; for example:
ORACLE_HOME=oracle_home_directory
SQL*Net and Net8 require that this variable be set prior to starting your federated instance. If this variable is changed, the federated instance must be stopped and restarted before the new ORACLE_HOME value takes effect.
If an individual user of the federated instance has the ORACLE_HOME environment variable set, it is not used by the federated instance. The federated instance uses only the value of ORACLE_HOME that you set in the DB2 profile registry.
ORACLE_BASE
For federated servers running on versions of UNIX, if you set the ORACLE_BASE variable during the installation of the Oracle client software, you should also set the ORACLE_BASE environment variable on the federated server:
ORACLE_BASE=oracle_home_directory
ORA_NLS
For federated servers running on versions of UNIX that will be accessing an Oracle 7.2 or later data source, set the ORA_NLS environment variable:
ORA_NLS=oracle_home_directory/ocommon/nls/admin/data
See Oracle Code Page Options for more information about National Language Support for Oracle data sources. TNS_ADMIN
If the SQL*Net or Net8 tnsnames.ora file resides outside the default search path, you must set the TNS_ADMIN environment variable to specify the location of the tnsnames.ora file; for example:
TNS_ADMIN=x:\path\tnsnames.ora
For Windows NT servers:
The default location of this file varies depending on the client software that is being used:
- If you are using SQL*Net, tnsnames.ora is in the %ORACLE_HOME%\NETWORK\ADMIN directory.
- If you are using Net8, tnsnames.ora is in the %ORACLE_HOME%\NET8\ADMIN directory.
For UNIX servers:
The default location of this file is $ORACLE_HOME/admin/util/network
- Issue the db2set command to update the DB2
profile registry with your changes.
If you are using this DB2DJ.ini file in a non-MPP environment, or if you want the values in this DB2DJ.ini file to apply to the current node only, issue:
db2set DB2_DJ_INI = sqllib/cfg/db2dj.ini
If you are using this DB2DJ.ini file in an MPP environment and you want the values in this DB2DJ.ini file to apply to all nodes within this instance, issue:
db2set -g DB2_DJ_INI = sqllib/cfg/db2dj.ini
If you are using this DB2DJ.ini file in an MPP environment, and you want the values in this DB2DJ.ini file to apply to a specific node, issue:
db2set -i INSTANCEX 3 DB2_DJ_INI = sqllib/cfg/node3.ini
where:
- INSTANCEX is the name of the instance.
- 3 is the node number as listed in the db2nodes.cfg file.
- node3.ini is the modified and renamed version of the DB2DJ.ini file.
step 4.
Ensure that the SQL*Net or Net8 tnsnames.ora file is updated for each Oracle server to which communications are configured.
Within the tnsnames.ora file, the SID is the name of the Oracle instance, and the HOST is the host name where the Oracle server is located.
Recycle the DB2 instance:
For Windows NT servers: |
NET STOP instance_name NET START instance_name |
For UNIX servers: |
db2stop db2start |
step 6.
Use the CREATE WRAPPER statement to define the wrapper library that will be used to access Oracle data sources. Wrappers are the mechanism that federated servers use to communicate with and retrieve data from data sources. The following example shows a CREATE WRAPPER statement:
CREATE WRAPPER SQLNET
where SQLNET is the default name of the wrapper module used with Oracle's SQL*Net client software. If using Oracle's Net8 client software, use NET8.
You can substitute the default name with a name that you choose; however, if you do so, you also must include the LIBRARY parameter and the name of the wrapper library for your DB2 server platform. See the Administration Guide, Design and Implementation for more information about wrapper library names.
step 7.
Optional: Set the DB2_DJ_COMM environment variable to include the wrapper library that corresponds to the wrapper module that you created in the previous step; for example:
db2set DB2_DJ_COMM = libsqlnet.a
The DB2_DJ_COMM environment variable controls whether a wrapper module is loaded when the federated server initializes, which can result in improved performance when the Oracle data source is first accessed. See the Administration Guide, Design and Implementation for more information about wrapper library names.
step 8.
Use the CREATE SERVER statement to define each Oracle server to which communications are configured; for example:
CREATE SERVER ORASERVER TYPE ORACLE VERSION '7.2' WRAPPER SQLNET
OPTIONS (NODE "oranode")
where:
- ORASERVER is a name that you assign to the Oracle server. This name must be unique.
- ORACLE is the type of data source to which you are configuring access.
- 7.2 is the version of Oracle that you are accessing.
- SQLNET is the wrapper name that you defined in the CREATE WRAPPER statement.
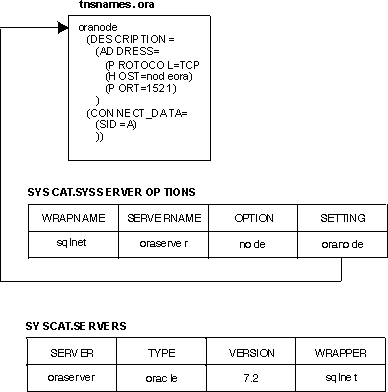
- oranode is the name of the node where ORASERVER
resides. Obtain the node value from the tnsnames.ora
file. This value is case sensitive. Figure 4 illustrates the relationship of the node option and the
tnsnames.ora file.
Although the node value is specified as an option, it is required for Oracle data sources. See the SQL Reference, Volume 2 for a comprehensive list of options.
Figure 4 shows the information in the tnsnames.ora file, the SYSCAT.SERVEROPTIONS view, and the SYSCAT.SERVERS view.
Figure 4. Relationship between DB2 System Files and the Oracle tnsnames.ora File
If a user ID or password at the federated server is different from a user ID or password at an Oracle data source, use the CREATE USER MAPPING statement to map the local user ID to the user ID and password defined at the Oracle data source; for example:
CREATE USER MAPPING FOR DB2USER TO SERVER ORASERVER
OPTIONS ( REMOTE_AUTHID "orauser", REMOTE_PASSWORD "dayl1te")
where:
- DB2USER is the local user ID that you are mapping to a user ID defined at an Oracle data source.
- ORASERVER is the name of the Oracle data source that you defined in the CREATE SERVER statement.
- orauser is the user ID at the Oracle data source to which you
are mapping DB2USER. This value is case sensitive.
Restriction:
The Oracle user ID (at the Oracle data source, not at the DB2 federated server) must have been created using the Oracle create user command with the 'identified by' clause, instead of the 'identified externally' clause.
- dayl1te is the password associated with "orauser". This value is case sensitive.
Use the CREATE NICKNAME statement to assign a nickname to a view or table located at your Oracle data source. You will use this nickname when you query the Oracle data source. The following example shows a CREATE NICKNAME statement:
CREATE NICKNAME ORASALES FOR ORASERVER.SALESDATA.MIDWEST
where:
- ORASALES is a unique nickname for the Oracle table or view.
- ORASERVER.SALESDATA.MIDWEST is a three-part
identifier that follows this format:
data_source_name.remote_schema_name.remote_table_name
See the SQL Reference, Volume 2 for more information about the CREATE NICKNAME statement.
See the Administration Guide, Design and Implementation for more information about nicknames in general.
step 11.
Repeat the previous step for all database objects that you want create nicknames for.
step 12.
For each HOST in the DESCRIPTION section of the tnsnames.ora file, update /etc/hosts for UNIX servers and the TCP/IP hosts file for Windows NT servers if necessary.
Whether you must update /etc/hosts or the TCP/IP hosts file depends on how TCP/IP is configured on your network. Part of the network must translate the remote host name specified in the DESCRIPTION section in the tnsnames.ora file ("oranode" in the example) to an address. If your network has a name server that recognizes the host name, you do not need to update /etc/hosts or the TCP/IP hosts file. Otherwise, you need an entry for the remote host. See your network administrator to determine how your network is configured.