Use the completed worksheet in Table 9 to configure DB2 Connect APPC
communications for access to a remote host or AS/400 database server.
|
| Go to the sections that describe how to configure APPC communications on the platforms that are present in your network: |
Read this section if you have a Windows NT workstation that has IBM eNetwork Communications Server for Windows NT SNA API Client Version 5.0 or higher installed and you want to connect to an IBM eNetwork Communications Server for Windows NT server.
The Communications Server for Windows NT server and its SNA API client act as a split client. This configuration requires that you have an APPC-enabled application (such as DB2 Connect) running on the SNA API client workstation.
 | The instructions in this section use a Windows NT client. The instructions for other supported operating systems are similar; refer to your Communications Server for Windows NT documentation for more information. |
To configure the Windows NT SNA API client for APPC communications, complete the following steps:
Step 1. | Create a user account for the SNA API client on the Communications Server for Windows NT server
|
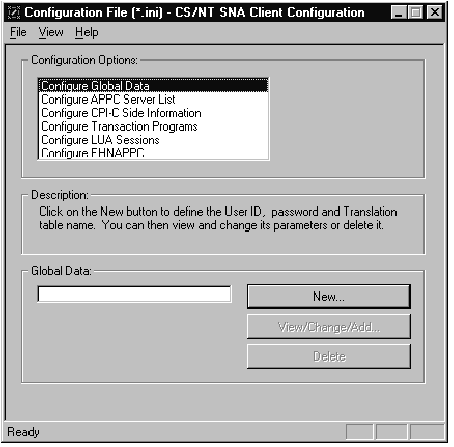
Step 2. | Start the configuration GUI for the IBM eNetwork CS/NT SNA API
Client. Click on the Start push button and select
Programs->IBM Communications Server SNA
Client->Configuration. The CS/NT SNA Client Configuration window
opens.
|
Step 3. | Configure Global Data
|
Step 4. | Configure APPC Server List
|
Step 5. | Configure CPI-C Side Information
|
Step 6. | Save the Configuration
|
|
| You now need to update the DB2 directories, bind utilities and
applications to the server, and test the connection.
The easiest way to do this is to use the Client Configuration Assistant (CCA). For more information on using the CCA, go to Configuring DB2 Connect to Host or AS/400 Communications Using the CCA. However, you can also perform these steps manually, as described in Step 3. Catalog the APPC or APPN Node and the sections that follow. |
This section describes how to configure Microsoft SNA Server Version
4.0 for Windows NT on your DB2 Connect workstation to connect to host
or AS/400 database servers using APPC. Although Microsoft SNA Server
will run on Windows NT 4.0 Workstation, Windows NT 4.0 Server is
recommended.
|
| For instructions on how to configure Microsoft SNA Client for Windows NT, go to Configuring Microsoft SNA Client. |
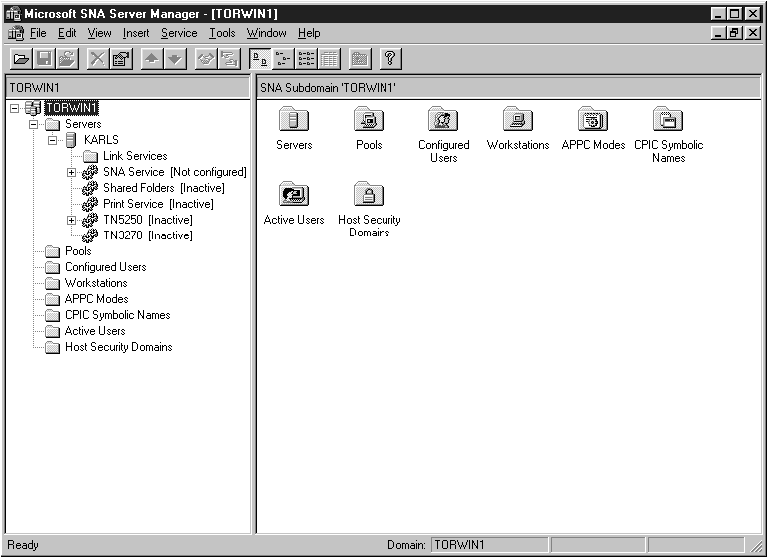
You can define the properties of your SNA connections in the Microsoft SNA Server Manager (Server Manager). The Server Manager uses an interface similar to that of the Windows NT Explorer. The following illustration shows the interface. There are two panes in the main window of the Server Manager. All the configuration options we will be using can be accessed by right-clicking on objects in the left-hand pane of the window. Every object has a context menu that you can access by right-clicking on the object.
To configure APPC communications for use by DB2 Connect using Microsoft SNA Server Manager, perform the following steps:
Step 1. | Start the Server Manager by clicking on the Start button and
selecting Programs->Microsoft SNA Server->Manager. The
Microsoft SNA Server Manager window opens.
| ||
Step 2. | Define the control point name
| ||
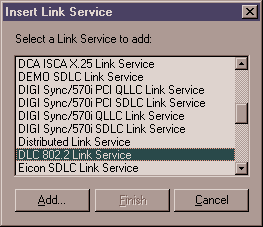
Step 3. | Define the link service (802.2)
| ||
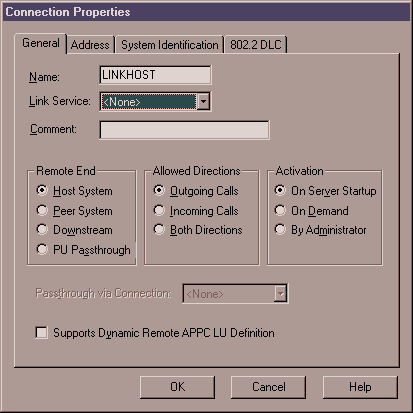
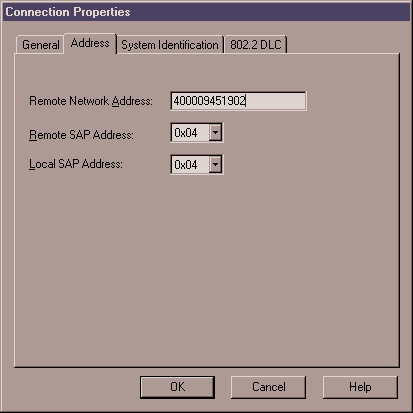
Step 4. | Define the connection properties
| ||
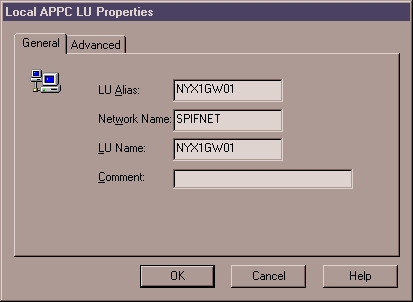
Step 5. | Define a local LU
| ||
Step 6. | Define a remote LU
| ||
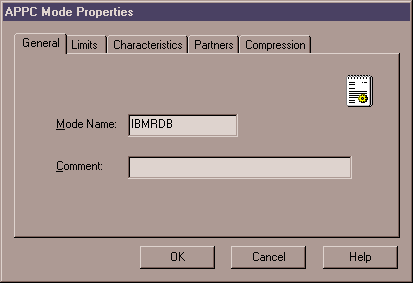
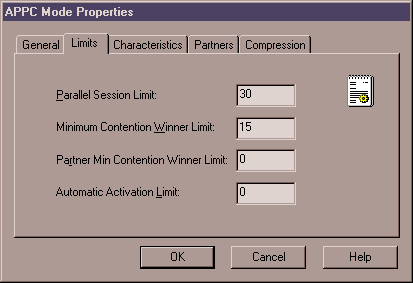
Step 7. | Define a mode
| ||
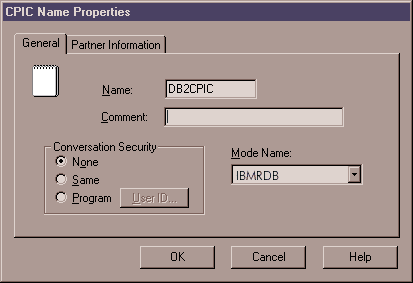
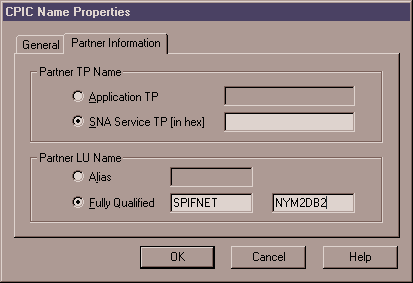
Step 8. | Define the CPIC name properties
|
Read this section if you have a Windows NT workstation that
has DB2 Connect installed. This section provides step-by-step
instructions for setting up the communications between your DB2 Connect
workstation and a Windows NT workstation that has Microsoft SNA Server
V4.0 (or later) installed.
|
| For instructions on how to configure Microsoft SNA Server Version 4.0 for Windows NT, go to Configuring Microsoft SNA Server for Windows NT. |
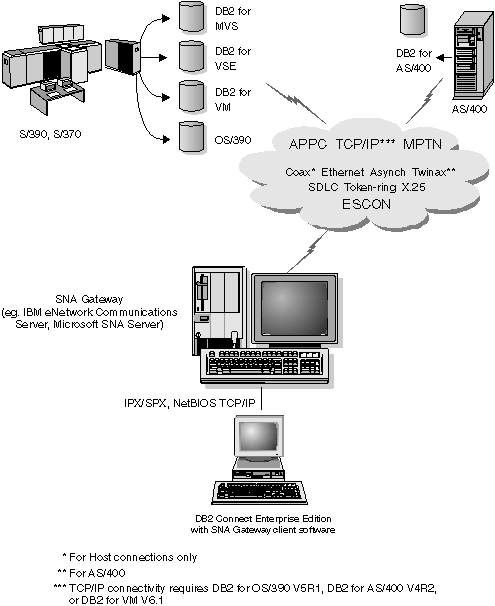
Figure 11 illustrates the example DB2 Connect Server scenario.
Figure 11. Indirect Connection to host or AS/400 database server via SNA Communications Gateway
 |
The rest of this section assumes:
To configure the Microsoft SNA client perform the following steps:
For your Microsoft SNA client software to function properly you must have access to a properly configured Microsoft SNA Server. Request that your SNA Server administrator:
Step 1. | Obtain the proper license for you to use Microsoft SNA Client on your workstation. |
Step 2. | Define a user ID and password for you on the SNA Server domain. |
Step 3. | Define connections to the host and AS/400 databases that you need to access, as described in Configuring Microsoft SNA Server for Windows NT. |
Step 4. | Provide you with the symbolic destination name ((16)), database name ((5)), and user account to use for each database connection defined in the previous step. If you plan to change host passwords, the SNA administrator will also need to provide you with symbolic destination names for password management tasks on each host. |
Step 5. | Provide you with the Microsoft SNA Server domain name and the protocol used for communicating with the SNA server (TCP/IP, NetBEUI, IPX/SPX).
|
Step 1. | Install DB2 Connect. | ||||
Step 2. | Open the DB2 Folder, and click on the Client Configuration Assistant to start the configuration dialog. | ||||
Step 3. | Click on the Start button and select Programs->DB2 for Windows NT->Client Configuration Assistant. | ||||
Step 4. | You need to provide the following information:
|
|
| You now need to update the DB2 directories, bind utilities and
applications to the server, and test the connection.
The easiest way to do this is to use the Client Configuration Assistant (CCA). For more information on using the CCA, go to Configuring DB2 Connect to Host or AS/400 Communications Using the CCA. However, you can also perform these steps manually, as described in Step 3. Catalog the APPC or APPN Node and the sections that follow. |