Quick Beginnings for DB2 Connect
Use the completed worksheet in Table 5 to configure DB2 Connect APPC
communications for access to a remote host or AS/400 database server.

| Go to the sections that describe how to configure APPC communications on
the platforms that are present in your network:
|
Before you begin, ensure that the IBM eNetwork
Communications Server for Windows NT (CS/NT) you installed meets the following
requirements:
__ 1.
| It is Version 5.0 or higher if you are planning to update multiple
databases within the same transaction; if you are planning to use 2-phase
commit then Version 5.01 of CS/NT is required
|
__ 2.
| The IBM Communications Server IEEE 802.2 LAN interface was
installed (this is an installation option for Communications Server)
|
__ 3.
| The APAR fixes JR11529 and J$11170 were applied. These fixes are
required to enable cancelling of queries in progress by using Ctrl-BREAK or
issuing the SQLCancel ODBC/CLI call.
|
__ 4.
| The LLC2 driver was installed from the CS/NT installation
directory. During installation CS/NT asks if you want to install
LLC2. If you are not sure whether LLC2 was installed with your copy of
CS/NT, you can find out as follows:
- Click on the Start push button, then select
Settings->Control Panel.
- Double-click on the Network icon.
- On the Network window, click on the Protocols tab.
IBM LLC2 Protocol must be one of the protocols listed. If it
is not, you need to install this protocol from your IBM Communications Server
for Windows NT software. Refer to documentation supplied with CS/NT for
instructions.
|
To start IBM eNetwork Personal Server, perform the following steps:
Step 1.
| Click on the Start button and select Programs->IBM
Communications Server-> SNA Node Configuration. The IBM
Communications Server SNA Node Configuration window opens.
|
Step 2.
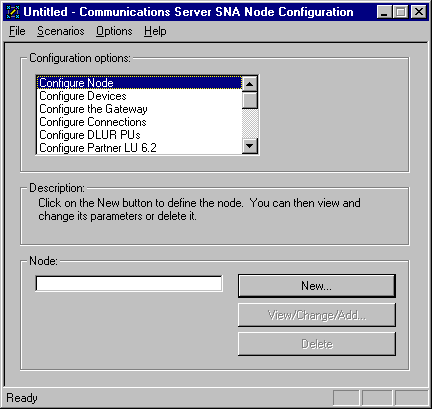
| Select File->New->Advanced from the menu bar. The
Configuration options window opens. Subsequent steps will
begin from this window.
|
To configure IBM eNetwork Personal Server for APPC communications, complete
the perform the following steps:
Step 1.
| Configure Node
- In the Configuration options field, select Configure
Node, then click on the New push button. The Define
the Node window appears.
- In the Fully qualified CP name fields, type in the network name
((9)) and the local control point name ((10))
(SPIFNET.NYX1).
- Optionally, in the CP alias field, type in a CP alias.
If you leave this blank the local control point name ((10)) will be
used (NYX1).
- In the Local Node ID fields, type in the block ID ((13))
and the physical unit ID ((14)) (05D.27509).
- Select the appropriate node type. The default is to select the
End Node radio button.
- Click on OK.
|
Step 2.
| Configure Devices
- In the Configuration options field, select Configure
devices.
- Ensure that in the DLCs field, the appropriate DLC is
highlighted. For example, LAN.
- Click on the New push button. The appropriate window
appears with default values displayed. For example, the Define a LAN
device window.
- Click on OK to accept the default values.
|
Step 3.
| Configure the Gateway
- In the Configuration options field, select Configure the
Gateway, then click on the New push button. The Define
Gateway window appears.
- Click on the SNA Clients tab.
- Ensure that there is a check mark in the Enable SNA API Client
Services check box.
- Click on OK to accept the default values.
|
Step 4.
| Configure Connections
- In the Configuration options field, select Configure
connections.
- Ensure that in the DLCs field, LAN is
highlighted.
- Click on the New push button. The Define a LAN
connection window appears.
- On the Basic tab panel:
- In the Link station name field, type in the name ((7))
from the worksheet (LINKHOST).
- In the Destination address field, type in the address
((8)) from the worksheet (400009451902).
- On the Security tab panel:
- In the Adjacent CP name fields, type in the network ID
((3)) and the Control Point name ((4))
(SPIFNET.NYX).
- In the Adjacent CP type field, select the appropriate CP type
(eg. Back-level LEN).
- Ensure that TG number is set to 0 (the
default).
- Click on OK.
|
Step 5.
| Configure Partner LU 6.2
- In the Configuration options field, select Configure
partner LU, then click on the New button. The Define a
partner LU 6.2 window appears.
- In the Partner LU name fields, type in the network ID
((3)) and the partner LU name ((2))
(SPIFNET.NYM2DB2).
- In the Partner LU alias field, type in the partner LU name
((2)) from the worksheet (NYM2DB2).
- If you are configuring Communications Server for SNA Clients, in the
Fully-qualified CP name fields, type in the network ID ((3))
and the adjacent control point SSCP name ((4))
(SPIFNET.NYX).
Leave the other fields blank.
- Click on OK.
|
Step 6.
| Configure Modes
- In the Configuration options field, select Configure
modes, then click on the New button. The Define a mode
window appears.
- In the Mode name field ((6)), type in the mode name
(IBMRDB).
- Click on the Advanced tab and ensure that the Class of
Service Name is set to #CONNECT.
Accept the defaults for the other fields.
- Click on OK.
|
Step 7.
| Configure Local LU 6.2
- In the Configuration options field, select Configure local
LU 6.2, then click on the New button. The
Define a local LU 6.2 window appears.
- In the Local LU name field, type in the name ((11)) from
the worksheet (NYX1GW01).
- Type in a value for the LU session limit field. The
default, 0, specifies the maximum allowed value.
Accept the defaults for the other fields.
- Click on OK.
|
Step 8.
| Configure CPI-C Side Information
- In the Configuration options field, select Configure CPI-C
side information, then click on the New button. The
Define CPI-C side information window appears.
- In the Symbolic destination name field, type in the name
((16)) from the worksheet (DB2CPIC).
- In the Mode name field, type in the name ((15)) from the
worksheet (IBMRDB).
- Click on the radio button beside Use Partner LU alias and
select a Partner LU alias.
- Specify the TP name. In the TP name field:
- To specify a non-service TP, in the TP name field, type in the
name of the non-service TP, for example DB2DRDA, and ensure that
there is no check mark in the Service TP check
box.
- To specify a service TP, in the TP name field, type in the name
of the service TP, for example 076DB, and ensure that there
is a check mark in the Service TP check box.
Accept the defaults for the other fields.
- Click on OK.
|
Step 9.
| Save the Configuration
- Select File->Save as from the menu bar. The Save As
window appears.
- Type in a file name, for example ny3.acg
- Click on OK.
- In the window that opens you are asked if you want this configuration to
be the default. Click on the Yes push button.
|
Step 10.
| Update the Environment
IBM Personal Communications uses an environment variable called
appcllu to set the default APPC Local LU. You may set this
variable on a per-session basis by opening a command window and typing
set appcllu=local_lu_name, however you will probably find
it more convenient to permanently set the variable. In order to
permanently set the variable in Windows NT, complete the following
steps:
Step a.
| Click the Start push button and select Settings->Control
Panel. Double-click on the System icon. When
the System Properties window appears, select the
Environment tab.
| Step b.
| Type appcllu in the Variable field, and type your
local LU name ((11)) in the Value field.
| Step c.
| Click Set to accept the changes then click OK to
exit the System Properties window.
|
The environment variable will now remain set for future sessions.
|
Step 11.
| Start SNA Node Operations
To start SNA node operations on your machine, complete the following
steps:
Step a.
| Click on the Start push button, then select Programs->IBM
Communications Server->SNA Node Operations. The SNA Node
Operations window opens.
| Step b.
| From the menu bar, click on Operations and select Start
Node. In the dialog box that opens, select the configuration file
you saved at the end of Step 2 (in our example,
ny3.acg). Click OK.
|
SNA node operations will now begin running.
|
Step 12.
| Registering Communications Server as a Windows NT Service
To automatically start Communications Server when the machine is booted,
you can register it as a Windows NT Service.
To register Communications Server as an NT service execute one of the
following commands:
csstart -a
to register Communications Server with the default configuration,
or:
csstart -a c:\ibmcs\private\your.acg
where c:\ibmcs\private\your.acg represents the
fully qualified name of the non-default Communications Server configuration
file you want to use.
Whenever your machine is booted in the future, Communications Server will
be started automatically with the required configuration file.
|
Read this section if you have a Windows NT workstation that has IBM
eNetwork Communications Server for Windows NT SNA API Client Version
5.0 or higher installed and you want to connect to an IBM eNetwork
Communications Server for Windows NT server.
The Communications Server for Windows NT server and its SNA API client act
as a split client. This configuration requires that you have an
APPC-enabled application (such as DB2 Connect) running on the SNA API client
workstation.

| The instructions in this section use a Windows NT client. The
instructions for other supported operating systems are similar; refer to your
Communications Server for Windows NT documentation for more
information.
|
To configure the Windows NT SNA API client for APPC communications,
complete the following steps:
Step 1.
| Create a user account for the SNA API client on the Communications Server
for Windows NT server
- Click on the Start button and select
Programs->Administrative Tools (Common)->User Manager. The
User Manager window opens.
- Select Users->New User from the menu bar. The New User
window opens.
- Fill in the fields for the new SNA client user accout. For more
information, refer to the Windows NT online help.
- Ensure that this user account is a member of the
Administrators, IBMCSADMIN, and IBMCSAPI
groups:
- Click on the Groups push button
- Select a group from the Not member of box and click on the
<- Add push button. Repeat this step for each group that
your user account must belong to.
- Click on OK.
- Click on the Add push button.
|
Step 2.
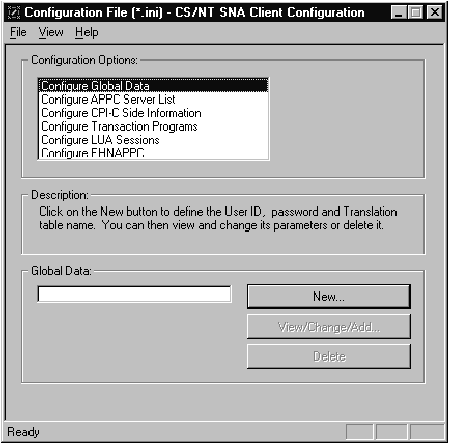
| Start the configuration GUI for the IBM eNetwork CS/NT SNA API
Client. Click on the Start push button and select
Programs->IBM Communications Server SNA
Client->Configuration. The CS/NT SNA Client Configuration window
opens.
|
Step 3.
| Configure Global Data
- In the Configuration options box, select the Configure
Global Data option and click on the New push button.
The Define Global Data window opens.
- Enter the user name for the SNA API client in the User name
field. This is the user name that was defined in Step 1.
- Enter the password for the user account in the Password and
Confirm Password fields.
- Click on OK.
|
Step 4.
| Configure APPC Server List
- In the Configuration options box, select the Configure
APPC Server List option. Click on the New push
button. The Define APPC Server list window appears.
- Type in the IP address of the server (for example,
123.123.123.123).
- Click on OK.
|
Step 5.
| Configure CPI-C Side Information
- In the Configuration options box, select the Configure
CPI-C side information option and click on the New push
button. The Define CPI-C side information window opens.
- Enter the symbolic destination name ((16)) in the Symbolic
destination name field.
- Enter your Local LU alias ((12)) in the Local LU alias
field.
- Enter the mode name ((15)) in the Mode name
field.
- Enter the transaction program name ((17)) in the TP name
field.
- Select the For SNA API Client use check box for this
transaction program.
- Enter the network ID ((3)) and partner LU name ((2)) in the
Partner LU name field.
- Click on OK.
|
Step 6.
| Save the Configuration
- Select File->Save As from the menu bar. The Save As
window opens.
- Type in a file name, and click on the Save push button.
|
This section describes how to configure Microsoft SNA Server Version
4.0 for Windows NT on your DB2 Connect workstation to connect to host
or AS/400 database servers using APPC. Although Microsoft SNA Server
will run on Windows NT 4.0 Workstation, Windows NT 4.0 Server is
recommended.
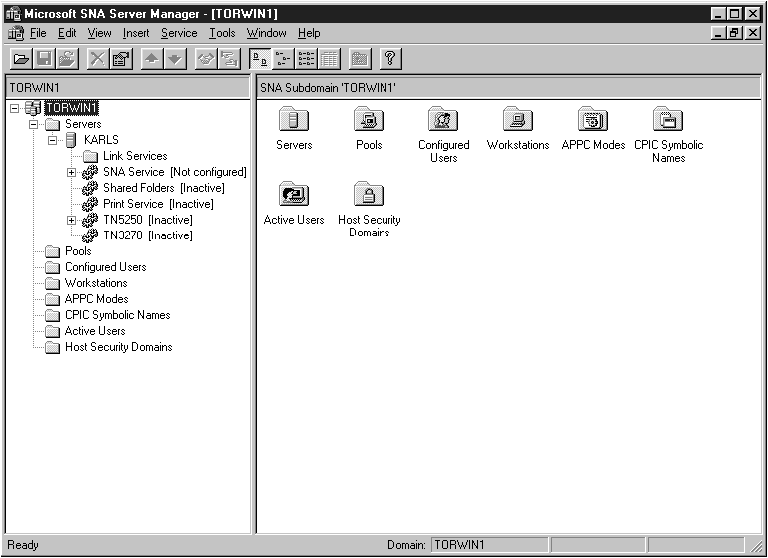
You can define the properties of your SNA connections in the Microsoft SNA
Server Manager (Server Manager). The Server Manager uses an interface
similar to that of the Windows NT Explorer. The following illustration
shows the interface. There are two panes in the main window of the
Server Manager. All the configuration options we will be using can be
accessed by right-clicking on objects in the left-hand pane of the
window. Every object has a context menu that you can access
by right-clicking on the object.
To configure APPC communications for use by DB2 Connect using Microsoft SNA
Server Manager, perform the following steps:
Step 1.
| Start the Server Manager by clicking on the Start button and
selecting Programs->Microsoft SNA Server->Manager. The
Microsoft SNA Server Manager window opens.
|
Step 2.
| Define the control point name
- Click on the [+] sign beside the Servers
folder.
- Right-click on SNA Service folder and select the
Properties option. The Properties window opens.
- Enter the correct NETID ((9)) and Control Point
Name ((10)) in the corresponding fields.
- Click on OK.
|
Step 3.
| Define the link service (802.2)
- Right-click on the SNA Service icon and select the
Insert->Link Service option. The Insert Link Service window
opens.
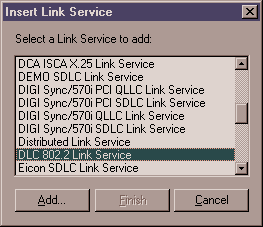
- Select DLC 802.2 Link Service.
- Click on the Add push button.
- Click on the Finish push button.
|
Step 4.
| Define the connection properties
- Right-click on SNA Service and select the
Insert->Connection->802.2 option. The Connection
Properties window opens.
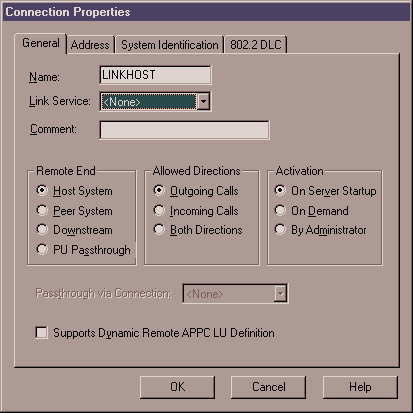
- Enter a connection name ((7)) in the Name field.
- Click on the Link Service drop-down box and select the
SnaDlc1 option.
- Select the Remote End radio button from the Host
System box.
- Select the Both Directions radio button from the Allowed
Directions box.
- Select the On Server Startup radio button from the
Activation box.
- Select the Address tab.
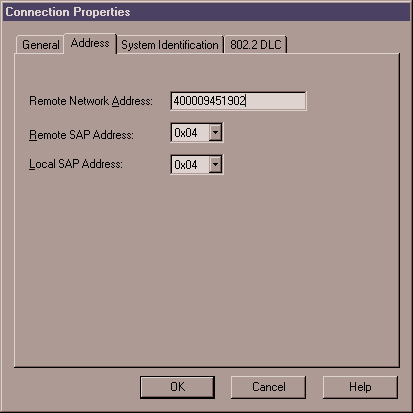
- Fill in the Remote Network Address field ((8)).
Accept the default numbers in the other fields.
- Select the System Identification tab.
- Enter the following information:
- For the Local Node Name, add the Network ID
((9)), the Local PU Name ((10)), and the Local
Node ID ((1) plus (14)). Accept the XID
Type default.
- For the Remote Node Name, add the NETID ((1))
and the Control Point Name ((4)). Accept the other
defaults
- Click on OK.
|
Step 5.
| Define a local LU
- Right-click on the SNA Service icon and select the
Insert->APPC->Local Lu option. The Local APPC LU Properties
window opens.
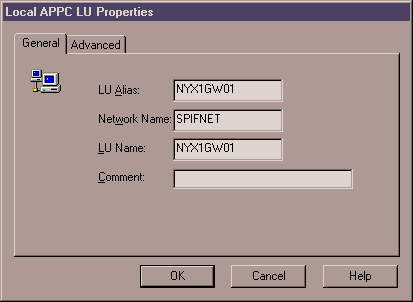
- Enter the following information:
- The LU Alias ((12)).
- The NETID ((9)).
- The LU Name ((11)).
- Select the Advanced tab.
- Select the Member of Default Outgoing Local APPC LU Pool
option. Accept the other defaults.
- Click on OK.
|
Step 6.
| Define a remote LU
- Right-click on SNA Services icon and select the
Insert->APPC->Remote LU option. The Remote APPC Lu
Properties window opens.
- Click on the Connection drop down box and select the
appropriate connection name ((7)).
- Enter the partner LU name ((2)) in the LU Alias
field.
- Enter the Network ID ((1)) in the Network Name
field.

| The other fields will be filled in by the program. If your LU
alias is not the same as your LU Name, make sure you specify the LU Name in
the appropriate field. The program will fill it in automatically, but
it will be incorrect if the alias and the name are not the same.
|
- Click on OK.
|
Step 7.
| Define a mode
- Right-click on APPC Modes folder and select the
Insert->APPC->Mode Definition option. The APPC Mode
Properties window opens.
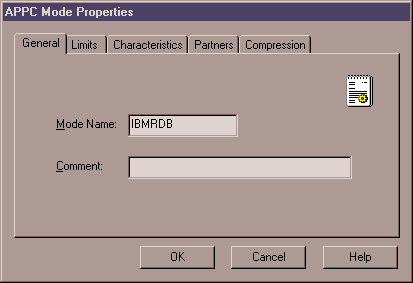
- Enter the Mode Name (6) in the Mode Name field.
- Select the Limits tab.
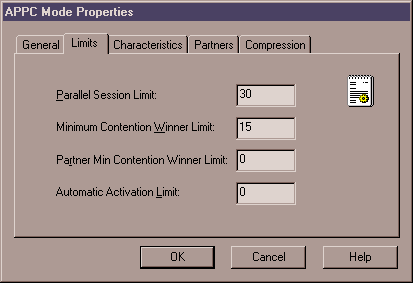
- Enter appropriate numbers for the Parallel Session Limit and
Minimum Contention Winner Limit fields. Your Host-Side or
LAN administrator should be able to supply you with the numbers if you do not
know the limits you should place here.
- Accept the other defaults, and click on OK.
|
Step 8.
| Define the CPIC name properties
- Right-click on CPIC Symbolic Name folder icon and select the
Insert->APPC->CPIC Symbolic Name option. The CPIC Name
Properties window opens.
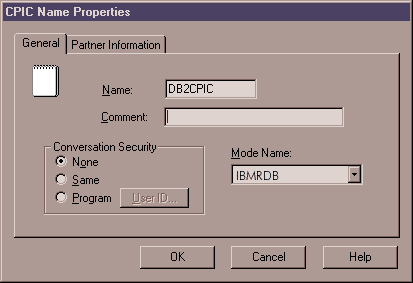
- Enter the Symbolic Destination Name ((16)) in the Name
field.
- Click on the Mode Name drop down box and select a mode name,
for example, IBMRDB.
- Select the Partner Information tab.
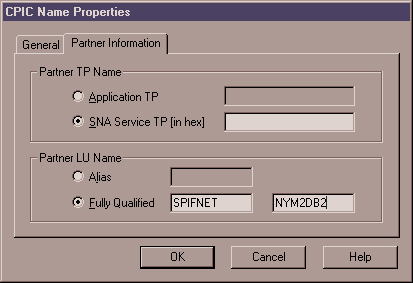
- In Partner TP Name box, select the SNA Service TP (in
hex) radio button and enter the Service TP name ((17)), or select
the Application TP radio button and enter the Application TP name
((17)).
- In the Partner LU Name box, select the Fully
Qualified radio button.
- Enter the fully-qualified Partner LU Name ((1) and (2)) or
alias.
- Click on OK.
- Save the configuration
- Select File->Save from the menu bar of the Server Manager
window. The Save File window opens.
- Type a unique name for your configuration into the File Name
field.
- Click on the Save push button.
|
Read this section if you have a Windows NT workstation that
has DB2 Connect installed. This section provides step-by-step
instructions for setting up the communications between your DB2 Connect
workstation and a Windows NT workstation that has Microsoft SNA Server
V4.0 (or later) installed.
Figure 13 illustrates the example DB2 Connect Server scenario.
Figure 13. Indirect Connection to host or AS/400 database server via SNA Communications Gateway
The rest of this section assumes:
- The Microsoft SNA Server has already been configured for APPC
communications with the host, and is enabled for ODBC and DRDA. Refer
to the Microsoft SNA Server documentation for further information.
- Microsoft SNA Client Version 2.11 is not already installed on your
DB2 Connect workstation.
To configure the Microsoft SNA client perform the following steps:
For your Microsoft SNA client software to function properly you must
have access to a properly configured Microsoft SNA Server. Request that
your SNA Server administrator:
Step 1.
| Obtain the proper license for you to use Microsoft SNA Client on your
workstation.
|
Step 2.
| Define a user ID and password for you on the SNA Server domain.
|
Step 3.
| Define connections to the host and AS/400 databases that you need to
access, as described in Configuring Microsoft SNA Server for Windows NT.
|
Step 4.
| Provide you with the symbolic destination name ((16)), database
name ((5)), and user account to use for each database connection
defined in the previous step.
If you plan to change host passwords, the SNA administrator will also need
to provide you with symbolic destination names for password management tasks
on each host.
|
Step 5.
| Provide you with the Microsoft SNA Server domain name and the protocol
used for communicating with the SNA server (TCP/IP, NetBEUI,
IPX/SPX).
|
- Obtain the Microsoft SNA Client software, and follow its instructions to
start the installation program.
- Follow the instructions on the screen to complete the installation.
Choose your SNA Server domain name and communication protocol according to the
instructions provided by your SNA Server administrator.
- When you reach the Optional Components window, deselect Install
ODBC/DRDA driver so that it will not be installed.
- Complete the installation.
Step 1.
| Install DB2 Connect.
|
Step 2.
| Open the DB2 Folder, and click on the Client Configuration
Assistant to start the configuration dialog.
|
Step 3.
| Click on the Start button and select Programs->DB2 for
Windows NT->Client Configuration Assistant.
|
Step 4.
| You need to provide the following information:
__ a.
| The Symbolic destination name ((16)) defined at the Microsoft SNA
Server for the Partner LU ((2)) of the target host or AS/400 database
server.
| __ b.
| The real database name ((5)).
|
|
[ Top of Page | Previous Page | Next Page | Table of Contents | Index ]
[ DB2 List of Books |
Search the DB2 Books ]


