WebSphere(R) Development Studio Client for iSeries(TM) Fix Pack 5.0.1 Readme file
This document contains information for IBM
WebSphere(R) Development Studio Client for iSeries(TM) Fix Pack 5.0.1. In addition, it includes
any limitations of the product and information
not included in the documentation.
For more information, see the WebSphere Development Studio Web site
at ibm.com/software/awdtools/iseries.
Table of contents
Installing fix pack 5.0.1
List of fixes and new features for fix pack
5.0.1
Installing fix pack 5.0.1
How to use Update Manager to install fix
pack 5.0.1
Update Manager is a mechanism you use to
install new software and documentation for
WebSphere Development Studio Client (and
other WebSphere products). The updates are
downloaded as plug-ins, and added to your
existing set of product plug-ins.
There are three ways to install fix pack
5.0.1:
- Install from CD (recommended)
- Use Search Discovery and Update Manager (If
you are accessing the fix pack from the Web
and have high-speed Internet access)
- Download ZIP files and use Update Manager
(If you are accessing the fix pack from the
Web)
We recommend method 1 because it is the fastest
and the easiest of the three methods. If
you do not have access to the CD, however,
you can use method 2 and method 3 if you
want to download the updates from the Web
right away. We recommend that you only use
method 2 if you have a high-speed Internet
connection.
Note for Advanced Edition Version 5.0 users
(of Development Studio Client): Your base product is WebSphere Studio Application
Developer (WSAD), not WebSphere Studio Site
Developer (WSSD). Read all references to
WSSD in this Readme as WSAD.
Method 1: Install from CD
Prerequisite, running wdsc50sp0:
- Open Development Studio Client from the Start
menu. Click Start > Programs > IBM WebSphere Studio
> Development Studio Client for iSeries to initialize your workspace.
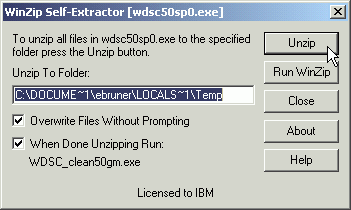
- Run the wdsc50sp0.exe file that is at the root level on this CD.
Use Windows Explorer to navigate to the rool
level of the CD and double-click wdsc50sp0.exe. (This executable fixes a problem with Update
Manager.)
- Click the Unzip button to automatically launch the stored
application. There is no user dialog after
you click Unzip; the installation happens automatically.
Part 1 of 3: Installing WebSphere Development
Studio Client for iSeries fixes
- Open Development Studio Client from the Start
menu. Click Start > Programs > IBM WebSphere Studio
> Development Studio Client for iSeries.
- When the product opens, from the menubar,
click Help > Software Updates > Update Manager. This opens the Install/Update perspective.

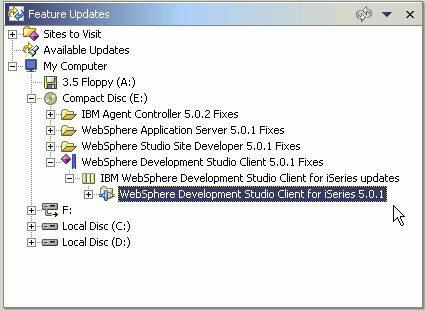
- In the Feature Updates view in the bottom-left
area of your screen, expand My Computer > Compact Disk (X:) > WebSphere Development Studio Client
5.0.1 Fixes > IBM WebSphere Development
Studio Client for iSeries updates , where X is the drive letter for your CD-ROM drive.
- Click (do not expand) WebSphere Development Studio Client for
iSeries 5.0.1.
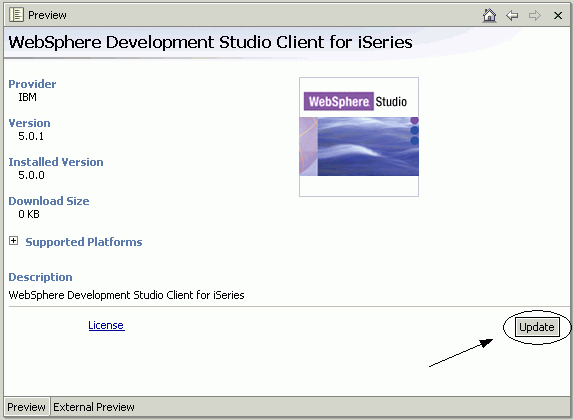
- In the lower-right area of the Preview screen,
click the Update button.
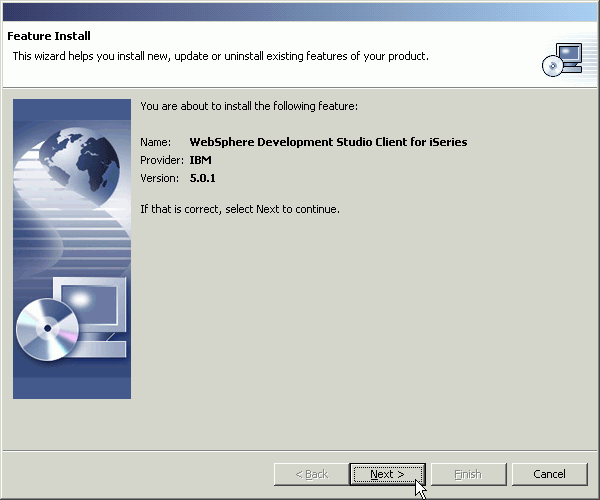
- On the Feature Install dialog, click Next.
- On the next screen, read the licence agreement
carefully. When you are satisfied with the
licence agreement, select the I accept the terms in the licence agreement radio button, and click Next.
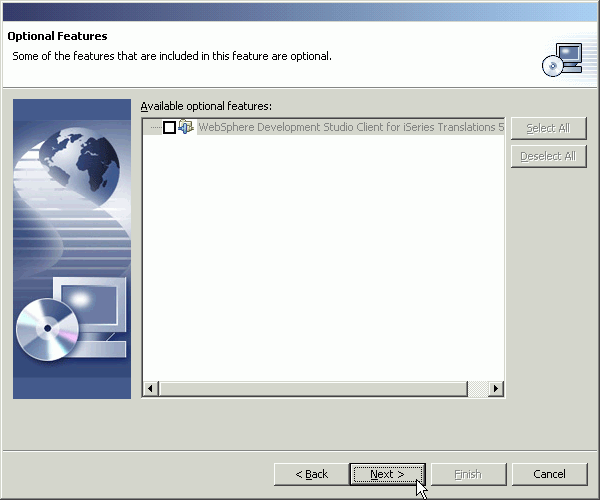
- IMPORTANT: On the Optional Features screen, do not try to change any of the
default selections; do not click Select All
or Deselect All, or add, or remove any checkmarks.
Simply click Next.
- On the last screen, click Finish, unless you want to specify a different
installation directory that corresponds to
where you installed the product.
- On the next page, if you receive a Feature Verification warning, just click Install to continue.
- At the end of the installation, you are asked
if you want to restart the workbench. You
do not need to restart the workbench yet,
so click No.
Part 2 of 3: Installing WebSphere Studio
Site Developer base fixes
The following steps are very similar to the
steps to install the WebSphere Development
Studio Client fixes. Refer to previous screen
shots for reference to the views and the
import wizard.
To install the fixes:
- Unzip the zip file found in the Compact Disk (X:) > WebSphere Studio Site
Developer 5.0.1 Fixes CD directory to a temporary directory.
- In the Feature Update view, expand My Computer > Temporary_directory > WebSphere Studio Site Developer 5.0.1
Fixes > IBM WebSphere Studio Site Developer
Updates.
- Click (do not expand) WebSphere Studio Site Developer (Windows)
5.0.1.
- In the upper-right area of the screen, click
the Update button.
- On the Feature Install dialog, click Next.
- On the next screen, select the I accept the terms in the licence agreement radio button, and click Next.
- IMPORTANT: On the Optional Features screen, do not change any of the default
selections; do not click Select All or Deselect
All, or add, or remove any checkmarks. Simply
click Next.
- On the last screen, click Finish, unless you want to specify a different
installation directory that corresponds to
where you installed the product.
- On the next page, if you receive a Feature Verification warning, just click Install to continue.
- At the end of the installation, you are asked
if you want to restart the workbench. You
do not need to restart the workbench yet,
so click No.
Part 3 of 3: Installing WebSphere Studio
Site Developer Product fixes
The following steps are very similar to the
steps to install the WebSphere Development
Studio Client fixes. Refer to previous screen
shots for reference to the views and the
import wizard.
To install the fixes:
- Unzip the zip file found in the Compact Disk (X:) > WebSphere Studio Site
Developer 5.0.1 Fixes CD directory to a temporary directory.
- In the Feature Update view, expand My Computer > Temporary_directory > WebSphere Studio Site Developer 5.0.1
Fixes > IBM WebSphere Studio Site Developer
Updates.
- Click (do not expand) WebSphere Studio Site Developer Product
(Windows) 5.0.1.
- In the upper-right area of the screen, click
the Update button.
- On the Feature Install dialog, click Next.
- On the next screen, select the I accept the terms in the licence agreement radio button, and click Next.
- IMPORTANT: On the Optional Features screen, do not change any of the default
selections; do not click Select All or Deselect
All, or add, or remove any checkmarks. Simply
click Next.
- On the last screen, click Finish, unless you want to specify a different
installation directory that corresponds to
where you installed the product.
- On the next page, if you receive a Feature Verification warning, just click Install to continue.
- At the end of the installation, you are asked
if you want to restart the workbench. Since
you are now finished all of the software
updates, you can click Yes.
Method 2: Use Search Discovery with Update
Manager
This section explains how to use Search Discovery
inside the product to install fix pack 5.0.1.
This method searches IBM support Web sites
and installs fixes needed in the product.
Use this method if you are accessing this
Readme from the Web and you do not have a
CD copy of the fix pack. This method is only
recommend if you have high-speed Internet
access.
- Open Development Studio Client from the Start
menu. Click Start > Programs > IBM WebSphere Studio
> Development Studio Client for iSeries.
- You need to run the wdsc50sp0 executable
file. You can find this on our site:
- Go to the Development Studio Client section
of our product Web site: ibm.com/software/awdtools/wdt400
- On the left-hand navigation, click Support > Support Downloads.
- Click the following link: WebSphere Development Studio Client Fix Pack
5.0.1
- The wdsc50sp0 fix should be listed there.
Download the file to a temporary directory
and run the executable. Note, there is no
user dialog for the executable; it runs automatically
when you double-click.
- Go back to Development Studio Client, and
from the menubar, click Help > Software Updates > New Updates.
- On the Available Updates screen, click Next.
- Accept the license agreement and click Finish.
- You need to go through three separate install
screens, make sure to check back and click
Install on each screen. Answer any additional prompts
to install and restart the workbench when
you are finished.
Method 3: Download ZIP files and use Update
Manager
This section outlines how to download and
install the fixes.
- Go to the Development Studio Client section
of our product Web site: ibm.com/software/awdtools/wdt400
- On the left-hand navigation, click Support > Support Downloads.
- The following update is listed:
- WebSphere Development Studio Client Fix Pack
5.0.1
(Steps 4 and 5 are a summary of the instructions
in this update.)
- Download wdsc50sp0.exe to a temporary directory
and run it to update the product.
- Click WebSphere Development Studio Client
fix pack 5.0.1 and follow the instructions.
After you download the Development Studio
Client fixes to a temporary directory, you
need to unzip the files into the same directory.
Note: These fixes only provide support for the
iSeries tools. You must also download the
WebSphere Studio Site Developer (WSSD) fixes
from the corresponding service Web sites.
(Or, the WebSphere Studio Application Developer
(WSAD) fixes if you are using the Advanced
Edition of Development Studio Client).
Download the applicable .zip file to a temporary
directory and unzip the file in the same
directory.
- Perform the installation steps outlined in
Method 1, beginning with Part 1 of 3: Installing WebSphere Development
Studio Client for iSeries fixes, except when you expand My Computer in the Feature Updates view, simply navigate
to the directories where you downloaded and
unzipped the files.
List of fixes and new features for fix pack
5.0.1
IBM WebFacing Tool
Change to documentation:
- Web applications built with the IBM WebFacing
Tool now use standard Web deployment descriptor
(web.xml) file for defining IBM WebFacing
Tool run-time configuration parameters.
In
previous releases, these parameters were
defined in the wfapp.properties file. Values
in web.xml can be modified in two ways:
by
using the IBM WebFacing Tool's project
properties
dialog box, or by launching the standard
deployment descriptor editor that is included
with WebSphere Development Studio Client.
Some documentation that ships with the
product
incorrectly refers to wfapp.properties
as
the file where configuration parameters
are
defined.
The benefit of using web.xml is that the
application server stores the parameter
values
in the application context; they are then
available to the Web application at startup
time. This results in improved performance
because these values do not need to be
loaded
for each client that connects to your application.
New Features
- Browser data compression for J2EE 1.3 projects
is now supported.
- Style classes for layout and alignment are
improved.
- The DSPATR (program-to-system-field) keyword
is now supported. It is fully supported for
most coded character set identifiers (CCSIDs),
while partially supported for some double-byte
character set, coded character set identifiers
DBCS CCSIDs. This support requires the latest
WebFacing server PTFs available for download
on the product Web page at: ibm.com/software/awdtools/wdt400. Click System Requirements on the left-hand navigation bar to find
the PTFs.
- Function key button generation is now externalized
in a JSP file called CmdKeys.jsp in the styles\chrome\ folder. You can customize this JSP file
if you want to.
- You can now convert the text constants (in
the application area) that describe function
keys, to buttons. You can select this conversion-time
option in project properties. Another new
run-time option also allows for function
key names to be displayed in the function
key button label. Now record formats, including
window record formats, can have buttons
placed
in any location on the Web page.
- A new "textbuttons" style has been
added to show how you can use the above support
for in-place function key buttons to put
buttons in the application area. This style
removes the function key buttons that would
typically have been placed in a button bar
on the left side of the Web page.
- On-data-entry validation in the IBM WebFacing
Tool is now extended to include double-byte
character set (DBCS) validation. Data that
is entered in a field using the input method
editor (IME) is validated immediately after
committing the data to the field.
- You can now use a logon.jsp file in your
WebFacing applications instead of logon.html.
The application will use the file that you
make available. If you set fileServingEnabled to false in the ibm-web-ext.xml file, you
must use logon.jsp in your Web application.
- Field exit is now supported and is mapped
by default to the Ctrl key on the keyboard.
You can configure this default in the web.xml
file.
- Support is added for response to the SNDPGMMSG
function. This support requires the latest
WebFacing server PTFs available for download
on the product Web page at: ibm.com/software/awdtools/wdt400. Click System Requirements on the left-hand navigation bar to find
the PTFs.
iSeries Java tools
Web Component tag libraries
The following run-time files are copied to
your Web project after you use the iSeries
Web Tools run time configuration wizard:
- iseriesut.jar
- iwcl.jar
- struts.jar
- wcl.jar
- IWCLTagLib.tld
- wdt400br.js
The above run-time files are for the iSeries
Web Component tag libraries. You can keep
them if you plan to do iSeries Web Component
development, otherwise, you can delete the
files.
iSeries Web development tools
Data format change for the selection box
and combo box:
In Development Studio Client Version 5.0,
the data format array returned from a host
program for a selection box or combo box
Web component can now be in one of two formats.
an update exists for returned data format.
The data format array returned from a host
program for a selection or combo box can
now be in one of two formats:
- The host program can return an array of selected
values if the selection box or combo box
is initialized with items. This ensures that
the array returned from the host is an array
of strings, and the values in it match the
values you defined when you created the component.
For example, you could initialize a selection
box with three items: Apple, Orange, and
Banana. Apple has a value of "A",
Orange has a value of "O", and
Banana has a value of "B". If the
array returned from the host program is a
single string array with an "O"
value, the selection box will display three
items, with Orange as the default selected
item.
- If the array returned from the host contains
a delimiter, then the data is treated as
dynamic data, overwriting the initial content
of the selection box or combo box. The array
must be an array of strings in key-value-selection
format with delimiters. For example, "APPLE;A;false",
"ORANGE;O;true", "BANANA;B;false".
Restrictions on Web Component naming:
- The first character in the name of your Web
Component cannot be uppercase. However, a
character in the middle of the name can be
uppercase, for example: myComp.
- If the first character must be uppercase, then the second character
has to be uppercase as well for the component
to function properly, for example: MYcomp.
- Web component names must be valid Java variable
names. For example, you cannot name a component
"my.comp". Instead, you would need
to use something like: mycomp.
- You cannot name a Web component the same
name as a Java-reserved word.
Integrated iSeries Debugger
Fixes and changes to documentation:
- Service entry points are supported for OS/400
V5R2 and higher.
- You need to install the following PTFs. Otherwise,
the Integrated iSeries Debugger cannot start:
| OS version |
Product |
Requiret PTF |
| V5R1 |
5722SS1 |
SI08015 |
| V5R2 |
5722SS1 |
SI08017 |
- The current documentation refers to the Debugger
editor as the place to set a service entry
point. The more specific information about
this task is as follows:
- You first need to have an active debug session
open.
- You can set a service entry point in two
similar ways, whichever you are most comfortable
with:
- Start the debugger for the program in which
you want to set a service entry point. Set
the service entry point from the source or
prefix area pop-up menu. Start your program.
- Start the debugger for any program. Add the
program in which you want to set a
service
entry point using the Modules/Programs
view.
Set the service entry point from the
source
or prefix area pop-up menu. Start your
program.
In both cases, when the debugging process
hits the service entry point, a new debug
session for that program is started.
Also note that the following PTFs are
required
if you want to user service entry points:
| OS version |
Product |
Requiret PTF(s) |
| V5R2 and up |
5722999 |
MF30131 |
| 5722SS1 |
SI07641
SI07934
SI08512 |
Special Instructions: Starting a Remote Server
in Debug Mode
If you have defined a remote server and configuration
for connection to an iSeries host, and you
wish to start the server in Debug mode, you
will need to increase the Communication Debugger
timeout setting. From the workbench menu
bar, select Window > Preferences > Java >Debug, and change the default value from 3000
(ms) to 60000 (ms).
To debug host programs that are part of Web
applications:
- Compile your host program with the appropriate
debug option.
- Create a connection to your iSeries host
(containing the program you want to debug)
in the Remote System Explorer.
- Use the iSeries Web Tools Run-time Configuration wizard to check the Display detailed run-time errors check box.
- Run the Web application.
- After the first invocation of the host program,
find your job ID in the WebSphere Test Environment
perspective in the Console view. For example:
[4/15/03 12:23:27:442 EDT] a3a00b4 SystemOut O iSeries host job id [141581/QZRCSRVS /QUSER]
[4/15/03 12:23:27:452 EDT] a3a00b4 SystemOut O invoking host program alias [login]
[4/15/03 12:23:27:522 EDT] a3a00b4 SystemOut O postprocessing action [loginActionAction]
- Switch back to the Remote System Explorer
perspective, expand your connection.
- Expand iSeries Jobs > Your active jobs. Refresh the list using the double-arrow
refresh button at the top of the Remote Systems
view in the Remote System Explorer.
- Right-click on the job and select Debug As > iSeries Job.
- Refer to the Integrated iSeries Debugger
documentation for more information on debugger
features.
Remote System Explorer and iSeries Projects
Prerequisites:
The following PTFs are required on your iSeries
host, to use the Remote System Explorer and
iSeries projects:
iSeries development tools host PTFs
| OS version |
Product |
Requiret PTF |
| V5R1 |
5722WDS |
SI08593 |
| V5R2 |
5722WDS |
SI08594 |
Note: The 5.0 version of the Development Studio
Client Readme lists different pre-requisite
PTFs for the Remote System Explorer and iSeries
Projects. Those PTFs are replaced with the
ones above.
To find host PTFs:
- Go to our Web site ibm.com/software/awdtools/wdt400 and click System Requirements on the left-hand navigation bar.
- Click the Required PTFs for OS/400, V5R1 or higher link.
- On the next page, see the Host PTF requirements
list on the right-hand side of the page.
Click General Product PTFs to find the above PTFs.
Remote System Explorer new features and fixes:
- The &X compile substitution variable
is now supported.
- Multiple member search is now enabled. However,
a problem exists such that when the string
was not found, the previous result was used.
This will be corrected in next fix pack.
- You can now find cached external descriptions
even when you have not expanded the library
list in the Remote Systems view (in the Remote
System Explorer perspective).
iSeries Projects new features and fixes:
- You can now select multiple items and right-click
to use the Add to Project menu action. In the 5.0 release, you had
to select one item at a time and add each
item to a project separately.
- There are no longer any threading problems
with any of the public Individual Software
Vendor APIs supplied by the iSeries Project
Object model. In the past, some of the APIs
would submit a thread access exception when
called from a non-user-interface thread.
- The New Local iSeries Member Wizard no longer
has a problem when validating member source
type entry fields.
- You can now use the Member Properties page
to change the source type of a local member.
Web services
Restriction:
If you are calling an ILE C/C++ program from
a Web service, do not use a null character
0x0 in the output parameter of the program.
This is because a null character cannot be
passed by SOAP, since SOAP is in XML format.
This is a restriction for the generally available
version of Development Studio Client Version
5.0, not fix pack 5.0.1.


